Home Appliances / Small Kitchen Appliances
User Manual for Somogyi HG KP 22 LCD 2-Slice Toaster
Quick guide for the Somogyi HG KP 22 LCD 2-slice toaster. Includes setup, first-use instructions, cleaning, maintenance, and troubleshooting.
Quick answers from the manual
Quick answer
- The Somogyi HG KP 22 LCD is a 2-slice toaster with an LCD display, 7 toasting levels, and reheat/defrost functions. It requires a 220-240V power supply and is intended for indoor household use. p. 24
Key actions
- First use procedure p. 5
First start
- Run empty 3 times on setting 7 p. 5
Problems and fixes
The lowering/raising lever does not stay down
Check the power supply. If there is no power, the lever will not stay down.
p. 6Technical specifications
| Parameter | Value | Meaning | Pages |
|---|---|---|---|
| Power | 950 W | Power consumption | p. 24 |
| Power supply | 220-240 V~ 50/60 Hz | Voltage and frequency | p. 24 |
Where to find it in the PDF
- Parts and Controls p. 2, 3
- Safety Instructions p. 4
- Installation and First Use p. 5
- Functions p. 24
Table of contents
Manual images
Click an image to enlargeQuick guide from the manual
Before using your Somogyi HG KP 22 LCD toaster for the first time, it is essential to perform a burn-in cycle to remove any manufacturing residues. Place the toaster on a solid, level surface, ensuring minimum installation distances are maintained. Plug the device into a grounded wall outlet, set the toasting level to 7, and press the lever down while the toaster is empty. The device will switch off automatically after 3 minutes and 15 seconds. Repeat this process two more times. The device is then ready for normal use.
Product description
The Somogyi HG KP 22 LCD is a 2-slice toaster featuring an LCD display, automatic centering, bread jamming prevention, and a bread lift system. It includes 7 toasting settings, reheat and defrost functions, a bun warmer accessory, and an easy-to-clean crumb tray.
Installation
- Remove all packaging material carefully to avoid damaging the appliance or cable.
- Place the toaster on a solid, horizontal, and stable surface.
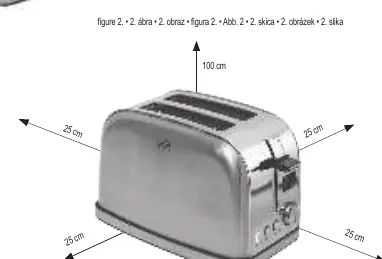
- Maintain the minimum installation distances as shown in Figure 2.
- Ensure the crumb tray is correctly positioned before use.
- Connect only to a properly grounded 230V~/50Hz wall outlet.
Operation
Toasting
- Insert a slice of bread into each baking tray.
- Select the desired toasting level.
- Press the lowering/raising lever.
- The toasting process can be interrupted at any time by pressing the CANCEL button.
Reheat and Defrost
- Reheat: Press the REHEAT button after lowering the lever. The cycle lasts 30 seconds.
- Defrost: Press the DEFROST button after lowering the lever. This extends the toasting time by approximately 20 seconds.
Bun Warmer
- Fold the legs of the bun warmer outwards until they collide.
- Place it on top of the toaster so the projections fit into the oven cavity.
- Place the pastry on the warmer, set the toaster to level 1, and press the lever down.
- Remove the bun warmer before using the toaster for regular bread.
Cleaning and maintenance
- Always unplug the appliance and allow it to cool down for at least 10 minutes before cleaning.
- Clean the outer surface with a slightly moistened cloth. Do not use aggressive cleaners.
- Do not immerse the unit in water.
- Pull the crumb tray out, remove crumbs and any stuck bread, then push it back until it clicks.
- Wash the bun warmer accessory by hand.
Troubleshooting
If the lowering/raising lever does not stay down, check the power supply. If there is no power, the lever will not engage.
Technical data
- Power supply: 220-240 V~ 50/60 Hz
- Output: 950 W
- Dimensions: 28.5 cm x 18 cm x 17.3 cm
Manufacturer information
Somogyi Elektronic Kft.
Practical help
Common problems
The lowering/raising lever does not stay down
Check the power supply. If the unit is not powered, the lever will not stay down.
Before use
- Remove all packaging material
- Place on a solid, level surface
- Ensure minimum installation distances are maintained
- Check that the crumb tray is in place
- Run the toaster empty 3 times on setting 7
Specs in practice
- Power Supply
- 220-240 V~ 50/60 Hz
Images and diagrams
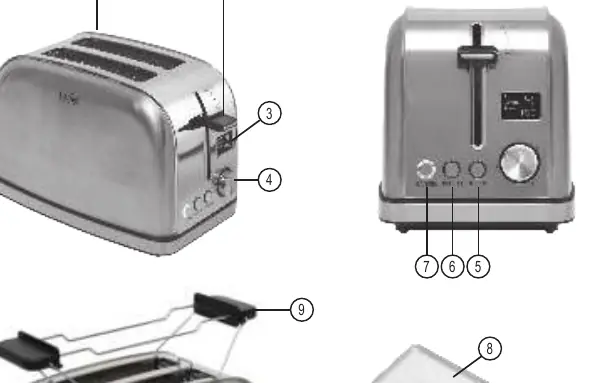
- Figure 1: Parts identification (1. Toaster compartment, 2. Lever, 3. LCD display, 4. Toast control, 5. Defrost, 6. Reheat, 7. Cancel, 8. Crumb tray, 9. Bun warmer, 10. Wire storage)
- Figure 2: Minimum installation distances (25 cm sides, 100 cm top)
Model compatibility
- Only for toasting sliced bread
- Do not use for warming pastries with sugar, jam, or filling
- Bun warmer is only for plain pastries without filling or glaze

Manual page author
David Miller
Documentation analyst
Organizes user manual content into clear summaries, with attention to model details, product context, and everyday usability.