Electronics / Security Cameras
Quick Start Guide for Speco Technologies 08P32X PTZ Camera
Get started with your Speco Technologies 08P32X PTZ camera. This guide covers installation, cable connections, SD card setup, and initial web configuration.
Table of contents
Manual images
Click an image to enlargeQuick guide from the manual
This document provides essential instructions for the installation and initial setup of the Speco Technologies 08P32X PTZ camera. It is intended for use by qualified personnel only. Ensure the camera is powered off during installation and that the mounting surface is strong enough to support the weight of the unit. The camera must be grounded to reduce the risk of electric shock.
Device Overview
The camera features several connection points and controls:
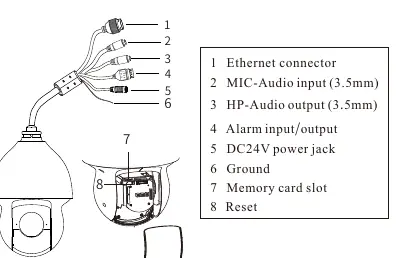
- 1. Ethernet connector: For network connectivity.
- 2. MIC-Audio input (3.5mm): For audio input.
- 3. HP-Audio output (3.5mm): For audio output.
- 4. Alarm input/output: For external alarm devices.
- 5. DC24V power jack: For power supply.
- 6. Ground: Connection for grounding.
- 7. Memory card slot: For local storage.
- 8. Reset: To reset the device.
Installation
Installing the SD Card:
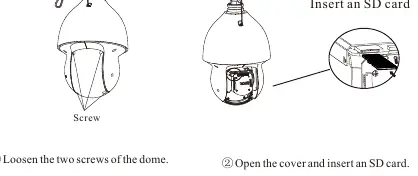
- Loosen the two screws on the dome cover.
- Open the cover and insert the SD card into the slot.
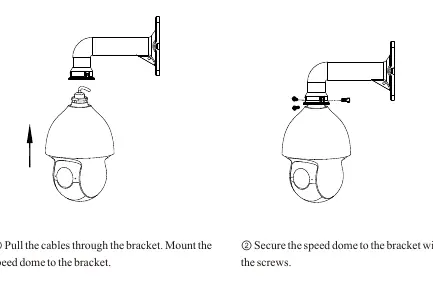
Wall Mounting:
- Pull the cables through the mounting bracket.
- Mount the speed dome to the bracket.
- Secure the speed dome to the bracket using the provided screws.
- Drill screw holes in the wall using the drill template and insert plastic screw anchors.
- Drive two screws into the holes, leaving 12mm of clearance.
- Connect the cables, hang the bracket on the wall, and fasten it with four screws.
Cable Connection
To ensure a secure network connection, follow these steps:
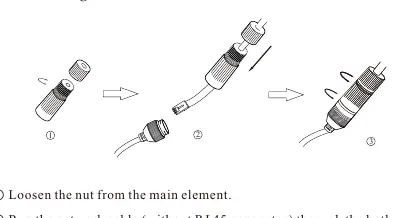
- Loosen the nut from the main element.
- Run the network cable (without the RJ45 connector) through both elements.
- Crimp the cable with an RJ45 connector.
- Connect the cable to the Ethernet connector, then tighten the nut and the main cover.
Web Operation and Login
The camera is set to DHCP by default. To access the web interface:
- Ensure the camera and PC are on the same local network.
- Install the IP Scanner software from the included CD or download it from https://www.specotech.com/ip-scanner/.
- Run the scanner to find the device in the list.
- Double-click the device in the list to open the web viewer, or enter the IP address directly into your browser.
- Default Login: Username is admin and password is 1234.
Official resources from the manual
Practical help
Common problems
Camera not found on the network
Ensure the camera and PC are connected to the same local network. The camera uses DHCP by default.
Poor IR functionality
Ensure the enclosure is cleaned using professional optical cleaning methods. Using a cloth can cause reflection and poor performance.
Login failed
Use the default credentials: username 'admin' and password '1234'.
Before use
- Verify the wall is strong enough to bear the camera's weight.
- Ensure the camera is powered off during installation.
- Check the package to ensure all components are included.
- Use the included PoE++ injector or a certified 24VDC 2.5A Class 2 power supply.
- Ground the camera to reduce the risk of electric shock.
Images and diagrams
- The overview diagram identifies the Ethernet, Audio, Alarm, Power, Ground, SD Card, and Reset ports.
- The cable connection diagram illustrates the waterproofing assembly for the network cable.
Model compatibility
- Installation must be performed by qualified personnel only.
- Do not install near sources of heat, power lines, or radar equipment.
- Only install in environments within the specified operating temperature and humidity range.

Manual page author
Emily Carter
User documentation editor
Prepares concise manual descriptions and highlights the most useful setup, operation, and maintenance information for readers.