Plumbing / Sinks Faucets
Installation Guide for Stonebaths Ramp Classic 100 Middle 1200mm Basin
A comprehensive installation guide for the Stonebaths Ramp Classic 100 Middle 1200mm wall-hung basin. Includes step-by-step mounting instructions, tool requirements, and technical specifications.
Table of contents
Manual images
Click an image to enlargeQuick guide from the manual
This guide provides instructions for the wall-hung installation of the Stonebaths Ramp Classic 100 Middle 1200mm basin. Ensure you have the necessary tools (drill, level, pencil, screwdriver) before starting. The basin weighs approximately 50kg, so ensure the wall structure is capable of supporting this weight.
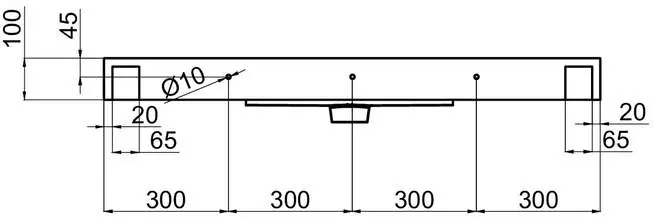
Product specifications
The basin measures 1200 x 460 x 100mm and has a net weight of approximately 50kg. It is constructed from Matte White Solid Surface material (12mm/20mm). The unit requires a 40mm waste connection.

Installation steps
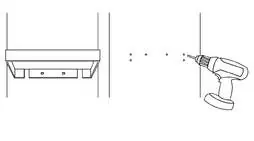
- Prepare tools: Gather a drill, level, pencil, and screwdriver. Ensure the included brackets and screws are present.
- Predrill: If necessary, predrill the ramp at the time of installation using a commercial drill and toughened drill bit to match wall studs.
- Mark and drill: Determine the desired height, ensuring alignment with internal wall studs. Use a level to ensure the basin is straight. Mark the bracket screw and fastener holes with a pencil, then drill pilot holes.
- Secure to wall: Use the mounting brackets and screws. Insert the first fastener and check for level. Secure with 4 fasteners for basins up to 1500mm (longer basins require 6-8 fasteners).
- Connect and finish: Connect supply hoses to the faucet and connect the waste. Turn on the water supply to check for leaks.
Important notes
Ramp basins with benchtop-mounted faucets may require water pressure restrictors to reduce splashing. This is particularly important for The Junior 100 Ramp Basins. The product includes a 10-year manufacturer's warranty.
Practical help
Common problems
Water splashing from benchtop mounted faucets
Install water pressure restrictors to reduce splash.
Before use
- Ensure wall studs or nogs are located for secure mounting
- Verify you have a drill, level, pencil, and screwdriver
- Check that brackets and screws are included in the package
- Confirm the wall structure can support the 50kg weight of the basin
Images and diagrams
- The diagrams show the precise dimensions for mounting holes and bracket placement.
- The installation steps illustrate the drilling and securing process.
Model compatibility
- Compatible with benchtop mounted faucets (may require pressure restrictors).
- Suitable for wall-hung installation.

Manual page author
Michael Turner
Technical manual editor
Reviews PDF manuals for structure, safety notes, and practical product details so readers can find the right information quickly.