Plumbing / Sinks Faucets
Stonebaths Ramp Classic 100 Middle 1000mm Wall Hung Basin Installation Guide
Installation guide for the Stonebaths Ramp Classic 100 Middle 1000mm wall-hung basin. Includes mounting instructions, drilling requirements, technical specifications, and plumbing connection steps.
Table of contents
Manual images
Click an image to enlargeInstallation Overview
This guide provides instructions for the installation of the Stonebaths Ramp Classic 100 Middle 1000mm wall-hung basin. Proper installation requires locating wall studs and using the provided brackets and screws to ensure a secure fit.
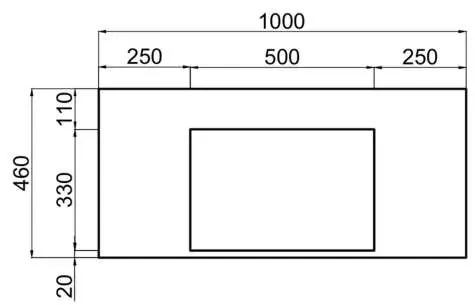
Technical Specifications
- Dimensions: 1000 x 460 x 100mm
- Net Weight: Approximately 40kg
- Waste Size: 40mm
- Material: Matte White Solid Surface (12mm/20mm)
- Tolerance: 3mm
Installation Steps
- Prepare tools and accessories: Ensure you have a drill, level, pencil, and screwdriver. Verify that the brackets, screws, and fasteners are included.
- Predrill ramp: Bracket and screw holes are pre-drilled at the time of manufacture. If necessary, holes can be drilled on-site using a commercial drill and a toughened drill bit at high speed.
- Mark and drill pilot holes: Determine the desired height, ensuring pre-drilled holes align with internal wall studs. Place the basin against the wall, use a level to ensure it is straight, and mark the location of the bracket screw and fastener holes. Drill the pilot holes.
- Secure the sink to the wall: Use the mounting brackets and screws. Insert the first fastener and check with a level. Once aligned, insert the remaining wall fasteners. Use 4 fasteners for this 1000mm basin.
- Connect and finishing: Connect all supply hoses to the faucet and connect the waste. Turn on the water supply to check for leaks.
Important Notes
- Tap Holes: Can be drilled on-site with a 35mm round cutout drill bit at high speed. Mark the position to the center of the back panel.
- Water Pressure: Basins with benchtop-mounted faucets may require water pressure restrictors to reduce splashing.
- Warranty: 10-year manufacturer's warranty.
Contact Information
For support, contact Stonebaths via the following channels:
Australia: 1800 462 946, [email protected], www.stonebaths.com.au
New Zealand: 0800 001 872, [email protected], www.stonebaths.co.nz
International: +61 1800 462 946, [email protected], www.therampbasinfactory.com
Official resources from the manual
Practical help
Common problems
Water splashing from faucet
Install water pressure restrictors if using benchtop-mounted faucets.
Leaking after installation
Check all supply hose connections to the faucet and the waste connection.
Before use
- Locate internal wall studs for secure mounting.
- Ensure you have a drill, level, pencil, and screwdriver.
- Verify the 40mm waste compatibility.
- Check if a tap hole needs to be drilled (35mm bit required).
Images and diagrams
- The technical drawings show the 1000mm width and 460mm depth of the basin.
- The installation diagram illustrates the step-by-step process from marking holes to securing the basin to the wall.
Model compatibility
- Designed for wall-hung installation.
- Compatible with benchtop-mounted faucets (may require pressure restrictors).

Manual page author
Michael Turner
Technical manual editor
Reviews PDF manuals for structure, safety notes, and practical product details so readers can find the right information quickly.