Plumbing / Showers & Tubs
User Manual for Better Bathrooms Basin Countertop
Quick guide for installing your Better Bathrooms basin countertop. Includes step-by-step instructions for cutting, sealing, and fitting the basin waste.
Table of contents
Manual images
Click an image to enlargeQuick guide from the manual
This document provides installation instructions for the Better Bathrooms basin countertop. Please note that the waste, trap, and tap are sold separately. We recommend using professional tradespeople for installation. Always check for pipes and cables before drilling.
Installation
Follow these steps to install your basin countertop:

- Cut holes: Proceed to cut holes for the waste and tap as required. Ensure the tap hole is positioned at a distance that does not cause interference with the basin.
- Seal edges: Seal the inside and exposed edge after cutting to prevent water or moisture penetration. Allow all sealant to dry for at least 24 hours before use.
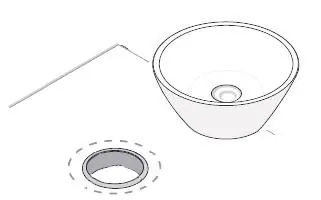
- Fit waste: Fit the basin waste to the basin as shown in the product-specific waste instructions.
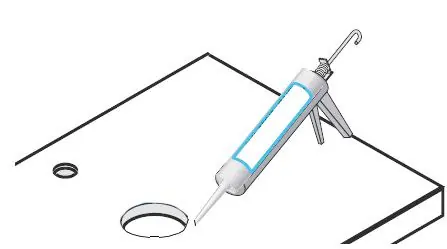
- Apply silicone: Apply a bead of silicone slightly from the edge of the basin. Apply the silicone slightly in from the outer edge on the underside of the basin.
- Positioning: Place the basin into position with the waste through the drilled hole to allow connection to the waste trap.
Cleaning
To maintain the surface finish, wipe clean after every use using a clean damp cloth and a mild detergent mixture. Do not use abrasive cleaning agents or materials that can strip or scratch the surface, as this may invalidate your guarantee.
Contact information
For further assistance, visit betterbathrooms.com, email [email protected], call 0330 390 3062, or write to Trident Business Park, Neptune Way, Huddersfield, HD2 1UA.
Official resources from the manual
Manufacturer information
Better Bathrooms
Practical help
Common problems
Water leakage around the waste
Ensure the waste is fitted correctly and the sealant has cured for at least 24 hours.
Surface damage
Do not use abrasive cleaning agents or materials that can strip or scratch the surface.
Before use
- Check for pipes and cables before drilling
- Ensure you have a drill and hole cutter
- Have silicone sealant ready
- Verify the tap hole position does not interfere with the basin
Images and diagrams
- The installation involves cutting holes for the tap and waste, sealing the cut edges, and applying silicone to secure the basin.
Model compatibility
- Waste, trap, and tap are sold separately.

Manual page author
Michael Turner
Technical manual editor
Reviews PDF manuals for structure, safety notes, and practical product details so readers can find the right information quickly.