HVAC / Heaters & Fireplaces
StyleWell 1418FM-23-251 Electric Fireplace Assembly and Operating Guide
Quick guide for the StyleWell 1418FM-23-251 electric fireplace. Includes assembly steps, operating instructions, remote control setup, and troubleshooting for error codes.
Table of contents
Manual images
Click an image to enlargeQuick guide from the manual
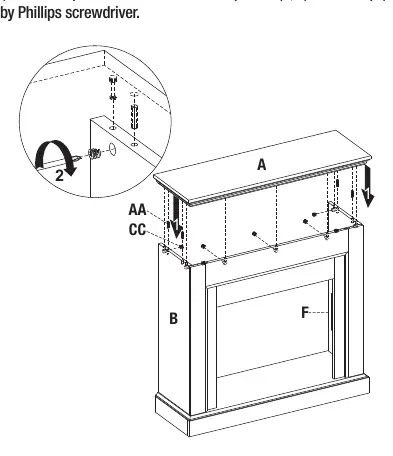
This document provides assembly and operating instructions for the StyleWell 1418FM-23-251 electric fireplace. Before beginning, ensure all parts are present and you have a Phillips screwdriver. Do not plug the unit into a power outlet until assembly is complete and the unit is in its final location. The fireplace requires a 15-Amp, 120-volt, 60 Hz grounded circuit.
Assembly instructions
The assembly process involves connecting the mantel panels and installing the fireplace insert. Key steps include:
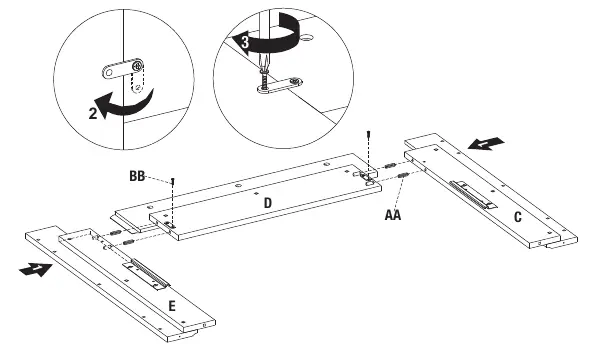
- Front Panel Assembly: Attach the center front panel to the left and right front panels using wooden dowels and short screws.
- Connecting Rods: Install connecting rods into the designated plastic bushings on the back of the panels.
- Side Panels: Attach the left and right side panels to the front assembly using locknuts.
- Base Installation: Secure the base to the assembly using long screws.
- Top Installation: Attach the top panel using wooden dowels and locknuts.
- Insert Installation: Remove pre-assembled insert brackets, position the insert into the mantel, and re-install the brackets to secure it.
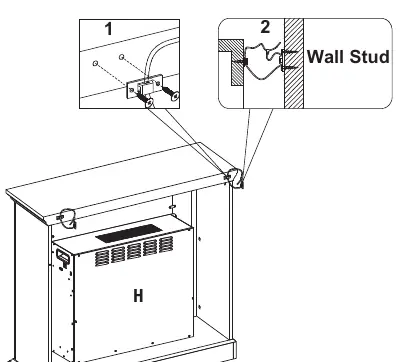
- Tip Restraint: It is mandatory to install the tip restraint hardware to a wall stud to prevent accidents.
Operating instructions
The fireplace can be operated via the control panel on the unit or the included remote control.
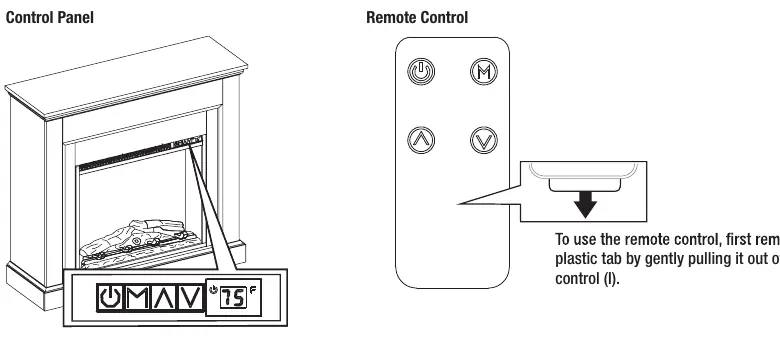
- Power Button: Turns the unit ON or OFF. The indicator light shows green when ON and red when OFF.
- Mode Button: Cycles through Temperature, Timer, and Flame Brightness functions.
- Up/Down Arrows: Adjust the settings for the selected function.
- Heater Lock: To lock the heater, press and hold the POWER button for 10 seconds. The unit will flash E3. Repeat to unlock.
- Temperature Mode: Range is 65°F (18°C) to 90°F (32°C), HI, and OF. Hold Up and Down arrows for 5 seconds to toggle between 5°F and 1°F increments. Hold the Mode button for 3 seconds to toggle between Fahrenheit and Celsius.
- Timer Mode: Set countdown from 0.0 to 9.0 hours.
- Flame Brightness: Settings range from F0 (lowest) to F5 (brightest).
Care and maintenance
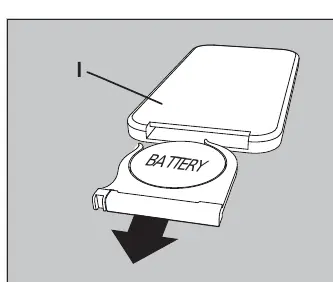
Regularly dust the fireplace with a soft, non-lint producing cloth. If the remote control stops working or range is reduced, replace the battery with a CR2025 lithium battery. Ensure the battery polarities match the compartment markings. Do not recharge non-rechargeable batteries.
Troubleshooting
If you encounter issues, check the following:
- Error E1/E2: Overheat sensor or thermostat issue. Unplug the unit for 5-10 minutes to reset the sensor. If the problem persists, contact customer service.
- Error E3: Heater is locked. Hold the POWER button for 10 seconds to unlock.
- No Power: Ensure the unit is plugged into a standard 120V outlet.
- Remote Issues: Replace the battery or ensure you are within 20 feet and 45 degrees of the front of the insert.
Practical help
Common problems
Error E1 or E2 displayed
The overheat or thermostat sensor has been engaged. Unplug the unit for 5-10 minutes to allow the sensor to reset.
Error E3 displayed
The heater is locked. Press and hold the POWER button for 10 seconds to unlock.
Remote control not working
Replace the CR2025 battery. Ensure you are within 20 feet and 45 degrees of the fireplace front.
No power / logs do not glow
Check that the power cord is securely plugged into a standard 120V outlet.
Before use
- Verify all parts are present using the package contents list.
- Ensure you have a Phillips screwdriver.
- Verify the location of electrical, plumbing, and gas lines before drilling into walls.
- Ensure the outlet is properly grounded.
- Do not use an extension cord or power strip.
Specs in practice
- Temperature Range
- 65°F (18°C) to 90°F (32°C), plus HI (High) and OF (Off) settings.
- Flame Brightness
- Adjustable levels from F0 (lowest) to F5 (brightest).
Images and diagrams
- Assembly diagrams illustrate the use of wooden dowels, locknuts, and screws to connect mantel panels.
- Control panel and remote diagrams show the layout of the Power, Mode, and Arrow buttons.
Model compatibility
- Requires a 15-Amp, 120-volt, 60 Hz grounded circuit.
- Not intended for use in bathrooms, laundry areas, or near water.

Manual page author
Michael Turner
Technical manual editor
Reviews PDF manuals for structure, safety notes, and practical product details so readers can find the right information quickly.