HVAC / Heaters & Fireplaces
User Manual for StyleWell 1418FM-23-259 Electric Fireplace
Quick guide for the StyleWell 1418FM-23-259 electric fireplace. Includes assembly instructions, operating modes, safety warnings, and troubleshooting steps.
Table of contents
Manual images
Click an image to enlargeImportant Information
This manual provides assembly and operating instructions for the StyleWell 1418FM-23-259 electric fireplace. Before beginning, ensure all parts are present and the unit is placed on a level surface. The estimated assembly time is 50 minutes. A Phillips screwdriver is required for assembly.
Safety Warnings
- Electrical Safety: Use a 15-Amp, 120-volt, 60 Hz grounded outlet. Do not use extension cords or power strips.
- Clearance: Keep combustible materials (furniture, bedding, curtains) at least 3 feet away from the unit.
- Installation: The unit must be mounted on the wall or floor using the included tip restraint hardware to prevent tipping.
- Usage: Do not use in bathrooms, laundry areas, or near water. Do not block air intakes or vents.
Installation
Follow these steps to assemble your fireplace:
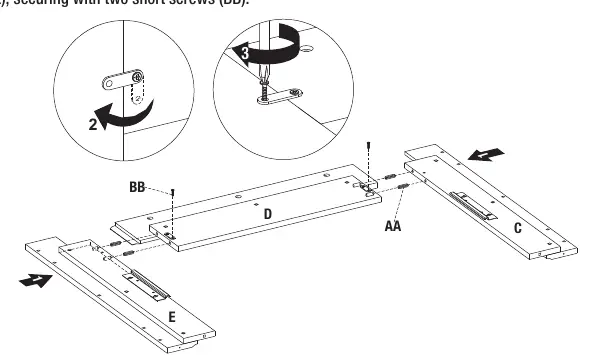
- Front Panel: Attach the center front panel (D) to the left (C) and right (E) front panels using wooden dowels (AA) and short screws (BB).
- Connecting Rods: Screw connecting rods (DD) into the plastic bushings on the back of the front panels.
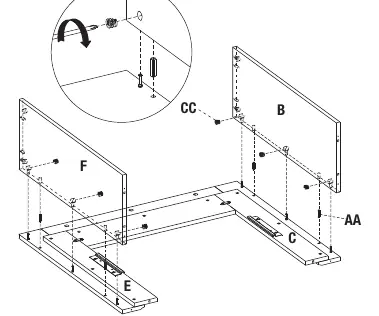
- Side Panels: Attach the left (B) and right (F) side panels to the front assembly using wooden dowels (AA) and locknuts (CC).
- Base: Attach the base (G) to the assembly using wooden dowels (AA) and long screws (EE).
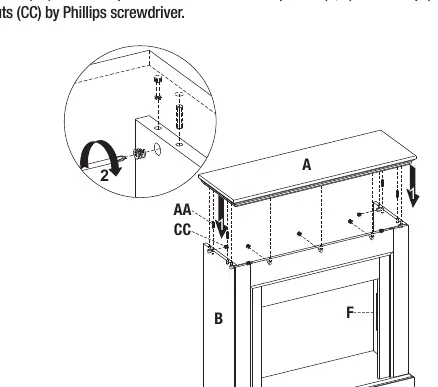
- Top: Install the top (A) using wooden dowels (AA) and locknuts (CC).
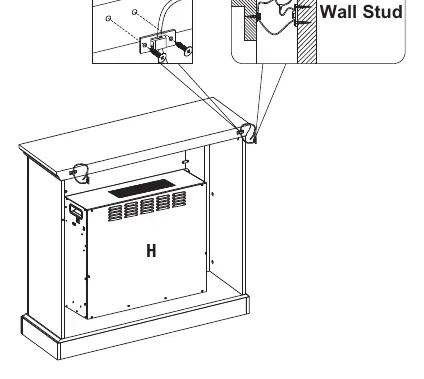
- Insert: Remove the pre-assembled insert brackets, position the insert (H) into the mantel, and re-install the brackets to secure it.
- Tip Restraint: Secure the unit to a wall stud using the provided tip restraint hardware.
Operating Instructions
The fireplace can be controlled via the control panel or the included remote control.
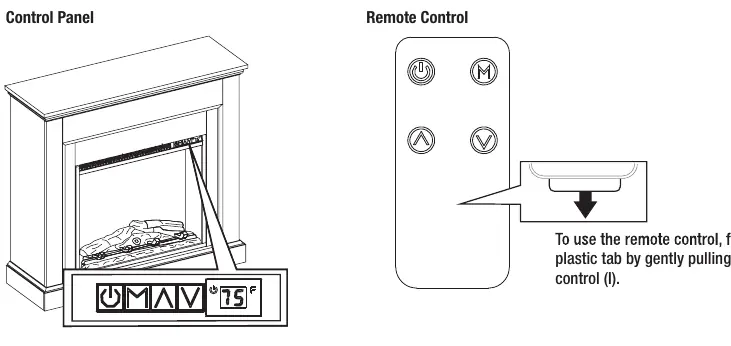
- Power Button: Turns the unit ON or OFF.
- Mode Button: Cycles through Temperature, Timer, and Flame Brightness functions.
- Up/Down Arrows: Adjust the settings for the selected function.
- Temperature Mode: Range is 65°F (18°C) to 90°F (32°C), HI, and OF. Hold Up/Down arrows for 5 seconds to toggle between 5°F and 1°F increments. Hold Mode button for 3 seconds to toggle between Fahrenheit and Celsius.
- Timer Mode: Set countdown from 0.0 to 9.0 hours.
- Flame Brightness: Settings F0 (lowest) to F5 (brightest).
- Heater Lock: Press and hold the POWER button for 10 seconds to lock/unlock the heater. The unit will flash E3 when locked.
Care and Maintenance
Regularly dust the fireplace with a soft, non-lint cloth. Use the included touch-up pen (FF) for scratches, stroking in the direction of the scratch or wood grain. To replace the remote control battery, slide the battery door open on the back of the remote and insert a new CR2025 lithium battery.
Troubleshooting
If you encounter issues, check the following:
- E1/E2 Error: Overheat or thermostat sensor issue. Unplug the unit, wait 5-10 minutes for the sensor to reset, then plug back in.
- E3 Error: Heater is locked. Hold the POWER button for 10 seconds to unlock.
- No Power: Ensure the unit is plugged into a standard 120V outlet and powered on.
- Remote Issues: Replace the battery or ensure you are within 20 feet and 45 degrees of the front of the insert.
Practical help
Common problems
Error E1 or E2 displayed
Overheat or thermostat sensor issue. Unplug the unit for 5-10 minutes to allow the sensor to reset.
Error E3 displayed
Heater is locked. Press and hold the POWER button for 10 seconds to unlock.
Remote control not working
Replace the CR2025 battery or ensure you are within 20 feet and 45 degrees of the unit.
Power cord gets warm
This is normal operation for a heater. Check connections and ensure the outlet is not overheating.
Before use
- Verify all parts are present against the parts list.
- Ensure you have a Phillips screwdriver.
- Confirm a 120V grounded outlet is available.
- Clear a 3-foot area around the fireplace of combustibles.
- Install the tip restraint hardware to a wall stud.
Specs in practice
- Temperature Range
- 65°F to 90°F (18°C to 32°C), plus HI and OFF settings.
- Flame Brightness
- 6 levels from F0 (lowest) to F5 (brightest).
Images and diagrams
- Assembly steps illustrate the correct placement of wooden dowels, screws, and locknuts.
- Control panel diagram shows the power, mode, and arrow buttons for operation.
Model compatibility
- Requires a dedicated 15-Amp, 120-volt, 60 Hz circuit.
- Remote control range is 20 feet at a 45-degree angle.

Manual page author
David Miller
Documentation analyst
Organizes user manual content into clear summaries, with attention to model details, product context, and everyday usability.