HVAC / Heaters & Fireplaces
User Manual for StyleWell Whittington Electric Fireplace 18WM5971-PG77
Comprehensive user guide for the StyleWell Whittington Electric Fireplace (18WM5971-PG77). Includes detailed assembly instructions, operation steps for the remote and control panel, safety warnings, and troubleshooting for common issues.
Quick answers from the manual
Quick answer
- The StyleWell Whittington Electric Fireplace is an indoor heating unit. This manual provides assembly instructions, operation guidelines for the remote and control panel, and troubleshooting steps for common issues like error codes. p. 1, 16, 20
Key actions
- Assemble the unit p. 8, 9, 10, 11
- Reset the Safer Plug p. 18
First start
- Ensure the unit is on a level surface, plugged into a grounded 120V outlet, and the power button is set to ON. p. 15, 16, 20
Problems and fixes
Display shows 'E1'
Thermostat sensor broken/disconnected; check connection.
p. 20
Display shows 'E3'
Manual Reset overheat protection triggered; check for blockages.
p. 20Error codes
| Code | Meaning | Action | Pages |
|---|---|---|---|
| E1 | Thermostat sensor broken or disconnected | Check connection to main circuit board | p. 20 |
| E3 | Manual Reset overheat protection triggered | Check air inlets/outlets for blockages | p. 20 |
| Er | Power cord overheating protection activated | Allow to cool, check outlet/plug connections | p. 18, 20 |
Maintenance and reset
- Reset the Safer Plug by allowing it to cool, unplugging for 5 seconds, and reconnecting. p. 18
Technical specifications
| Parameter | Value | Meaning | Pages |
|---|---|---|---|
| Voltage | 120VAC | Operating voltage | p. 6 |
| Amps | 12.5 Amps | Current draw | p. 6 |
| Watts | 1500 Watts | Power consumption | p. 6 |
Where to find it in the PDF
- Assembly Instructions p. 8, 9, 10, 11
- Operation p. 16, 17, 18
- Troubleshooting p. 20, 21
Table of contents
Manual images
Click an image to enlargeQuick guide from the manual
The StyleWell Whittington Electric Fireplace is an indoor heating unit. Before assembly, ensure you have all parts and a Phillips screwdriver. The estimated assembly time is 90 minutes. Always operate the unit on a level surface and ensure it is plugged into a grounded 120V outlet.
Safety Information
- Do not cover: Never block air intakes or exhaust openings. Do not use on soft surfaces like beds.
- Location: Not intended for use in bathrooms, laundry areas, or near water.
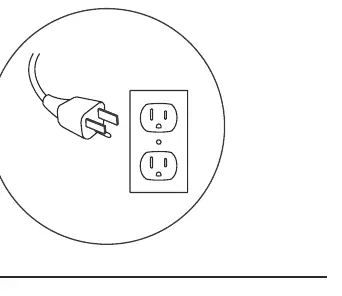
- Grounding: Connect only to properly grounded outlets. Do not use two-prong adapters or extension cords.
- Supervision: Keep children and disabled persons away from the heater during operation.
- Maintenance: Only qualified service personnel should repair the unit.
Assembly
The assembly process involves 20 steps. Key phases include:
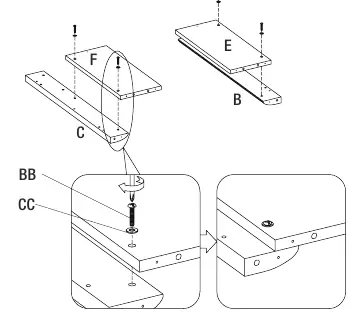
- Front Surround: Assembling the front panels (B, C, E, F) using bolts and washers.
- Decorative Panels: Attaching decorative surround panels (E, F) to the top decorative panel (H) using wood dowels and metal plates.
- Main Assembly: Connecting side panels (I, J) to the surround assembly using cam locks and wood dowels.
- Base Assembly: Constructing the base using rails (K, L, M, N) and plastic connector blocks.
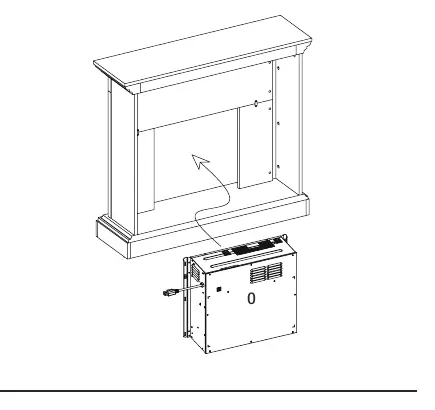
- Insert Installation: Carefully placing the fireplace insert (O) into the back of the unit and securing it with screws (HH).
- Tipping Restraint: It is imperative to install the tipping restraint hardware (KK) to prevent the unit from tipping over.
Operation
The fireplace can be controlled via the panel on the upper-right corner of the insert or the included remote control.
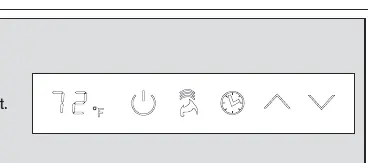
- Power: Press the Power button to enter standby mode.
- Flame Adjustment: Choose from 5 brightness levels (F5-F1).
- Heater: Adjustable from 62°F to 82°F (17°C to 27°C) in 2°F/1°C increments.
- Timer: Cycle through settings from 30 minutes to 9 hours.
- Safer Plug: This device monitors plug temperature. If it cuts power (displays 'Er'), allow the plug to cool, unplug for 5 seconds, then reconnect.
Care and Cleaning
- Dust regularly with a soft, non-lint-producing cloth.
- Use a gentle, non-abrasive household cleaner.
- Ensure the unit is turned OFF and unplugged before cleaning.
- The fan and flame generator motors are pre-lubricated and require no further maintenance.
Practical help
Common problems
Fireplace stopped heating before reaching the desired temperature
The unit has reached the set temperature. Set the fireplace to a higher temperature or 'always on'.
Display shows 'E1'
Thermostat sensor is broken or disconnected. Unplug the unit, remove the back panel, and check the connection to the main circuit board.
Display shows 'E3'
Manual Reset overheat protection has triggered. Check for blocked air inlets, unplug for 30 minutes to cool, then retry.
Remote control is not working
Check batteries, ensure you are within 20 ft of the unit, and operate buttons with a slow, even motion.
Before use
- Ensure all parts are present according to the package contents list
- Have a Phillips screwdriver ready
- Assemble on a soft surface (like a rug) to prevent scratches
- Ensure the unit is plugged into a grounded 120V outlet
- Install the tipping restraint hardware for safety
Images and diagrams
- Assembly steps 1-20 detail the panel connections and hardware usage
- The control panel diagram shows the location of buttons for power, flame, and timer
- The Safer Plug diagram illustrates the plug and reset procedure
Model compatibility
- For indoor use only
- Not for use in bathrooms or laundry areas
- Do not use with extension cords or power strips

Manual page author
Michael Turner
Technical manual editor
Reviews PDF manuals for structure, safety notes, and practical product details so readers can find the right information quickly.