Lighting / Industrial Lighting
User Manual for Sunco Lighting Gas Station Canopy LED Light
Quick guide for the Sunco Lighting Gas Station Canopy LED Light. Includes installation methods (surface mount, pendant), electrical specifications, and mounting instructions.
Table of contents
Manual images
Click an image to enlargeQuick Guide
This manual provides installation and technical information for the Sunco Lighting Gas Station Canopy LED Light. This fixture is designed for gas station or under-canopy lighting, featuring an IP65 rating, 150W power output, and 20100LM brightness. Ensure all electrical connections are made according to local codes.
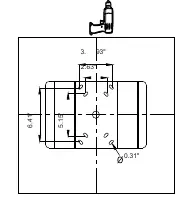
Technical Specifications
- Input Voltage: 120-277V
- Power: 150W
- Lumens: 20100LM
- Color Temperature: 5700K
- Operating Temperature: -33°F to 140°F
- Beam Angle: 120°
- IP Rating: IP65
Installation Methods
Method I: Surface Mount with Safety Rope
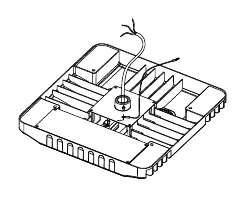
- Fix one side of the accessory safety rope to the back of the fixture.
- Use an electric drill to create fixed holes in the ceiling.
- Fix the other side of the safety rope to the ceiling.
- Connect the fixture wires to the main supply according to local electrical codes.
- Ensure proper protection on wire joints and fix the fixture to the ceiling using the provided screws.
Method II: 3/4" NPT Stem Mount
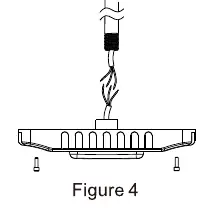
- Connect the wiring to the local power supply within the 3/4" NPT stem.
- Screw the fixture onto the 3/4" NPT stem.
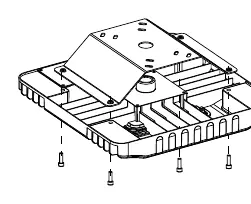
Method III: Bracket Mount
Option 1 (Stem):
- Fix the mounting bracket to the back of the fixture using supplied screws.
- Unscrew the nut from the customer-supplied 3/4" NPT stem.
- Pass the stem through the mounting bracket hole and secure it with the nut.
- Make wiring connections and ensure good wire protection.
Option 2 (Ceiling):
- Drill alignment holes in the ceiling to match the mounting bracket.
- Insert the supplied rubbers into the alignment holes.
- Fix the mounting plate to the ceiling using the supplied screws.
- Mount the fixture onto the mounting plate using the supplied screws.
- Make wiring connections and ensure good wire protection.
Practical help
Common problems
Light fails to turn on
Check electrical connections and ensure the input voltage is within the 120-277V range.
Mounting instability
Ensure the ceiling structure can support the fixture weight and that all screws are tightened securely.
Before use
- Verify input voltage (120-277V)
- Ensure mounting surface is suitable for the fixture weight
- Check for required tools (electric drill)
- Confirm safety rope is available for Method I
- Ensure all wiring connections are protected
Images and diagrams
- Figure 1-3: Surface mount with safety rope
- Figure 4-5: 3/4 inch NPT stem mount
- Figure 6-7: Bracket mount with stem
- Figure 8-10: Bracket mount to ceiling
Model compatibility
- Compatible with 3/4 inch NPT stems
- Suitable for gas station or under canopy lighting

Manual page author
Emily Carter
User documentation editor
Prepares concise manual descriptions and highlights the most useful setup, operation, and maintenance information for readers.