Lighting / Outdoor Lighting
Installation Manual for Sunco Lighting SHOEBOX 150W/200W Parking Lot LED Light
Quick installation guide for the Sunco Lighting SHOEBOX 150W/200W Parking Lot LED Light. Includes wiring diagrams, mounting instructions, dimming options, and sensor setup.
Table of contents
Manual images
Click an image to enlargeQuick Guide for Installation
This manual provides instructions for installing the Sunco Lighting SHOEBOX 150W/200W Parking Lot LED Light. Ensure power is turned off at the circuit breaker before beginning. Required tools include a drill, ladder, hammer, wrench, tape measure, and pencil.
Components
- Adjustable Slip Fitter (AM)
- Dusk to Dawn Sensor
Easy Installation
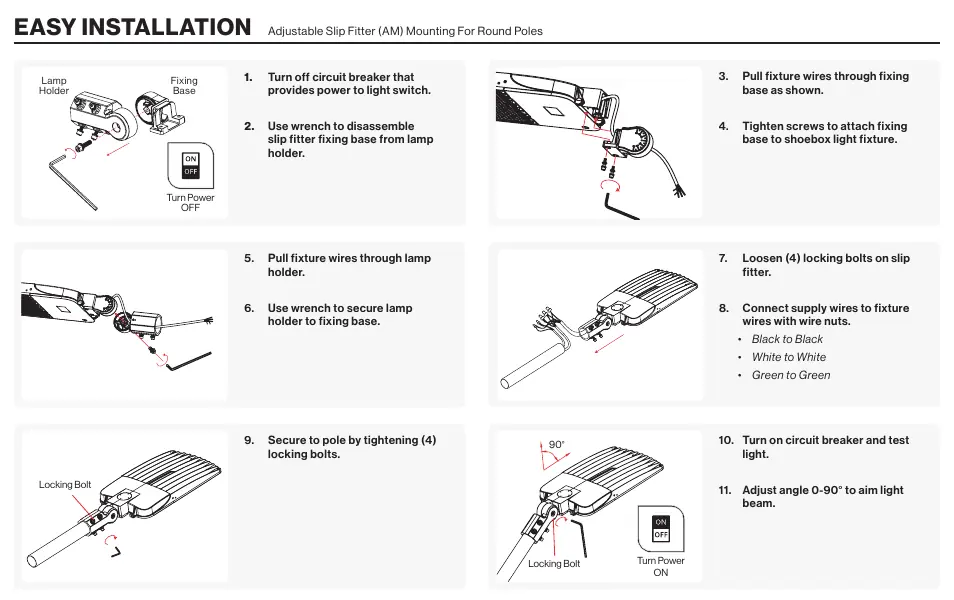
- Turn off the circuit breaker providing power to the light switch.
- Use a wrench to disassemble the slip fitter fixing base from the lamp holder.
- Pull the fixture wires through the fixing base.
- Tighten screws to attach the fixing base to the shoebox light fixture.
- Pull the fixture wires through the lamp holder.
- Use a wrench to secure the lamp holder to the fixing base.
- Loosen the four locking bolts on the slip fitter.
- Connect supply wires to fixture wires using wire nuts: Black to Black, White to White, Green to Green.
- Secure the fixture to the pole by tightening the four locking bolts.
- Turn on the circuit breaker and test the light.
- Adjust the angle (0-90°) to aim the light beam.
Wiring Diagram
The fixture supports standard AC connections and dimming controls:
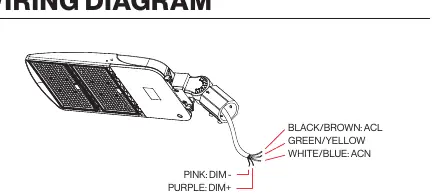
- AC Power: Black/Brown (ACL), White/Blue (ACN), Green/Yellow (Ground).
- Dimming: Pink (DIM-), Purple (DIM+).
Dimming Options
To dim the light, connect a compatible dimmer switch (not included) to the fixture wires. Supported methods include:
- 1-10VDC dimming (constant current).
- PWM signal dimming.
- Variation of resistance unit dimming.
Dusk to Dawn Sensor Setup
The fixture includes a photocell sensor for automatic operation based on ambient light levels. To install:
- Insert the blue Dusk to Dawn sensor into the three curved slots on the lamp top.
- Twist the unit clockwise to lock it into place.
Best Practices: Ensure the fixture is powered on continuously for the sensor to function. Keep the sensor unobstructed by trees or buildings and away from other light sources or reflective surfaces.
Safety and Warnings
- Installation must be performed by a person familiar with the construction and operation of the product.
- Check for shipping damage prior to installation.
- Proper grounding is required.
- Do not install in the rain.
- Clean the fixture regularly; do not use harsh solvents.
- If smoke or fire occurs, turn off power immediately.
Specifications
The fixture is available in 150W and 200W variants. Both models feature a 120-277V voltage range, wet moisture rating, and aluminum alloy + PC housing. The 150W model weighs 12.5lbs, while the 200W model weighs 17lbs. Both include a 7-year warranty.
Practical help
Common problems
Sensor not turning on
Ensure the fixture is powered on continuously and not obstructed by trees, buildings, or nearby light sources/reflective surfaces.
Fixture not working after installation
Check that the circuit breaker is on and verify all wiring connections (Black to Black, White to White, Green to Green) are secure.
Before use
- Turn off power at the circuit breaker.
- Check for shipping damage.
- Ensure proper grounding.
- Verify tools: Drill, Ladder, Hammer, Wrench, Tape Measure, Pencil.
- Do not install in the rain.
Specs in practice
- Moisture Rating
- Wet (suitable for outdoor installation).
Images and diagrams
- Wiring: Black/Brown is Line (ACL), White/Blue is Neutral (ACN), Green/Yellow is Ground.
- Dimming: Pink wire is DIM-, Purple wire is DIM+.
Model compatibility
- Compatible with 1-10VDC dimming, PWM signal dimming, or resistance unit dimming.

Manual page author
Emily Carter
User documentation editor
Prepares concise manual descriptions and highlights the most useful setup, operation, and maintenance information for readers.