Lighting / Fixtures
User Manual for Tecnolite 180CTL8360MVCH Interior Lighting Fixture
Quick guide for the Tecnolite 180CTL8360MVCH interior lighting fixture. Includes installation steps, technical specifications, safety warnings, and maintenance instructions.
Quick answers from the manual
Quick answer
- This manual provides installation instructions, safety guidelines, and technical specifications for the Tecnolite 180CTL8360MVCH interior lighting fixture. p. 1
Key actions
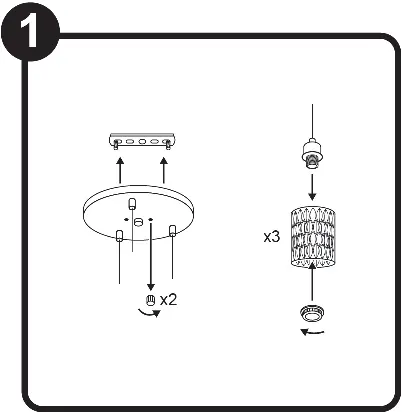
- Install the fixture following the 4-step diagram. p. 1
- Maintain a minimum distance of 0.50m from combustible materials. p. 1
First start
- Disconnect the power source before installation and ensure the ground connection is physical. p. 1
Maintenance and reset
- Disconnect power and clean the fixture and internal parts with a dry rag periodically. p. 1
Technical specifications
| Parameter | Value | Meaning | Pages |
|---|---|---|---|
| Voltage | 100V - 240V | Operating voltage range | p. 1 |
| Frequency | 50 Hz / 60 Hz | Operating frequency | p. 1 |
| Power | 25.5 W | Total power consumption | p. 1 |
| Lamp Base | E27 | Compatible lamp base type | p. 1 |
| Lamp Type | LED 8.5 W x 3 | Recommended lamp type and quantity | p. 1 |
Where to find it in the PDF
- Installation and Technical Specifications p. 1
- Warranty and Contact Information p. 2
Table of contents
Quick guide from the manual
This document provides instructions for the installation and maintenance of the Tecnolite 180CTL8360MVCH interior lighting fixture. Ensure all electrical power is disconnected before beginning installation. The fixture is designed for interior use only and must be kept away from combustible materials.
Safety Warnings
- Disconnect Power: Always turn off the electrical supply at the circuit breaker before starting any installation or maintenance work.
- Fire Hazard: Keep the luminaire at least 0.50 meters away from any combustible material.
- Handling: The lamp and parts of the luminaire can become hot during operation. Use a clean rag or gloves when handling the fixture.
- Grounding: The ground connection must be physical.
Technical Specifications
- Voltage: 100V - 240V, 50/60Hz
- Power: 25.5W
- Lamp Base: E27
- Usage: Interior use only
Installation Instructions
- Prepare the fixture: Assemble the shades onto the fixture base as shown in the diagram.
- Mounting: Drill holes in the ceiling and install the mounting bracket using the provided anchors (A-03) and screws (A-02). Secure the bracket to the ceiling.
- Wiring: Connect the electrical wires (Line, Neutral, and Ground) using the provided connectors (A-06). Ensure the ground connection is secure.
- Final Assembly: Attach the fixture base to the mounting bracket using the provided nuts. Install the bulbs into the sockets.
Parts List
- A-01: Lag screw
- A-02: Pija (Screw)
- A-03: Taquete (Anchor)
- A-04: Tornillo (Screw)
- A-05: Rondana (Washer)
- A-06: Conector rápido (Quick connector)
Maintenance
To maintain the fixture, disconnect the power supply and clean the luminaire and its internal parts with a dry cloth. Periodically check all electrical connections to ensure they remain secure.
Manufacturer information
Tecnolite
Practical help
Common problems
Fixture does not turn on
Verify that the power supply is active and that all electrical connections (Line, Neutral, Ground) are properly secured.
Fixture components are hot
Ensure the fixture is not covered and is installed at the correct distance from combustible materials. Use gloves when handling.
Before use
- Ensure the electrical power is disconnected at the circuit breaker.
- Verify that the mounting surface can support the weight of the fixture.
- Check that the local voltage matches the 100V-240V specification.
- Ensure you have all parts listed (A-01 through A-06).
- Wear gloves to handle the fixture parts to avoid burns.
Images and diagrams
- Step 1: Shows the assembly of the shades onto the main fixture body.
- Step 2: Illustrates the drilling and mounting process for the bracket using anchors and screws.
- Step 3: Details the wiring connections for Line, Neutral, and Ground.
- Step 4: Shows the final attachment of the fixture to the ceiling and bulb installation.
Model compatibility
- For interior use only.
- Not suitable for constant work with voltages over those specified on the product label.

Manual page author
David Miller
Documentation analyst
Organizes user manual content into clear summaries, with attention to model details, product context, and everyday usability.