Lighting / Fixtures
Instruction Manual for Tecnolite 12FTLLED013MV Outdoor LED Pendent Light
Quick guide for the Tecnolite 12FTLLED013MV outdoor LED light, covering installation steps, electrical wiring, safety precautions, and maintenance requirements.
Table of contents
Manual images
Jump to the sectionQuick guide from the manual
This document provides essential installation and safety instructions for the Tecnolite 12FTLLED013MV outdoor LED light. The fixture is designed for outdoor use and requires a physical ground connection for safe operation. Ensure the power is disconnected before starting any installation or maintenance work.
Installation
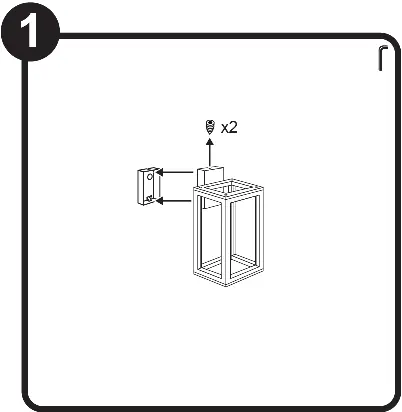
- Detach the mounting bracket from the fixture using the provided Allen wrench.
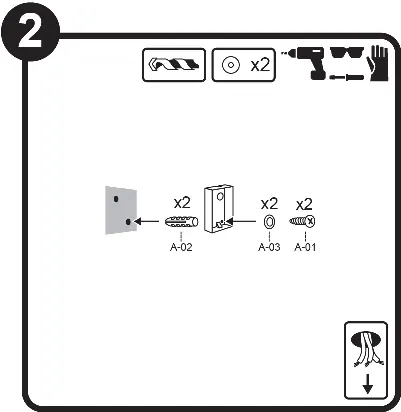
- Drill holes in the mounting surface and secure the bracket using the included anchors (A-02), washers (A-03), and screws (A-01).
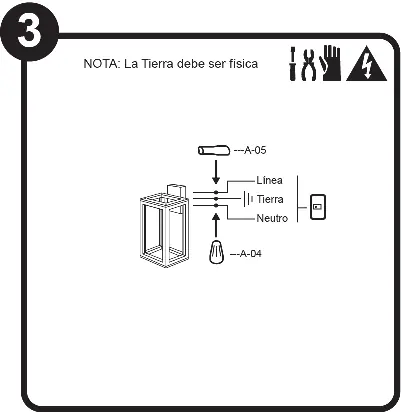
- Connect the electrical wires: Line, Neutral, and Ground. Ensure the ground connection is physical. Use the provided wire connectors (A-04) and insulating tube (A-05) to secure the connections.
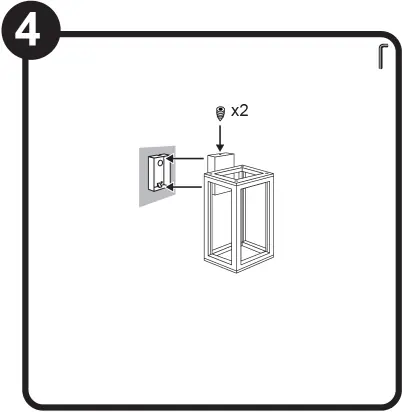
- Attach the fixture back to the mounting bracket and tighten the screws.
Safety and Maintenance
Safety Precautions:
- The fixture must be installed at a minimum distance of 0.50 m from any combustible material to avoid fire hazards.
- The lamp and other parts of the luminaire may become hot during operation; use a clean rag or gloves when handling the unit.
- Always disconnect the power supply before performing any maintenance.
Maintenance:
- Clean the luminaire and its internal parts periodically with a dry rag.
- Check all connections regularly to ensure they remain secure.
Technical Specifications
- Voltage: 100 V - 240 V ~ 50 Hz/60 Hz
- Power: 12 W
- Protection Rating: IP54, IK07
- Lamp Type: LED
Manufacturer information
Tecnolite
Practical help
Common problems
Fixture gets too hot
Use a clean rag or gloves to handle the luminaire if it has been operating, as parts can become hot.
Fire hazard risk
Ensure the fixture is installed at least 0.50 m away from any combustible materials.
Before use
- Verify the power supply is disconnected before starting installation.
- Ensure the mounting surface is suitable for the fixture weight.
- Confirm that a physical ground connection is available.
- Check that all parts (A-01 to A-06) are present in the kit.
- Use appropriate tools: drill, screwdriver, and protective gear.
Images and diagrams
- Step 1: Removing the mounting bracket.
- Step 2: Drilling and securing the bracket to the wall.
- Step 3: Wiring diagram showing Line, Neutral, and Ground connections.
- Step 4: Final mounting of the fixture to the bracket.
Model compatibility
- Designed for 100 V - 240 V AC power supply.
- Not suitable for use with voltages higher than those indicated on the product label.

Manual page author
Michael Turner
Technical manual editor
Reviews PDF manuals for structure, safety notes, and practical product details so readers can find the right information quickly.