Electronics / Sim Racing Equipment
User Manual for Thermaltake G15 Direct Drive Racing Wheel with Pedals Bundle
Quick guide for the Thermaltake G15 Direct Drive Racing Wheel and Pedals Bundle. Includes assembly instructions, pedal setup, calibration steps, and safety warnings.
Table of contents
Quick guide from the manual
This document provides essential instructions for assembling and operating the Thermaltake G15 Direct Drive Racing Wheel and Pedal Bundle. It covers hardware installation, cable connections, calibration procedures, and critical safety warnings to ensure optimal performance and user safety.
Device Overview
The G15 system features a 15Nm direct drive servo motor, 12 function buttons, 2 thumb rotary knobs, a 5-way joystick, and a metal three-pedal set. It is designed for PC platforms (Windows 7/10/11).
Installation Guide
Base Mounting: Secure the base to your racing cockpit bracket using the provided M6*12mm screws.
Cable Connections:
- Connect the PC/Console port on the base to your PC using the USB Type-A to C cable.
- Connect the pedals to the base using the USB Type-B to C cable.
- Connect the brake pedal to the throttle and clutch pedals using the provided RJ11 6P4C cables.
- Insert the emergency stop button into the E-STOP port on the base.
- Plug in the power adapter and press the power button to turn on the base.
Quick Release Instructions
Align the 10 steel balls on the steering wheel with the 10 grooves on the wheelbase. Press the wheel into the base until it snaps into place. To remove, pull back on the outer black ring and pull the wheel out.
Pedal Installation
Arrange the clutch (L), brake (M), and throttle (R) pedals on the footrest. Secure them using the M4*10mm screws. If using on a floor, attach the provided 12.5 mm edge protectors to the bottom of the pedal set.
Calibration
If the joystick or shift paddles behave abnormally:
- Press and hold the A + VIEW buttons for 3 seconds to enter calibration mode (indicator lights will flash).
- Move the joystick in all four directions and press each shift paddle twice.
- Press and hold the B + VIEW buttons for 1 second to complete calibration.
Safety and Maintenance
Temperature Warnings: The base will automatically reduce power if the motor reaches 60°C and will shut down if it exceeds 70°C. Do not touch the motor if it overheats.
Ventilation: Keep at least 10 cm of space around the base and ensure ventilation holes are not blocked.
Usage: Intended for users aged 16 and older. Take a 10-15 minute break every hour. Do not place hands near pedals or inside steering wheel openings during operation.
Manufacturer information
Thermaltake
Practical help
Common problems
Indicator light on steering wheel does not turn on
Remove and reinstall the wheel, check power connection, and ensure the USB cable is securely plugged into the PC.
Steering wheel or pedals unresponsive during gameplay
Exit the game, unplug and replug the USB cable on the base, then restart the game.
Joystick or shift paddles behaving abnormally
Enter calibration mode by holding A + VIEW for 3 seconds, perform the movement sequence, and save with B + VIEW.
Before use
- Ensure the base is securely mounted to a cockpit bracket.
- Verify all cables (USB, RJ11, Power) are firmly connected.
- Install the latest Thermaltake Racing Control Software from www.thermaltake.com.
- Ensure the emergency stop button is connected.
- Check that the steering wheel is properly locked via the quick-release mechanism.
Specs in practice
- 15Nm Peak Torque
- The maximum force feedback strength provided by the servo motor.
- Hall Effect Sensor
- High-sensitivity technology used in paddle shifters for longevity.
- 24V / 7.5A Power Adapter
- Required power supply specifications for the base.
Images and diagrams
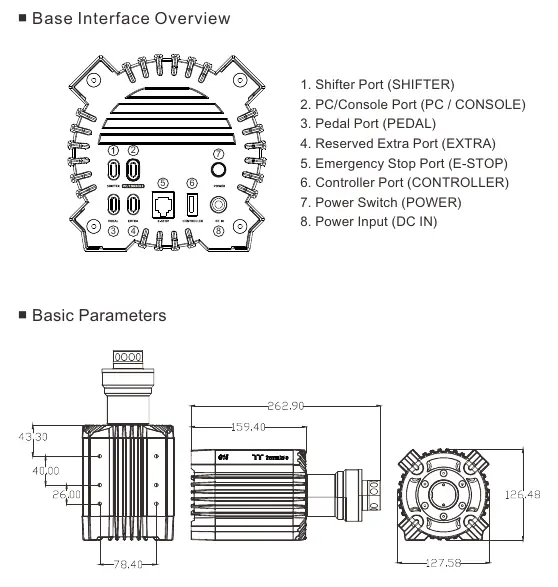
- Base Interface: Shows ports for Shifter, PC/Console, Pedal, Extra, E-Stop, Controller, Power Switch, and DC Input.
- Quick Release: Illustrates aligning the 10 steel balls with grooves and using the outer ring to detach the wheel.
- Pedal Wiring: Shows the RJ11 connection sequence between brake, throttle, and clutch pedals.
Model compatibility
- Compatible with Windows 7, 10, and 11.
- Intended for users aged 16 and older.

Manual page author
Emily Carter
User documentation editor
Prepares concise manual descriptions and highlights the most useful setup, operation, and maintenance information for readers.