Wearables / Watches
Timex Analog Watch User Manual
Quick guide for operating your Timex analog watch. Learn how to set time, date, alarm, use the Indiglo light, adjust the bracelet, and understand water resistance.
Table of contents
Manual images
Click an image to enlargeQuick guide from the manual
This manual covers various Timex analog watch models, including Quartz, Solar, Hand-wind, Perpetual Calendar, Moon Phase, and Easy Set Alarm versions. Please note that your specific watch may not have all the features described.
Starting your watch
Quartz Movement: Remove the plastic guard from under the crown and push the crown in against the case. The second hand will begin advancing.
Solar Movement: Expose the watch to direct sunlight or artificial light to charge the battery before use. When fully charged, it can function for up to 2 months.
Hand-wind Movement: Remove the plastic guard, set the time and date, and push the crown in. Slowly turn the crown clockwise until you feel resistance and hear the watch ticking.
Water and shock resistance
If your watch is water-resistant, the depth is indicated on the watch face or caseback. Warning: Do not press buttons or pull out the crown while underwater unless your watch is rated for 200 meters.
- Keep the crystal, push buttons, and case intact.
- Rinse with fresh water after exposure to salt water.
- The watch is not designed for diving.
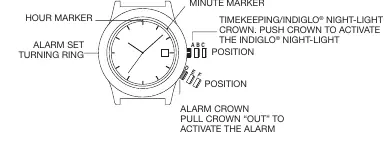
Indiglo Night-Light
Press the button or the crown to activate the Indiglo night-light, which illuminates the entire watch face in low light conditions.
Setting time and date
Most models use a multi-position crown (A, B, C):
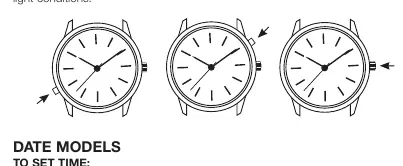
- Position A: Normal position.
- Position B: Usually for setting the date.
- Position C: Usually for setting the time.
For screw-in crowns, push the crown in while turning clockwise to tighten after setting.
Easy Set Alarm
Models with this feature have an alarm crown and a turning ring. The alarm can be set to ring or vibrate twice daily (12-hour alarm) or every hour (hourly alarm). Pull the alarm crown to the 'E' or 'F' position to activate.
Perpetual Calendar
These watches automatically track the number of days in each month and adjust for leap years. The date is preset at the factory. If the date changes at noon, adjust the time by 12 hours.
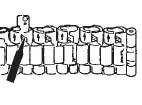
Bracelet adjustment
Sliding Clasp: Open the locking plate, move the clasp to the desired length, and snap the locking plate closed.

Foldover Clasp: Use a pointed tool to push the spring bar and disengage the bracelet.
Link Removal: Place the bracelet upright, insert a tool into the link opening, and push the pin in the direction of the arrow to detach the link.
Battery
The watch battery is not intended to be replaced by the consumer. Only a jeweler or professional should replace it.
Manufacturer information
Timex Group USA, Inc.
Practical help
Common problems
Watch stops within 24 hours
Increase the number of clockwise turns during the hand-winding process.
Date changes at noon
Advance or reverse the time by 12 hours.
Solar battery not charging
Ensure the watch is exposed to light and not covered by sleeves or clothing.
Before use
- Remove the plastic guard from under the crown.
- Push the crown in against the case to start the watch.
- For solar models, expose the watch to light to charge the battery.
- For hand-wind models, wind the crown clockwise until resistance is felt.
- Check if your model requires the crown to be screwed in for water resistance.
Specs in practice
- Water-Resistance
- Indicates the depth the watch can withstand. Do not operate buttons or the crown underwater unless rated for 200m.
Images and diagrams
- Crown positions (A, B, C) are standard for most models to set time and date.
- Bracelet link removal requires pushing the pin out in the direction of the arrow.
Model compatibility
- Not all features described apply to every watch model.
- Battery replacement should only be performed by a professional.

Manual page author
David Miller
Documentation analyst
Organizes user manual content into clear summaries, with attention to model details, product context, and everyday usability.