Automotive / Lighting Accessories
Tivoli 120V Commercial Strand Light Installation Instructions
A comprehensive installation and usage guide for the Tivoli 120V Commercial Strand Light. This manual covers safety precautions, suspension cable setup, light shade installation, bulb replacement, and field cutting procedures.
Table of contents
Manual images
Click an image to enlargeImportant Information
The Tivoli 120V Commercial Strand Light is designed for 120V AC operation only. For outdoor or wet locations, the circuit must be protected by a Ground Fault Circuit Interrupter (GFCI). Do not exceed the maximum wattage of 6.5W per socket or 156W per single strand set. A maximum of 8 sets can be connected on a single 10 Amp circuit.
Installing Suspension Cable
For suspension applications, a catenary cable is required to support the product. Failure to use this support will void the warranty.
- Attach eye bolts or appropriate hardware to structural supports.
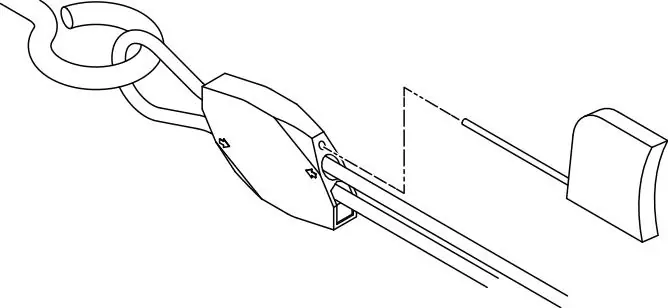
- Insert the catenary cable into the upper hole of the Cable Lock (LS-LOCK) following the arrow direction.
- Loop the cable through the eye bolt and insert it back into the lower hole of the Cable Lock.
- Use the Catenary Tensioning Tool (LS-TT) to tighten the cable if necessary.
- To loosen the cable, insert the included key into the small hole above the cable entry and press to release.
Installing Strand System
Installation with Suspension Cable: Once the suspension cable is secure, use tie-wraps to attach the strand light units to the cable.
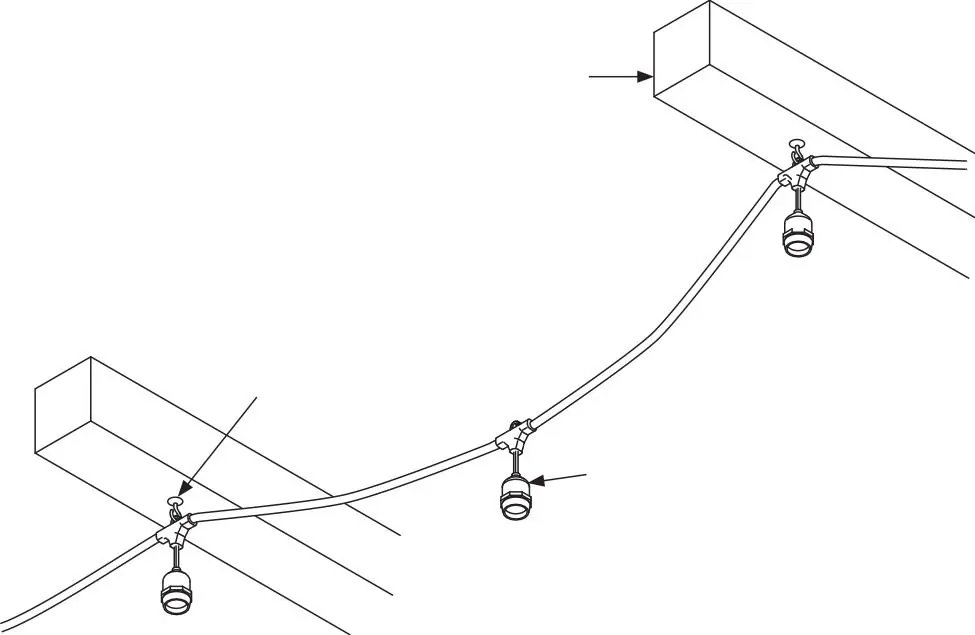
Installation on Structure: Install screw hooks into a solid structure, spaced no more than 2-4 feet apart. Connect the corresponding sockets to the hooks.
Installing Optional Light Shades
- Hang the strand light as described in the previous section.
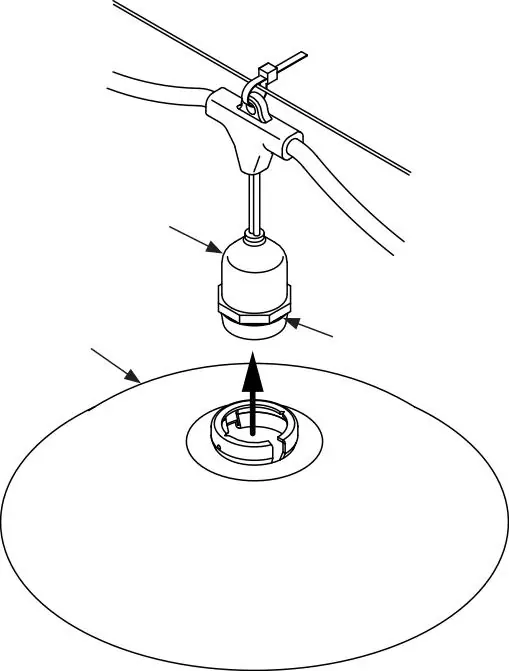
- Insert the Adapter Ring into the light shade opening, pressing the sides together until the lip locks below the hole edge.
- Press the Adapter Ring onto the bottom of the light socket until it locks into the groove.
- Use the included Hex Wrench to thread set screws through the collar and tighten to secure the shade.
- Screw in the light bulb.
Installing and Replacing Light Bulbs
Installation: Screw a bulb into each socket before plugging in the strand. Do not overtighten. The PVC socket fits tightly; turn the bulb slowly but firmly to stretch the PVC. Ambient temperatures between 65°-95°F are ideal for installation.
Troubleshooting: If a bulb does not light, unplug the strand and carefully turn the unlit bulb until it makes contact with the power contacts at the base of the socket.
Replacement: Disconnect power before replacing bulbs. Unscrew the old bulb counterclockwise and replace only with a Tivoli replacement bulb.
Connecting to Power
Plug the power cord into an AC outlet. Ensure all safety precautions are met, including the use of weatherproof outlet protectors for wet locations. Do not connect or disconnect the plug when the equipment is wet.
Optional Installation: Cutting in Field
- Ensure power is turned off.
- Cut the strand to the desired length, leaving a minimum of 2 inches of strand for the end cap.
- Apply RTV silicone (provided by others) to the end cap and insert it onto the cut end of the strand.
- Allow 24 hours for the silicone to cure.
Practical help
Common problems
Bulb does not light
Unplug the strand and carefully turn the unlit bulb until it makes contact with the power contacts at the base of the socket.
PVC socket is too tight
Turn the bulb slowly but firmly to stretch the PVC. Ideal ambient temperature for installation is 65°-95°F.
Cable sagging
Ensure a catenary cable is used for suspension applications and tighten using the Catenary Tensioning Tool (LS-TT).
Before use
- Verify all package contents.
- Ensure power is turned off before installation.
- Confirm GFCI protection is installed for outdoor/wet locations.
- Check that the circuit capacity supports the number of sets (max 8 sets per 10A circuit).
- Ensure appropriate mounting hardware is used (not included).
Specs in practice
- Max Wattage per Socket
- 6.5W
- Max Load per Set
- 156W
Images and diagrams
- Cable Lock installation for suspension cable support.
- Using the Catenary Tensioning Tool to tighten the support cable.
- Attaching light shades using the adapter ring and hex wrench.
- Field cutting procedure and end cap sealing with RTV silicone.
Model compatibility
- Designed for 120V AC current only.
- Requires catenary cable for suspension applications.
- Use only Tivoli replacement bulbs.
- Outdoor use requires GFCI protected outlets.

Manual page author
David Miller
Documentation analyst
Organizes user manual content into clear summaries, with attention to model details, product context, and everyday usability.