HVAC / Refrigeration Components
Installation Instructions for TMI Polar-Pro Swinging Doors
A comprehensive installation and adjustment guide for TMI Polar-Pro swinging doors. This manual covers three mounting methods (Inside Surface, In-Jamb, and Wall/In-Jamb), panel alignment, tension adjustment, and sealing procedures to...
Table of contents
Manual images
Click an image to enlargeQuick Guide from the Manual
The TMI Polar-Pro Swinging Doors are custom-manufactured for specific cooler or freezer doorway dimensions. Installation requires a helper and basic tools, including a mason's level and a drill. Before starting, identify your mounting method based on your door jamb thickness and type. Ensure the door jamb is structurally sound enough to support the weight of the door.
Mounting Methods
Choose the method that matches your doorway configuration:
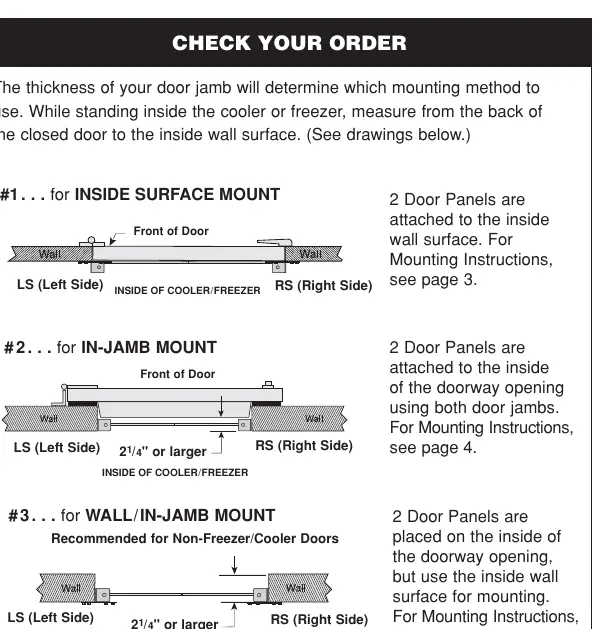
- #1 Inside Surface Mount: Panels are attached to the inside wall surface.
- #2 In-Jamb Mount: Panels are attached to the inside of the doorway opening using both door jambs.
- #3 Wall/In-Jamb Mount: Panels are placed on the inside of the doorway opening but use the inside wall surface for mounting. Recommended for non-freezer/cooler doors.
Installation Steps
General Preparation:
- Do not use nails to attach brackets. Use the provided 1/4" x 1 1/2" screws and washers.
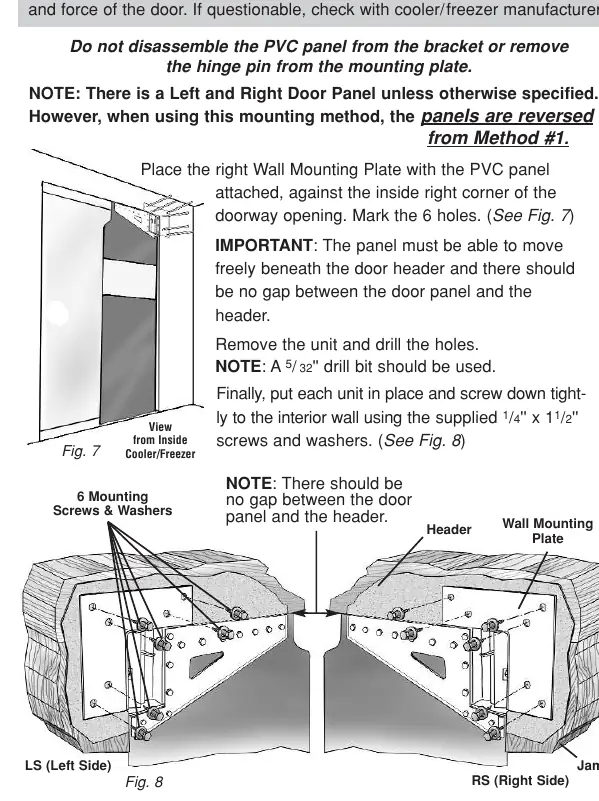
- Do not disassemble the PVC panel from the bracket or remove the hinge pin.
- Always use a 5/32" drill bit for pilot holes.
Mounting Procedure:
- Measure and mark the mounting location according to the specific method requirements.
- For In-Jamb mounts, use a mason's level to draw a plumb line 7" down from the top mark to ensure the panel hangs straight.
- Place the bracket/mounting plate against the jamb or wall, ensuring the panel moves freely beneath the header without gaps.
- Mark the holes, remove the unit, and drill the pilot holes.
- Secure the unit tightly to the wall or jamb using the provided screws.
Final Adjustments
Centering
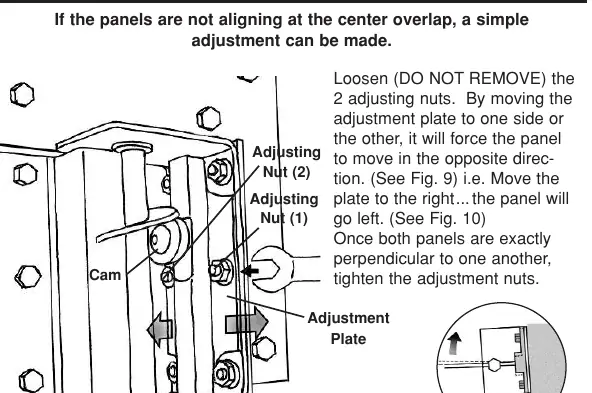
If panels do not align at the center overlap, loosen (do not remove) the two adjusting nuts on the mounting bracket. Move the adjustment plate to shift the panel position until they are perpendicular to one another, then tighten the nuts.
Tension
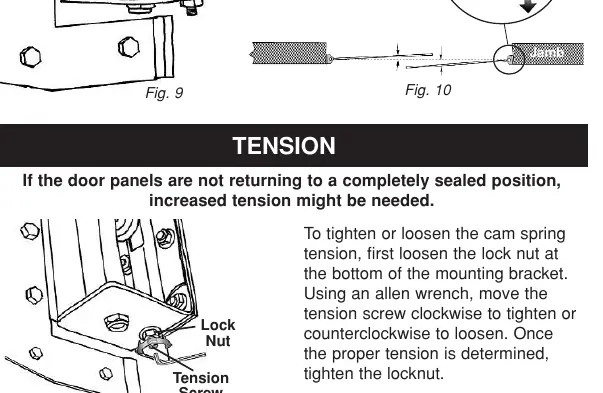
If panels do not return to a fully sealed position, increase the cam spring tension. Loosen the lock nut at the bottom of the bracket, use an Allen wrench to turn the tension screw clockwise to tighten (or counter-clockwise to loosen), then re-tighten the lock nut.
Sealing
If the PVC panels are too long and buckle, they will allow cold air to escape. Cut the bottom of the panel to achieve a recommended 1/8" clearance from the floor.
Practical help
Common problems
Panels are not aligning at the center overlap
Loosen the two adjusting nuts on the mounting bracket and shift the adjustment plate until the panels are perpendicular.
Panels are not returning to a fully sealed position
Increase the cam spring tension by loosening the lock nut and turning the tension screw clockwise with an Allen wrench.
PVC panel is buckling at the bottom
The panel is likely too long; cut the bottom of the panel to allow for a 1/8" clearance.
Before use
- Verify the door jamb is strong enough to support the door weight.
- Ensure you have a helper for the installation process.
- Measure the doorway width and height to confirm the door fits.
- Gather necessary tools: mason's level, drill, and 5/32" drill bit.
- Identify the correct mounting method (#1, #2, or #3) based on your door jamb.
Specs in practice
- 1/4" x 1 1/2" screws
- Included hardware required for securing mounting brackets.
- 5/32" drill bit
- Recommended size for drilling pilot holes into the jamb or wall.
- 1/8" clearance
- Recommended gap between the bottom of the panel and the floor to prevent buckling.
Images and diagrams
- Mounting diagrams illustrate the difference between Inside Surface, In-Jamb, and Wall/In-Jamb configurations.
- Adjustment diagrams show the location of the adjusting nuts and tension screw on the mounting bracket.
Model compatibility
- Method #3 (Wall/In-Jamb) is primarily recommended for non-freezer/cooler doors.
- Panels are specific to Left and Right sides; ensure correct orientation during installation.

Manual page author
David Miller
Documentation analyst
Organizes user manual content into clear summaries, with attention to model details, product context, and everyday usability.