Plumbing / Toilets Urinals
Installation Guide for TOTO 0GU220 Wall-Mounted Toilet Bowl
A comprehensive installation and maintenance guide for the TOTO 0GU220 wall-mounted toilet bowl. Includes step-by-step mounting instructions, flush valve connection, adjustment procedures, and CEFIONTECT cleaning guidelines.
Table of contents
Manual images
Click an image to enlargeQuick guide from the manual
This document provides installation instructions for the TOTO 0GU220 wall-mounted toilet bowl. Key requirements include ensuring the wall surface is flat, maintaining a 1/16 inch (1.6 mm) gap if a baseboard is present, and using a nut with a thread depth of at least 3/4 inch (18 mm). Professional installation is recommended to prevent leaks and property damage.
Safety precautions
- Do not subject the toilet to strong forces or impacts to prevent breakage or leaks.
- Use only the included or specified parts for installation.
- Do not over-tighten nuts, as this can damage the toilet bowl.
- Ensure the toilet is connected securely to the water supply and waste outlet to prevent foul odors or leaks.
Installation procedure
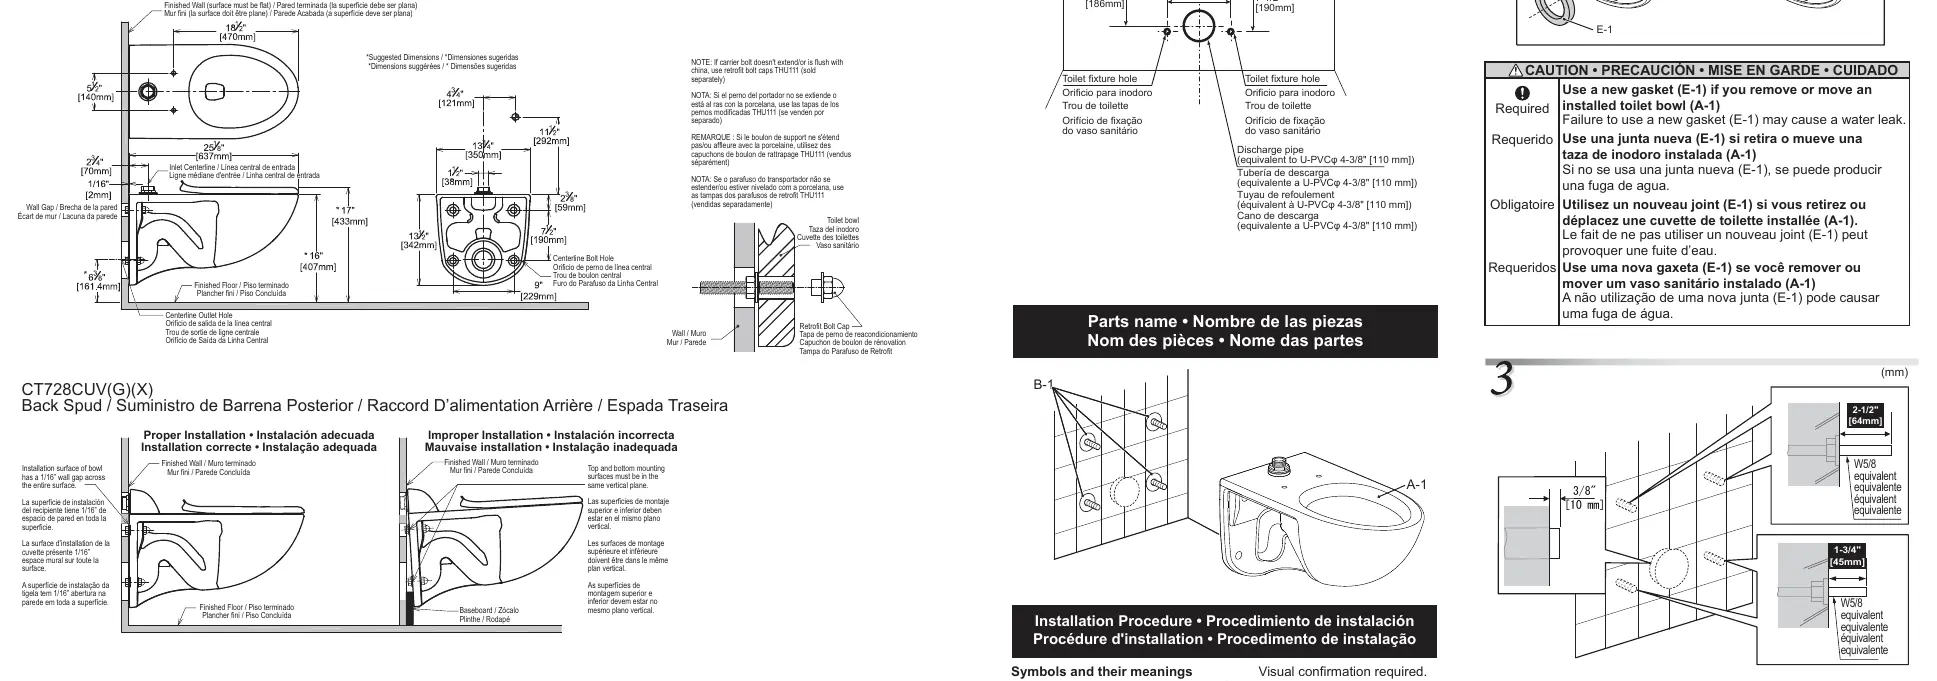
- Preparation: Confirm all parts are present. The product shape may vary slightly by model.
- Mounting: Install fastening fixtures according to the provided dimensions. Ensure the top and bottom mounting surfaces are in the same vertical plane.
- Wall Gap: If there is a surface such as a baseboard, adjust the installation so there is an equal gap of 1/16 inch (1.6 mm).
- Flush Valve Connection: Follow the specific installation guide included with your flush valve to connect it to the toilet bowl.
- Testing: After installation, conduct a test run to confirm no connections are leaking.
- Final Cleanup: Remove any oil or substances (like caulking or adhesive) from the bowl using a neutral detergent.
Adjustments
After installing the flush valve, adjust the flush volume. Additionally, adjust the opening angle of the shutoff valve to prevent flushed water from spraying out of the toilet bowl.
Cleaning instructions for CEFIONTECT
CEFIONTECT is a permanent glaze that prevents debris from sticking to surfaces. Products with the letter 'G' in the model number feature this glaze.
- Lavatory: Use a mild dish detergent with a clean, soft cloth.
- Toilet: Use a gel-based cleaner with a soft-bristled plastic brush.
- Prohibited: Do not use abrasive cleaners, polishing powders, detergents with gritty particles, bleach, chemical thinners, acid/alkaline detergents, metal scrub brushes, or steel wool.
Warranty
TOTO warrants its vitreous china products to be free from defects in materials and workmanship for one (1) year from the date of purchase. This warranty is limited to the original purchaser and applies to products installed in North, Central, and South America. Proof of purchase is required for warranty claims. Contact TOTO U.S.A., INC. at 1155 Southern Road, Morrow, GA 30260 or call (888) 295-8134 for service.
Practical help
Common problems
Water leaks at connections
Ensure all connections are tightened properly and that the gasket (E-1) is used correctly. If the toilet was removed, always use a new gasket.
Black or silver line-shaped marks on porcelain
These are caused by metallic objects (like watch bands or belt buckles) brushing against the surface. Gently rub the surface with an abrasive detergent to remove.
Rust stains or foreign substances
Check inside the toilet bowl for debris like pipe chips. Ensure the bowl is clean after installation.
Before use
- Confirm all parts are present according to the included parts list.
- Ensure the wall surface is flat.
- Verify the flush valve is installed according to its own specific guide.
- Check that the nut thread depth is at least 3/4 inch (18 mm).
- Ensure the toilet bowl is free of debris or pipe chips.
Specs in practice
- 1/16 inch (1.6 mm) gap
- Required adjustment when installing against a surface like a baseboard.
- 3/4 inch (18 mm) thread depth
- Minimum depth required for the mounting nut to ensure secure installation.
Images and diagrams
- Top Spud vs. Back Spud: Diagrams show different water supply configurations.
- Wall Gap: Illustrates the required 1/16 inch gap when a baseboard is present.
- Mounting: Shows the correct alignment of the toilet bowl against the finished wall.
Model compatibility
- Flush valve installation must follow the guide provided with the flush valve.
- If the carrier bolt does not extend or is flush with the china, use retrofit bolt caps THU111 (sold separately).

Manual page author
Emily Carter
User documentation editor
Prepares concise manual descriptions and highlights the most useful setup, operation, and maintenance information for readers.