Plumbing / Toilets Urinals
Installation and Owner's Manual for TOTO Dual-Flush Toilet CST436/CST448
Comprehensive installation and maintenance guide for TOTO dual-flush toilet models CST436 and CST448. Includes step-by-step installation procedures, water supply requirements, maintenance instructions for the flush tower and fill valve...
Table of contents
Manual images
Click an image to enlargeQuick Guide from the Manual
This manual provides installation and maintenance instructions for TOTO dual-flush toilet models CST436 and CST448. Important: These toilets are not specified for back-to-back installations unless the drain connections incorporate a WYE fitting. Ensure your water supply pressure is between 20 and 80 psi static. Always leave these instructions with the customer for future maintenance and warranty reference.
Included Parts and Tools
Ensure your package includes the toilet, tank, Unifit rough-in, template, and all necessary mounting hardware. Required tools include a 10” adjustable wrench, carpenter's level, tape measure, pliers, screwdrivers, pencil, putty knife, and a drill with appropriate bits (11/16” for wood floors, 5/16” for concrete/tile).
Installation Procedure
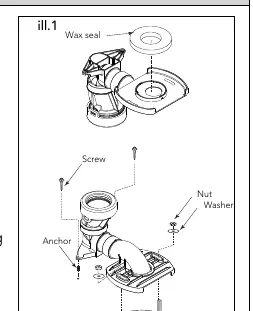
1. Unifit Rough-In and Bowl
- Install the Unifit rough-in according to its specific instructions.
- Place the template to prepare for the bowl installation.
- Position the toilet bowl over the Unifit rough-in and mounting blocks. Ensure the bowl outlet aligns with the opening.
- Check for rocking; use shims if necessary to stabilize the bowl.
- Align the toilet perpendicular to the back wall and parallel to side walls.
- Install side screws to the mounting blocks and cover with provided caps.
2. Tank Installation
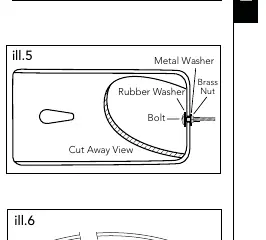
- Install tank-to-bowl mounting hardware. Place rubber washers on bolts, insert through tank holes, and secure with metal washers and nuts from the outside. Tighten finger-tight, then add 1/2 turn with a wrench.
- Connect the water supply hose to the fill valve threads at the bottom of the tank.
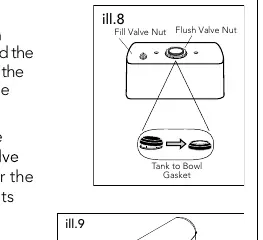
- Place the tank-to-bowl gasket on the flush tower nut.
- Guide the tank onto the bowl, aligning the gasket and bolts.
- Hand-tighten the provided nuts evenly until the tank sits snugly on the 3 contact points. Do not overtighten.
- Connect the flexible supply hose to the angle stop valve.
Maintenance
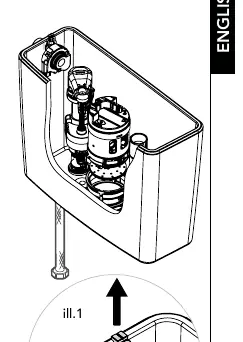
Replacing the Flush Tower
- Turn off water supply and flush the toilet.
- Remove the tank lid and drain remaining water.
- Pull the clip on the trip lever gear box to remove it.
- Rotate the flush tower until the arrow aligns with the overflow tube, then pull up to remove.
- Clean the rubber seal gasket under running water.
- Reinstall in reverse order.
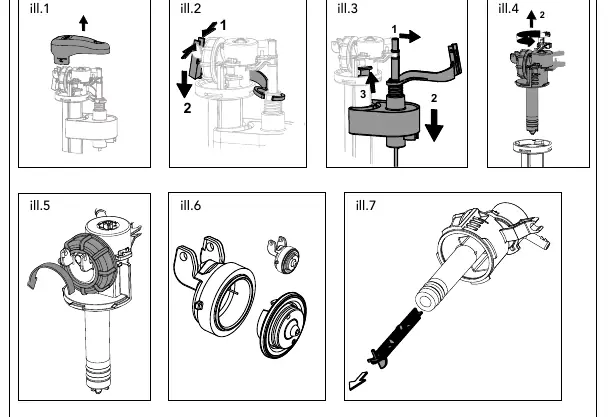
Servicing the Fill Valve
- Remove the top cover and lever arm.
- Snap off the adjustable rod and remove the retainer tab.
- Twist the valve unit 1/4 turn counterclockwise to remove.
- Unscrew the diaphragm housing and clean the diaphragm and strainer.
- Reinstall all parts and check for leaks.
Care and Cleaning
Use a detergent or non-abrasive toilet cleaner with a soft-bristled plastic brush. For hard water stains, use vinegar or a lime-dissolving cleaner with a non-scratch scour pad. Notice: Do not use in-tank bowl cleaners, as high concentrations of chlorine can damage fittings and cause leaks.
CEFIONTECT Cleaning
CEFIONTECT is a super-smooth permanent glaze. For best results, use a mild dish detergent and a soft cloth for lavatories, or a gel-based cleaner with a soft-bristled brush for toilets. Avoid gritty cleaners, bleach, chemical thinners, or metal scrub brushes.
Practical help
Common problems
Toilet rocks after installation
Use shims to prevent the toilet from rocking.
Leakage at tank-to-bowl connection
Ensure the tank-to-bowl gasket is properly seated and nuts are tightened evenly.
Delayed fill cycle or inadequate water flow
The strainer in the fill valve may require cleaning due to water conditions.
Fill valve rotates inside the tank
Avoid using a wrench to tighten the water supply connection; hand-tighten only.
Before use
- Verify all parts are included in the package.
- Ensure water supply pressure is 20-80 psi static.
- Purge the supply line if this is a new construction.
- Gather required tools: 10” adjustable wrench, level, drill, etc.
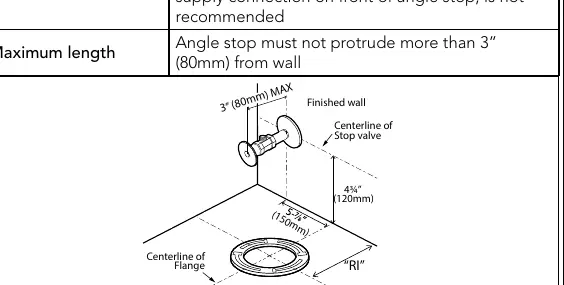
- Check that the angle stop valve is not protruding more than 3” from the wall.
Specs in practice
- Water Supply Pressure
- Must be between 20 and 80 psi static for proper operation.
- Angle Stop Length
- Must not protrude more than 3” (80mm) from the wall.
Images and diagrams
- Installation illustrations show the correct alignment of the Unifit rough-in, tank-to-bowl gasket placement, and the 3-point contact system for the tank.
Model compatibility
- Not for back-to-back installations unless using a WYE fitting.
- Do not use in-tank bowl cleaners containing chlorine.

Manual page author
Michael Turner
Technical manual editor
Reviews PDF manuals for structure, safety notes, and practical product details so readers can find the right information quickly.