Plumbing / Toilets Urinals
OVE Zino 1-Piece Dual Flush Toilet User Manual
Quick guide for the OVE Zino 1-piece dual flush toilet. Includes installation steps, part list, maintenance tips, and water level adjustment instructions.
Table of contents
Manual images
Click an image to enlargeQuick Guide
The OVE Zino is a 1-piece dual flush toilet. This manual provides essential installation and maintenance instructions. Key specifications include a dual flush system (1.06 gal / 1.6 gal or 4 L / 6 L). Ensure your floor flange and water inlet are installed according to the minimum measurements provided in the dimension diagrams before starting.
Parts List
The package includes the following components:
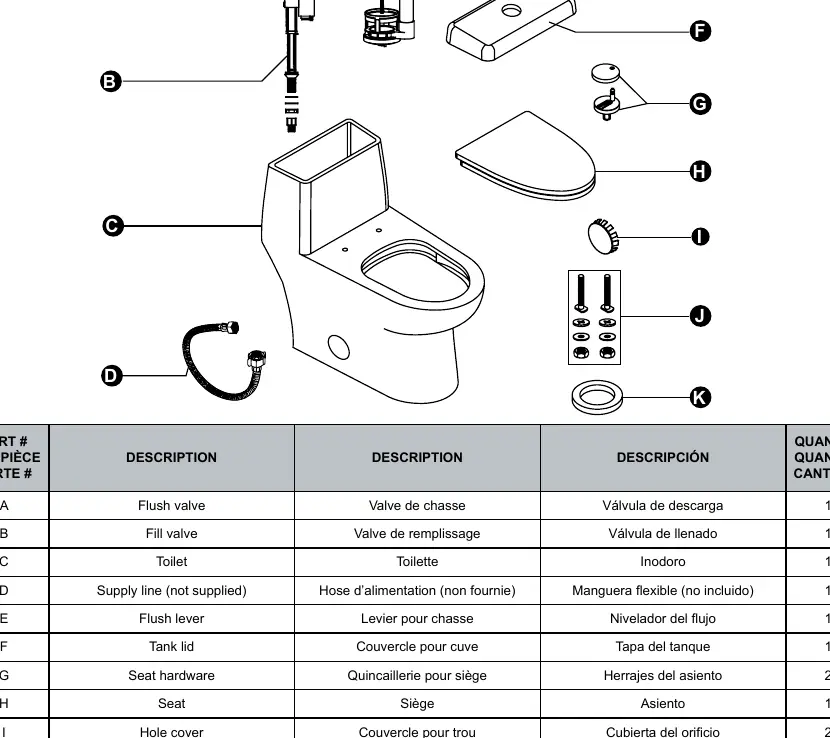
- Flush valve (A)
- Fill valve (B)
- Toilet (C)
- Flush lever (E)
- Tank lid (F)
- Seat hardware (G)
- Seat (H)
- Hole covers (I)
- Flange hardware (J)
- Toilet seal ring (K)
Note: Supply line (D) is not supplied.
Tools Required
You will need the following tools (not supplied):
- Adjustable wrench
- Measuring tape
- Caulking gun
- Screwdriver
Installation
Step 1: Preparation
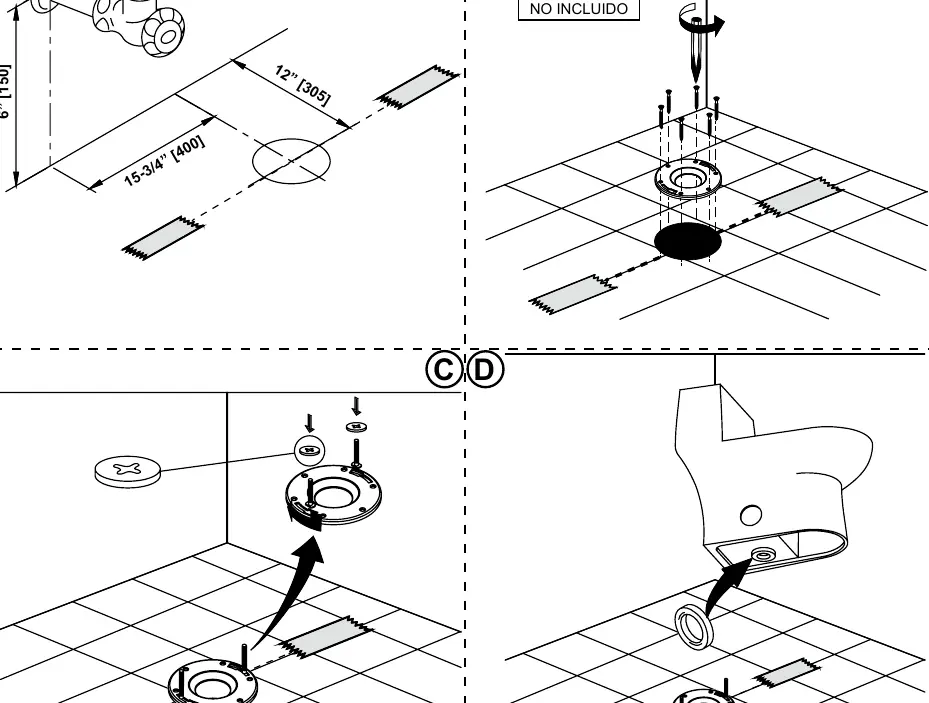
- Ensure water inlet and floor discharge drain are installed.
- Align masking tape with the center of the drain to assist with positioning.
- Install the floor flange per manufacturer recommendations.
- Position fixing bolts and use plastic nuts to immobilize them.
- Firmly push the seal ring onto the toilet drain.
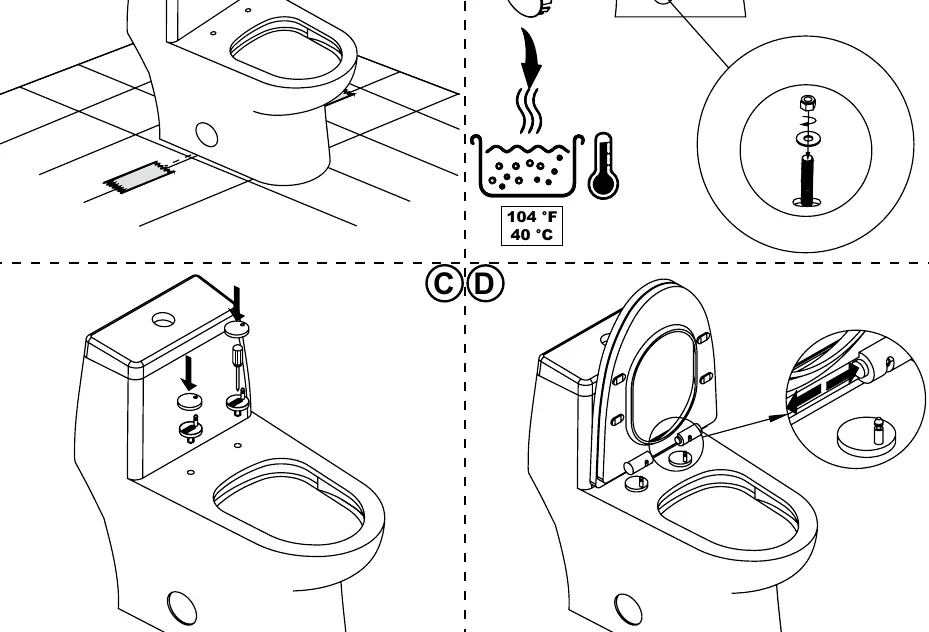
Step 2: Toilet Placement
- Position the toilet onto the floor flange, aligning holes with fixing bolts.
- Tighten the nut to the fixing bolts using an adjustable wrench.
- Cover the bolt holes with the provided covers. Tip: Soak plastic covers in 40°C (104°F) water for 1 minute to soften them for easier installation.
- Install the seat cover hardware and decorative caps. Adjust pegs front/back before tightening.
- Insert the seat by pushing the two buttons and securing it to the fixing pegs.
Step 3: Water Connection
- Connect the toilet to the water inlet valve using a supply line (not supplied).
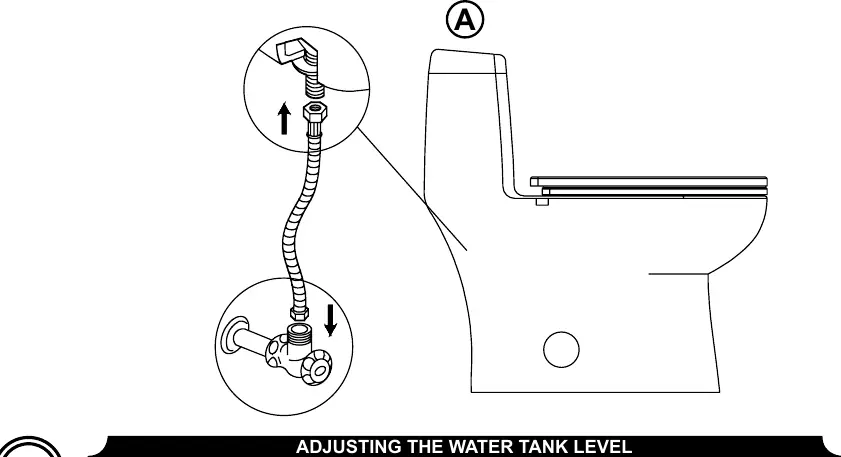
Adjusting the Water Tank Level
To adjust the water level in the tank:

- Locate the adjustable rod on the fill valve.
- Rotate the rod to adjust the height of the floater, which controls the water level (1.6 gal / 6 L).
Maintenance and Care
- Use mild, nonabrasive soap and warm water for general cleaning.
- Do not use abrasive cleaners containing sand or silica, as they will scratch the ceramic finish.
- Do not use in-tank bowl cleaners, as they contain corrosive chemicals that can damage tank components.
Warranty
The product includes a limited warranty: 5 years on fittings and 20 years on ceramic components. For claims, contact OVE customer service at 1-866-839-2888 or email [email protected].
Practical help
Common problems
Toilet wobbles after installation
Ensure the floor flange is level and the fixing bolts are tightened securely.
Seat is loose or misaligned
Adjust the seat pegs front or back before fully tightening the hardware.
Water level in tank is incorrect
Rotate the adjustable rod on the fill valve to change the floater height.
Plastic covers are hard to install
Soak the plastic covers in 40°C (104°F) water for 1 minute to soften them.
Before use
- Verify floor flange is installed according to manufacturer recommendations.
- Ensure water inlet pipe is correctly positioned.
- Have an adjustable wrench, measuring tape, and caulking gun ready.
- Check that the seal ring is firmly attached to the ceramic drain.
- Soak plastic seat covers in warm water before installation.
Specs in practice
- Flush Capacity
- Dual flush system: 1.06 gal (4 L) and 1.6 gal (6 L).
- Water Temperature for Installation
- Use 40°C (104°F) water to soften plastic components during installation.
Images and diagrams
- Page 1 provides detailed dimensions for the toilet and rough-in requirements.
- Page 2 illustrates the parts list (A-K) and required tools.
- Page 3-5 provide step-by-step visual guides for installation and water level adjustment.
Model compatibility
- Designed for personal, consumer residential use only.
- Do not use in-tank bowl cleaners; they contain corrosive chemicals.
- Supply line is not included.

Manual page author
Emily Carter
User documentation editor
Prepares concise manual descriptions and highlights the most useful setup, operation, and maintenance information for readers.