Plumbing / Sinks Faucets
User Manual for Glacier Bay High Efficiency Elongated 1-Piece Dual Flush Toilet N2420
Quick guide for the Glacier Bay High Efficiency Elongated 1-Piece Dual Flush Toilet (Model N2420). Includes installation steps, maintenance tips, and troubleshooting.
Table of contents
Manual images
Click an image to enlargeQuick Guide
This guide provides instructions for installing and maintaining the Glacier Bay High Efficiency Elongated 1-Piece Dual Flush Toilet. Estimated assembly time is 60 minutes. Before beginning, ensure all parts are present and the mounting surface is clean and level.
Safety Information
- Handle vitreous china with care; it is glasslike and can have sharp edges if broken.
- Do not overtighten bolts.
- If the toilet is not installed immediately, plug the floor flange hole with a towel to prevent sewer gases from escaping.
- Observe local plumbing and building codes.
Installation
Removing the old toilet
- Turn off the water supply and flush the tank completely.
- Remove remaining water from the tank and bowl.
- Disconnect the old water supply line.
- Remove the bowl from the floor by removing bolt caps and floor bolt nuts.
- Clean old wax, putty, and sealant from the base area.
Installing the floor bolts
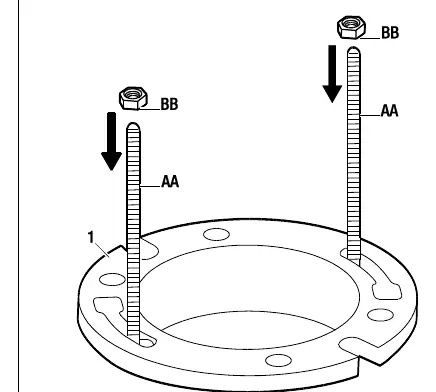
- Insert floor bolts (AA) into the toilet flange slots with heads down and threaded ends facing up.
- Ensure bolts are parallel to the wall and hand-tighten hex nuts (BB).
Installing the wax ring and toilet
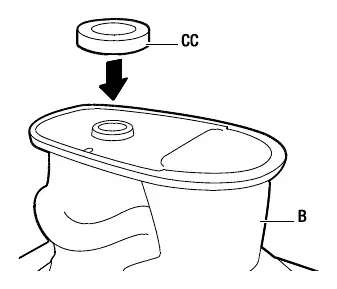
- Turn the toilet bowl (B) upside down. Place the wax ring (CC) around the raised outlet ring, ensuring the rounded end faces the toilet.
- Place the bowl over the flange, aligning it with the floor bolts. Press down firmly.
- Secure the toilet by placing plastic discs (DD) over the bolts and tightening the wing nuts (EE). Snap bolt cap covers (FF) into place.
Installing and adjusting the flush button
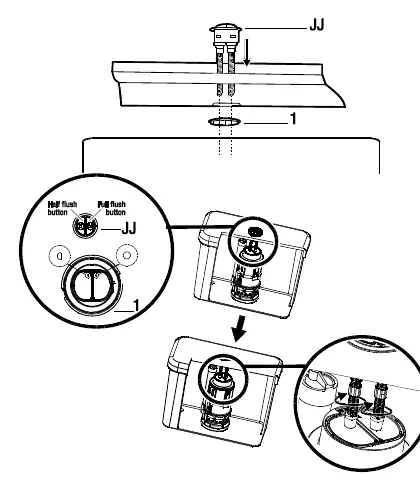
- Position the flush button mechanism (JJ) in the tank lid.
- Secure with the lock nut (1).
- Ensure push rods touch the top of the flush valve levers. To adjust, loosen the rod locknut, rotate the push rod to increase length, and tighten the locknut.
Connecting the water supply
- Connect the water supply line between the tank and the shut-off valve.
- Tighten the coupling nut 1/4 turn beyond hand tight. Do not overtighten.
Installing the seat
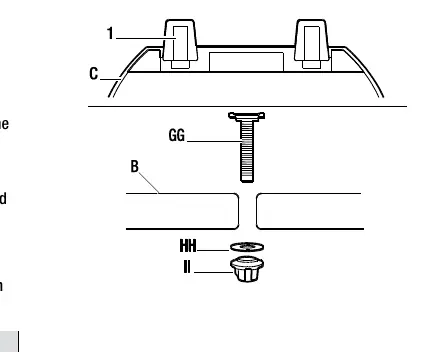
- Insert lock-bolts (GG) into the seat, then into the toilet holes.
- Secure from underneath using washers (HH) and lock-nuts (II).
Care and Cleaning
Clean the exterior with mild soap, warm water, and a soft cloth. Do not use abrasive scouring powders or pads. Warning: Do not use in-tank cleaners containing chlorine (calcium hypochlorite), as they can damage tank fittings and cause leaks.
Troubleshooting
- No water flows into the tank: Ensure the supply valve is fully open and check the debris filter screen for obstructions.
- Poor flush quality: Ensure water level is at the line on the overflow tube. Adjust the fill valve screw to raise the float cup. Adjust push rod length if necessary.
- Water continues to run: Check the rubber seal gasket on the flush valve for debris and ensure it is closed completely.
Replacement Parts
- Fill Valve: A1250
- Flush Valve: A2417
Manufacturer information
Glacier Bay
Practical help
Common problems
No water flows into the tank
Ensure the water supply valve is fully open. Check the debris filter screen inside the threaded shank for obstructions.
Poor flush quality
Check that the water level is at the line on the overflow tube. Adjust the fill valve screw to raise the float cup. Ensure push rods have a 1/16 in. gap above the flush valve buttons.
Water continues to run
Check the rubber seal gasket on the flush valve for debris and ensure it is completely closed.
Before use
- Turn off the water supply and flush the tank completely.
- Remove the old toilet and clean the floor flange area of old wax and sealant.
- Ensure the mounting surface is clean and level.
- Verify all hardware (bolts, wax ring, nuts) is present.
Specs in practice
- Estimated Assembly Time
- 60 minutes
- Flush Button Adjustment
- Push rods should have a gap of approximately 1/16 in. above the flush valve buttons.
Images and diagrams
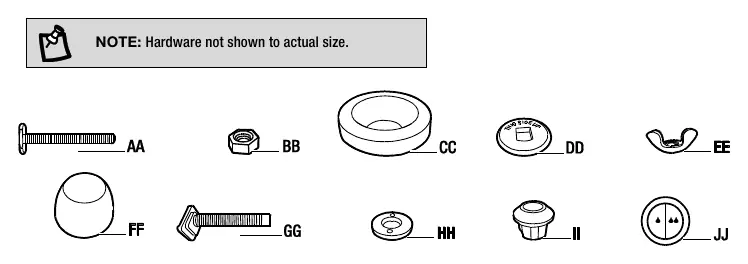
- The hardware list identifies floor bolts (AA), wax ring (CC), and flush button (JJ).
- Installation steps illustrate the correct orientation of the wax ring and the alignment of the toilet over the floor bolts.
Model compatibility
- Do not use in-tank cleaners containing chlorine (calcium hypochlorite) as they can damage tank fittings.

Manual page author
David Miller
Documentation analyst
Organizes user manual content into clear summaries, with attention to model details, product context, and everyday usability.