HVAC / Parts & Accessories
Trane Replacement Coils Installation Guide
Official installation guide for Trane replacement coils. Includes safety warnings, inspection procedures, and specific modification instructions for gas manifolds, filter driers, and liquid valves.
Quick answers from the manual
Quick answer
- This guide provides installation instructions for Trane replacement coils, including necessary modifications for gas manifolds, filter driers, and liquid valve connections. p. 1, 2
Key actions
- Recover refrigerant to relieve pressure before opening the system. p. 1
- Ensure all joints are brazed, not soldered. p. 1
Where to find it in the PDF
- Safety and Inspection p. 1
- Installation and Modifications p. 2
Table of contents
Important Information
This document provides installation instructions for Trane replacement coils. It is intended for use by qualified personnel only. Improper installation, adjustment, or alteration can result in death, serious injury, or property damage.
Safety Precautions
- Qualified Personnel Only: Installation and servicing must be performed by trained professionals.
- Hazardous Voltage: Disconnect all electric power, including remote disconnects, before servicing. Follow proper lock out/tag out procedures.
- Refrigerant Handling: The system contains oil and refrigerant under high pressure. Recover refrigerant to relieve pressure before opening the system.
- Brazing: If using existing refrigerant lines, ensure all joints are brazed, not soldered. Perform a leak test after mechanical connections.
- Chemical Warning: This product may expose you to chemicals, including lead, known to the State of California to cause cancer and birth defects.
Inspection
Upon receiving the kit, perform the following steps:
- Unpack all components of the kit.
- Check carefully for any shipping damage. Report any damage immediately to the transportation company.
- Verify that all components are present. Report missing components to your supplier at once for replacement with authorized parts.
General Information
Replacement coils are identical to the production coil for all heat pumps, RunTru cooling, and Ameristar cooling units. For Trane and American Standard cooling units, the replacement coil may differ in height but has been verified to perform the same or better than the production coil. It is recommended to change the filter drier when replacing the coil.
Installation and Modifications
One or more of the following modifications may be required to install the replacement coils:
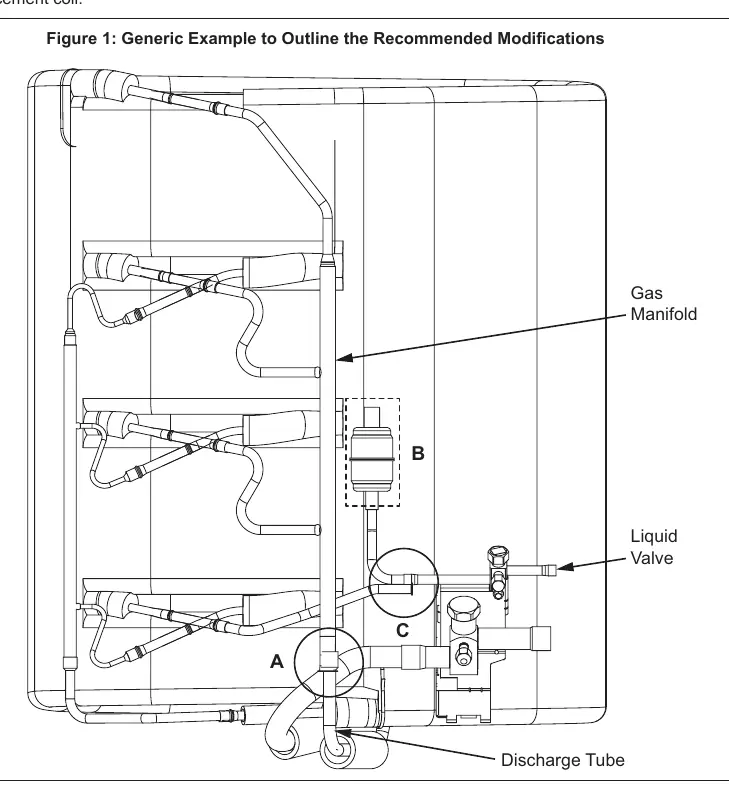
- Gas Manifold: If the gas manifold extends too far below the discharge connection, remove an appropriate amount of tubing from the gas manifold on the replacement coil.
- Filter Drier: If the original unit contains an internal filter drier, it is recommended to convert to a filter drier external to the cabinet.
- Liquid Valve: If the liquid valve connection tube on the replacement coil does not reach the liquid service valve, brazing an extension is required.
Practical help
Common problems
Gas manifold extends too far below the discharge connection
Remove an appropriate amount of tubing from the gas manifold on the replacement coil.
Liquid valve connection tube does not reach the liquid service valve
Brazing an extension is required.
Before use
- Ensure only qualified personnel perform the installation.
- Recover refrigerant to relieve pressure before opening the system.
- Disconnect all electric power and follow lock out/tag out procedures.
- Unpack all components and check for shipping damage.
- Report any missing components to the supplier immediately.
Images and diagrams
- Figure 1 illustrates the recommended modifications, highlighting the gas manifold, liquid valve, and discharge tube locations.
Model compatibility
- Replacement coils are identical to the production coil for all heat pumps, RunTru cooling, and Ameristar cooling units.
- For Trane and American Standard cooling units, the replacement coil may differ in height but is verified to perform the same or better.

Manual page author
David Miller
Documentation analyst
Organizes user manual content into clear summaries, with attention to model details, product context, and everyday usability.