HVAC / Parts & Accessories
Trane Sound Enclosure Kit Installation Guide
Installation guide for Trane Sound Enclosure Kits (BAYSDEN001-5). Includes step-by-step instructions for scroll, reciprocating, and rotary compressor installations, along with safety warnings and inspection procedures.
Quick answers from the manual
Quick answer
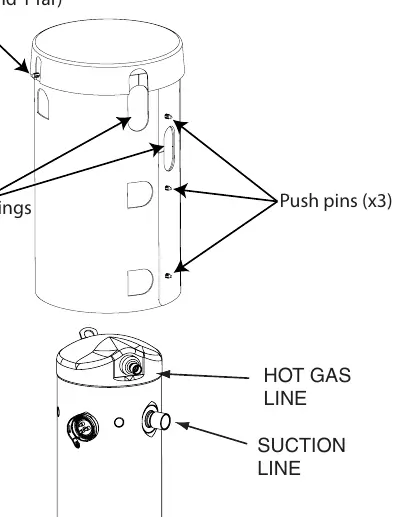
- The Sound Enclosure Kit is designed to reduce compressor noise. Installation involves wrapping the enclosure around the compressor, aligning it with the suction and gas lines, and securing it with the provided push pins. p. 1, 2
Key actions
- Disconnect power to the condensing unit before servicing. p. 1
First start
- Ensure power is disconnected, inspect for damage, and follow the specific installation steps for your compressor type (Scroll/Reciprocating or Rotary). p. 1, 2
Where to find it in the PDF
- Installation for Scroll/Reciprocating Compressors p. 1
- Installation for Rotary Compressors p. 2
Table of contents
Important information from the manual
This guide provides installation instructions for Trane Sound Enclosure Kits (models BAYSDEN001, BAYSDEN002, BAYSDEN003, BAYSDEN004, and BAYSDEN005). Warning: Hazardous voltage is present. Always disconnect power to the condensing unit before performing any service or installation.
Inspection
Before beginning installation, inspect the kit carefully for any shipping damage. Report any damage to the transportation company immediately. Check that all parts are present; report any missing parts to your supplier and replace them only with authorized parts.
Installation for Scroll and Reciprocating Compressors
- Disconnect power to the condensing unit.
- Remove the unit top cover to access the compressor.
- Wrap the enclosure around the compressor, ensuring the line openings align with the suction and gas lines of the compressor.
- Carefully align and secure the enclosure using the three push pins provided in the assembly.
- Align the top cap holes with the holes on the enclosure and secure using the two provided push pins.
- Reinstall the unit top cover.
Installation for Rotary Compressors
- Open the enclosure like a clamshell and place it around the compressor and compressor accumulator.
- Align the top cap holes with the wiring harness, suction tube, and discharge tube.
- Fasten the pins provided in the sound enclosure assembly to the sides and top to ensure a secure fit.
Practical help
Common problems
Missing parts
Report missing parts to your supplier immediately and replace them with authorized parts only.
Shipping damage
Report any shipping damage to the transportation company immediately.
Before use
- Disconnect power to the condensing unit
- Inspect the kit for shipping damage
- Verify all parts are present
- Identify compressor type (Scroll, Reciprocating, or Rotary)
Images and diagrams
- The diagram illustrates the installation of the sound enclosure on a compressor, highlighting the line openings for suction and hot gas lines, and the correct placement of push pins.
Model compatibility
- Compatible with scroll, reciprocating, and rotary compressors.

Manual page author
David Miller
Documentation analyst
Organizes user manual content into clear summaries, with attention to model details, product context, and everyday usability.