HVAC / Parts & Accessories
Trane Tracer 10-inch Display Installation Instructions
Installation and connection guide for the Trane Tracer 10-inch Display. Includes mounting instructions, wiring requirements, and network configuration steps for Ethernet and Wi-Fi setups.
Table of contents
Manual images
Click an image to enlargeImportant Safety Information
Installation and servicing of this equipment must be performed by qualified personnel only. Improper installation can result in death or serious injury. Technicians must adhere to all Environmental, Health, and Safety (EHS) policies and wear appropriate Personal Protective Equipment (PPE), including cut-resistant gloves, safety glasses, and arc flash clothing when necessary. Always refer to Safety Data Sheets (SDS) and OSHA guidelines.
Mounting the Display
The display is designed for conditioned indoor environments only. It can be mounted using the provided anchors and screws or via a standard 75 mm x 75 mm VESA mount.
- Select a wall space near an electrical outlet to ensure continuous power.
- Use a small screwdriver to loosen the screw on the top of the display.
- Carefully detach the back cover.
- Stick the provided silicon gaskets onto the back cover.
- Affix the back cover to the wall with the logo facing the wall using the provided anchors and screws.
- Plug the power cable and Ethernet cable (if applicable) into the display.
- Reconnect the display to the mounted back cover.
Connecting the Display
The display supports multiple connection methods depending on the customer's preference. To configure settings, select the MENU icon in the upper left-hand corner of the screen, navigate to Settings, then DEVICE SETTINGS. Select Network & Internet to configure Wi-Fi or Ethernet settings. Use the EDIT CONNECTION option to update address and user credentials.
Connection Methods
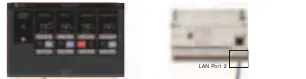

- Ethernet Connection - Direct: Connects the display directly to the controller via Ethernet cable.
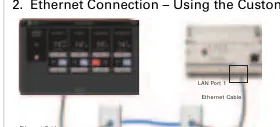
- Ethernet Connection - Using Customer's Network: Connects the display to the controller through the customer's existing network infrastructure.
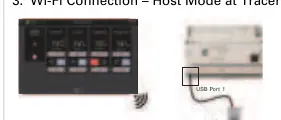
- Wi-Fi Connection - Host Mode at Tracer SC+: The display connects via Wi-Fi to the Tracer SC+ controller in Host mode.
- Wi-Fi Connection - Using Customer's Network or Client Mode at Tracer SC+: The display connects via Wi-Fi through the customer's network or in Client mode at the Tracer SC+ controller.
Practical help
Common problems
Display not connecting to network
Navigate to Settings > DEVICE SETTINGS > Network & Internet to verify credentials and connection type (Wi-Fi or Ethernet).
Mounting difficulties
Ensure the wall surface is suitable for the provided anchors or utilize a standard 75 mm x 75 mm VESA mount.
Before use
- Ensure installation is performed by qualified personnel.
- Wear required PPE (gloves, safety glasses, arc flash clothing).
- Verify power source availability near the mounting location.
- Confirm Wi-Fi or Ethernet cable availability.
- Check that the environment is a conditioned indoor space.
Images and diagrams
- Ethernet Connection - Direct: Shows direct cabling between the display and the controller.
- Wi-Fi Connection: Illustrates the wireless setup process via the display's Network & Internet menu.
Model compatibility
- The display communicates to the controller using either Wi-Fi or Ethernet cable connection.

Manual page author
Emily Carter
User documentation editor
Prepares concise manual descriptions and highlights the most useful setup, operation, and maintenance information for readers.