Lighting / Fixtures
Installation Guide for Unbranded 1JAY-70492GF 2-Light Ceiling Light
Step-by-step installation guide for the Unbranded 1JAY-70492GF 2-Light Farmhouse Ceiling Light. Includes wiring instructions, tool requirements, and mounting steps.
Quick answers from the manual
Quick answer
- This manual provides instructions for installing the 1JAY-70492GF 2-Light Ceiling Light, including safety precautions, wiring diagrams, and mounting steps. p. 1, 2
Key actions
- Turn off power at the circuit breaker before starting installation. p. 1
First start
- Mount the unit to the junction box, connect the wires (hot, neutral, ground), attach the fixture, and install bulbs. p. 1, 2
Show 1 more answers Show less
Where to find it in the PDF
- Installation and Wiring p. 1, 2
Table of contents
Manual images
Click an image to enlargeImportant Safety Information
Before starting the installation of this fixture or removing a previous one, you must disconnect the power by turning off the circuit breaker or removing the fuse at the fuse box. Inspect the wire insulation for any cuts, abrasions, or exposed copper that may have resulted during shipping. If there is a defect in the wire, do not attempt installation.
Tools Required
- Ladder
- Safety glasses
- Electrical tape
- Phillips screwdriver
- Flat blade screwdriver
- Pliers
- Wire strippers
Hardware Included
- Fixture
- Mounting unit
- Rubber rings
- Mounting screws
- Wire nuts
Installation Steps
Step 1: Mounting
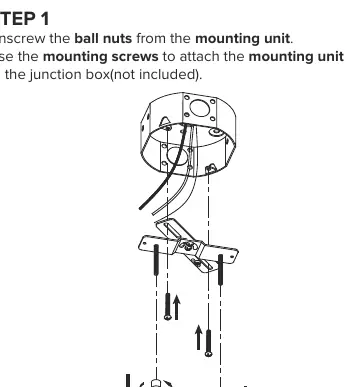
Unscrew the ball nuts from the mounting unit. Use the mounting screws to attach the mounting unit to the junction box (junction box not included).
Step 2: Wiring
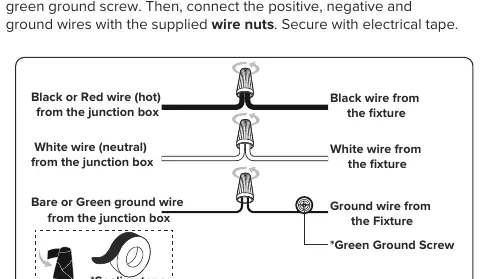
Make the electrical connection from the junction box to the fixture. Connect the ground wire to the mounting unit using the preinstalled green ground screw. Then, connect the positive, negative, and ground wires with the supplied wire nuts. Secure the connections with electrical tape.
- Black or Red wire (hot) from junction box: Connect to Black wire from the fixture.
- White wire (neutral) from junction box: Connect to White wire from the fixture.
- Bare or Green ground wire from junction box: Connect to Ground wire from the fixture.
Step 3: Attaching Fixture
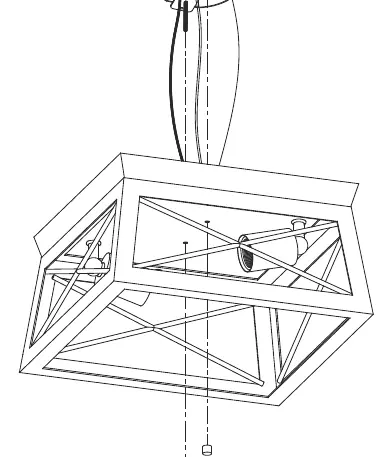
Attach the fixture to the mounting unit through the screw holes as shown in the diagram and secure it using the ball nuts.
Step 4: Installing Bulbs
Install the bulbs (not included) into the fixture sockets.
Practical help
Common problems
Wire insulation damaged
Do not attempt installation if wires are cut or abraded.
Fixture not working after installation
Verify all wire connections are secure and that the circuit breaker is turned on.
Before use
- Turn off power at the circuit breaker or fuse box
- Inspect all wires for damage
- Ensure you have a ladder and necessary screwdrivers
- Verify the junction box is ready for installation
Show more Show less
Specs in practice
- Junction box
- The electrical housing in your ceiling where the fixture connects.
- Neutral wire
- Usually white; completes the electrical circuit.
Images and diagrams
- The wiring diagram illustrates connecting the hot (black/red), neutral (white), and ground (bare/green) wires using wire nuts.
- The exploded parts view shows the assembly order of the mounting unit, fixture, and ball nuts.
Model compatibility
- Bulbs are not included with the fixture.
- Junction box is not included.

Manual page author
Emily Carter
User documentation editor