Electronics / Monitors
User Manual for UPERFECT 173J19 Portable Monitor
Quick guide for the UPERFECT 173J19 portable monitor. Learn how to connect via USB-C or HDMI, adjust OSD settings, configure display modes in Windows, and troubleshoot common power or signal issues.
Quick answers from the manual
Quick answer
- The UPERFECT 173J19 is a 17.3-inch portable monitor. It supports USB-C and Mini HDMI connections. For stable operation, especially at 2K 144Hz, use the included power adapter. p. 4, 5
Key actions
- Connect via USB-C p. 5
- Connect via HDMI p. 5
First start
- Connect the monitor to your device using the appropriate cable (USB-C or HDMI) and connect the power adapter for stability. p. 5
Show 4 more answers Show less
Problems and fixes
Monitor won't turn on
Check Type-C port compatibility or use external power (min 18W).
p. 9
No signal
Ensure device supports USB 3.1/Thunderbolt 3 or use HDMI.
p. 9Maintenance and reset
- Use the OSD menu to reset settings. p. 6
Technical specifications
| Parameter | Value | Meaning | Pages |
|---|---|---|---|
| Screen Size | 17.3 inches | Display diagonal size | p. 4 |
| Resolution | 2560*1440 | Screen resolution | p. 4 |
| Refresh Rate | 144 Hz | Screen refresh rate | p. 4 |
Where to find it in the PDF
- Preparations p. 2
- Interface p. 3
- Specifications p. 4
- Connecting p. 5
- Screen Adjustment p. 6
- Windows Setup p. 7, 8
Table of contents
Manual images
Click an image to enlargeQuick guide from the manual
The UPERFECT 173J19 is a 17.3-inch portable monitor designed for versatility. For optimal performance, especially when running at 2K 144Hz, it is highly recommended to use the original power adapter to ensure a stable power supply. If you encounter issues with the monitor not turning on or displaying a "no signal" message, verify your cable connections and ensure your source device supports the required signal transmission (USB 3.1/Thunderbolt 3 for USB-C).
Package Contents
- Portable Monitor
- Power Adapter
- User Guide
- Mini HDMI Cable
- Type-C to Type-C Cable
Interface Function Introduction
The monitor features several ports and buttons for control:
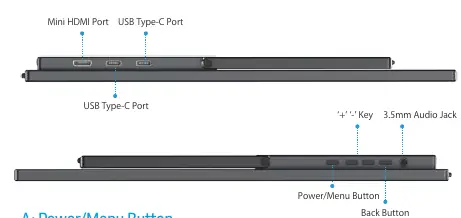
- Power/Menu Button: Short press to enter the OSD menu; long press to turn the monitor on/off.
- +/- Keys: Used for volume and brightness adjustment.
- Back Button: Returns to the previous menu step.
- 3.5mm Audio Jack: For headphone connection.
- USB Type-C Ports: Full-featured ports for power and signal transmission.
- Mini HDMI Port: For signal transmission.
- VESA Mount: 75x75mm (Screw size: M4*4mm).
Connecting
The monitor supports two primary connection methods:
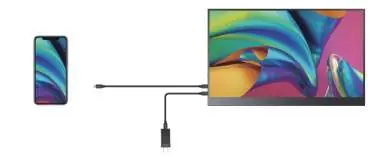
- TYPE-C Signal Transfer: Connect your device to the monitor using the Type-C to Type-C cable. Ensure your device's Type-C port supports full-featured signal and power transmission.
- HDMI Signal Transfer: Use a Mini HDMI to HDMI cable for video signal. Note that you may still need to connect the monitor to an external power source using the original power adapter for stability.
Screen Adjustment
The On-Screen Display (OSD) menu allows you to adjust various settings:
- Brightness: Adjust brightness, contrast, ECO mode, DCR, and sharpness.
- Image: Configure aspect ratio.
- Color Temp: Adjust color temperature (User, Red, Green, Blue).
- OSD Setting: Change language, OSD position, and timer.
- Reset: Reset settings, toggle HDR mode, and Low Power mode.
- Misc: Select signal source, adjust low blue light, FreeSync, and OD.
Setting Up (Windows 10)
To configure display modes:
- Right-click on your desktop and select Display settings.
- Scroll to Multiple displays.
- Select your preferred mode (e.g., Extend desktop, Duplicate these displays).
- Alternatively, use the Windows key + P keyboard shortcut to quickly toggle between display modes.
Troubleshooting
If you experience issues, consider the following:
- Monitor won't turn on: Check if the Type-C port is full-featured. If not, use HDMI for signal and USB-C for power. Ensure power supply is at least 18W.
- "No signal" message: Ensure your device supports USB 3.1/Thunderbolt 3. If not, use the Mini HDMI cable.
- Monitor turns off when brightness increases: This indicates insufficient power. Connect the original power adapter.
- Splash screen or restarts: Usually caused by insufficient power. Use the original power adapter or a power bank with at least 30W output.
Practical help
Common problems
Monitor does not turn on
Check if the device's Type-C port supports signal/power. If not, use HDMI for signal and USB-C for power. Ensure power supply is at least 18W.
No signal displayed
Verify device supports USB 3.1/Thunderbolt 3. If not, use Mini HDMI cable. Ensure original cables are used.
Monitor turns off when brightness is increased
The monitor requires more power. Connect the original power adapter.
Splash screen or constant restarts
Insufficient power supply. Use the original power adapter or a power bank with at least 30W output.
Before use
- Verify all package contents are present.
- Ensure your source device supports USB-C signal transmission.
- Use the original power adapter for stable operation.
- Connect cables securely to the monitor and source device.
Show more Show less
Specs in practice
- Refresh Rate
- 144 Hz
Images and diagrams
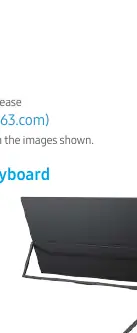
- The bracket supports 180-degree opening for adjustable viewing angles.
- Interface layout identifies the location of ports and control buttons.
- Connection diagrams illustrate proper setup for USB-C and HDMI configurations.
Model compatibility
- USB-C connection requires a full-featured Type-C port (USB 3.1/Thunderbolt 3).
- Monitor requires at least 18W power input for basic operation; higher power recommended for 2K 144Hz.

Manual page author
Michael Turner
Technical manual editor