Electronics / Monitors
User Manual for Uperfect 18-inch 2K 144Hz Portable Monitor
Comprehensive user guide for the Uperfect 18-inch 2K 144Hz portable monitor. Includes setup instructions, connection methods, OSD menu adjustments, and troubleshooting tips.
Quick answers from the manual
Quick answer
- To connect the monitor, use the provided Type-C cable for devices supporting USB 3.1/Thunderbolt 3, or a Mini HDMI cable for video with a separate power source. Ensure the monitor receives at least 30W of power for stable operation. p. 5, 9
Key actions
- Install the stand case p. 2
- Adjust OSD settings p. 6
First start
- Connect the monitor to your device using either the Type-C or HDMI cable. p. 5
- Ensure the monitor is powered with at least 30W. p. 9
Show 4 more answers Show less
Problems and fixes
No Signal
Ensure your device supports USB 3.1/Thunderbolt 3. If not, use a Mini HDMI cable. Use original cables.
p. 9Maintenance and reset
- Use the Reset option in the OSD menu to restore settings. p. 6
Technical specifications
| Parameter | Value | Meaning | Pages |
|---|---|---|---|
| Resolution | 2560*1600 | Display resolution | p. 4 |
| Refresh Rate | 144Hz | Screen refresh rate | p. 4 |
Where to find it in the PDF
- Package Contents and Stand Installation p. 2
- Interface Functions p. 3
- Specifications p. 4
- Connecting p. 5
- Screen Adjustment p. 6
- Windows 10 Setup p. 7, 8
Table of contents
Manual images
Click an image to enlargeQuick guide from the manual
This portable monitor requires a stable power supply of at least 30W for optimal performance, especially when running at 2K 144Hz. For connection, use a full-featured USB-C cable (USB 3.1/Thunderbolt 3) for both signal and power, or a Mini HDMI cable for video signal combined with a separate power source. If you experience flickering or the monitor fails to turn on, ensure you are using the original cables and an external power adapter.
Package Contents
- Portable Monitor
- Power Adapter
- Smart Cover
- Mini HDMI to Standard HDMI Cable
- Type-C to Type-C Cable (x2)
- User Guide
Installing the stand case
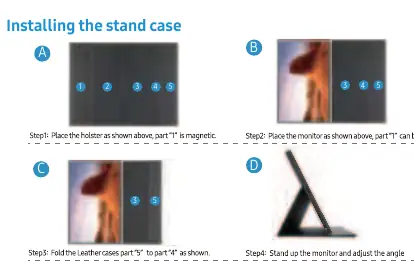
- Place the holster on a flat surface; part 1 is magnetic.
- Place the monitor onto the holster; part 1 will adhere to the monitor.
- Fold the leather case part 5 to part 4 to create a stand.
- Stand up the monitor and adjust the viewing angle as needed.
Interface Functions
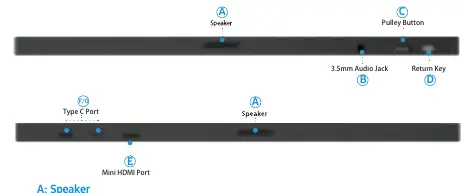
- Speaker: Built-in audio output.
- Audio Port: 3.5mm jack for headphones or external speakers.
- Pulley Button: Scroll up/down to adjust volume or navigate the OSD menu. Press to confirm selections. Scroll down and hold to turn the screen on.
- Return Key: Press to return to the previous menu step.
- Mini HDMI Port: For audio and video signal transmission.
- Type C 3.1 Port: Full-featured port for signal and power transmission.
- VESA: 4 M4*4mm holes for mounting.
Connecting the Monitor
TYPE-C Signal Transfer: Connect the monitor directly to a device with a full-featured Type-C port (supporting USB 3.1/Thunderbolt 3) using the provided Type-C cable.
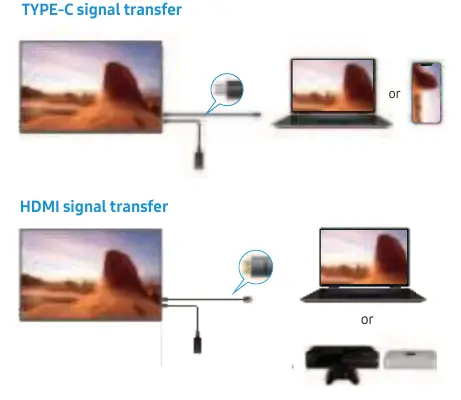
HDMI Signal Transfer: Connect the monitor to your device using the Mini HDMI cable for video. You must also connect a power source to the monitor's Type-C port to ensure it functions.
For a stable connection: Ensure cables are intact and plugged in securely. Use the original power adapter to avoid flickering. If performance is poor, test with another device.
Screen Adjustment
The On-Screen Display (OSD) menu allows you to adjust various settings:
- Brightness: Adjust Brightness, Contrast, ECO mode, DCR, and Sharpness.
- Image: Adjust Aspect Ratio.
- Color Temp: Customize Red, Green, and Blue color levels.
- OSD Setting: Change Language, OSD position, timer, and transparency.
- Reset: Reset settings, toggle HDR mode, and Low Power mode.
- Misc: Select Signal Source, Low Blue Light, Volume, FreeSync, and OD.
Windows 10 Setup
To configure display modes (Extend/Duplicate):
- Right-click on your desktop and select Display settings.
- Scroll down to Multiple displays.
- Select the desired mode (Duplicate, Extend, or Show only on 1/2) from the drop-down list.
- Alternatively, use the Windows key + P keyboard shortcut to quickly toggle display modes.
Troubleshooting
If you encounter issues:
- Monitor won't turn on: Check if your device's Type-C port supports power. If not, use an external power supply (at least 30W).
- No Signal: Ensure your device supports USB 3.1/Thunderbolt 3. If not, use the Mini HDMI cable. Try using original cables.
- Flickering/Spots: Ensure sufficient power is provided (at least 30W).
Specifications
- Size: 18 Inches
- Resolution: 2560*1600
- Refresh Rate: 144Hz
- Panel Type: QLED
- Color Gamut: 100% DCI-P3
- Aspect Ratio: 16:10
- Interfaces: Standard HDMI, Type C 3.1 (x2), 3.5mm Audio
Practical help
Common problems
Monitor won't turn on
Check if the device's Type-C port supports power and signal. If not, use HDMI for video and USB-C for power. Ensure at least 30W power supply.
No Signal
Ensure your device supports USB 3.1/Thunderbolt 3. If not, use a Mini HDMI cable. Try using original cables and testing with another device.
Flickering or constant restarts
Ensure sufficient power by using the original cable and a power source providing at least 30W.
Before use
- Check package contents for all cables and the monitor.
- Verify your device's Type-C port capabilities (USB 3.1/Thunderbolt 3).
- Use the original power adapter to prevent flickering.
- Ensure the monitor is placed on a stable surface using the stand case.
Show more Show less
Specs in practice
- Refresh Rate
- 144Hz, suitable for smooth motion in gaming and video.
Images and diagrams
- The stand case installation involves magnetic attachment and folding the leather cover to create a stable base.
- The interface layout includes a Pulley button for OSD navigation and volume control, located on the top edge.
- Connection diagrams show two methods: single cable Type-C for compatible devices, and dual-cable (HDMI + Power) for others.
Model compatibility
- Requires at least 30W power supply for stable operation at 2K 144Hz.
- Type-C connection requires a full-featured port (USB 3.1/Thunderbolt 3) on the host device.

Manual page author
Emily Carter
User documentation editor