Home Appliances / Space Heaters
User Manual for Utilitech 1500W Ceramic Heater NT15-20A
Quick guide for the Utilitech 1500W Ceramic Heater (Model NT15-20A). Includes safety warnings, operating instructions, heat settings, and maintenance tips.
Table of contents
Quick Guide from the Manual
The Utilitech 1500W Ceramic Heater is designed for indoor heating. It features adjustable heat settings, a fan-only mode, and built-in safety mechanisms. Always place the unit on a flat, stable surface at least 3 feet (0.9m) away from combustible materials. Do not use extension cords; plug the unit directly into a wall outlet.
Product Overview
The heater consists of the following main components:
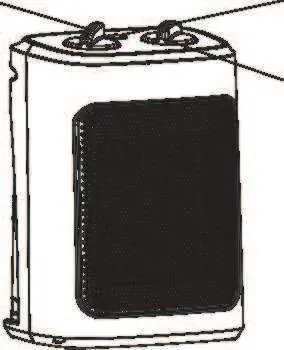
- Thermostat Control (Part A): Used to set and maintain the desired room temperature.
- Power and Setting Control (Part B): Used to select between heat levels or fan-only mode.
- Power indicator light (Part C): Illuminates when the unit is in operation.
Safety Instructions
To prevent fire, electric shock, or injury, observe the following precautions:
- Do not use in bathrooms, laundry areas, or near water.
- Keep the heater away from furniture, pillows, bedding, papers, clothes, and curtains.
- Do not block air intakes or exhaust.
- Do not use on soft surfaces like beds.
- The unit draws 12.5 amps; do not plug into a circuit with other high-wattage appliances.
- If the plug feels warm, it may be due to a loose outlet; contact an electrician.
Operation
Heat Mode Setting
- Turn the Thermostat Control clockwise to the maximum setting to begin.
- Turn the Power and Setting Control to the desired level:
- 1: 700W
- 2: 900W
- 3: 1500W
- The power light will remain illuminated during operation.
Fan Mode Setting
To use the unit as a cooling air circulator without heat, turn the power fan setting control to the fan icon position.
Thermostat Control
Turn the thermostat clockwise to the highest position to start. Once the desired temperature is reached, turn the control counterclockwise until the heater stops. The unit will automatically cycle ON and OFF to maintain the set temperature.
Safety Features
- Thermal Cut-off: Automatically shuts the heater off if it overheats. If this happens, turn off, unplug, remove obstructions, let it cool for a few minutes, and restart.
- Tip-over Switch: Automatically shuts the heater off if it is tipped over. Simply place the unit back in an upright position to resume operation.
Troubleshooting
If the unit shuts down unexpectedly:
- Turn the unit off.
- Unplug the unit and wait 10 minutes.
- Plug it back in and turn it on.
If the heater still fails to operate, check for obstructions, ensure the outlet is working, and verify the unit is plugged in correctly. If issues persist, have the appliance serviced by an authorized electrician.
Cleaning and Maintenance
Clean the heater at least once a month and before off-season storage:
- Turn the heater OFF, unplug it, and allow it to cool.
- Use a dry cloth to clean external surfaces.
- Do not use water, wax, polish, or any chemical solution.
- The motor is factory-lubricated for life and requires no further lubrication.
Manufacturer information
Utilitech
Practical help
Common problems
Heater shuts down unexpectedly
Turn off, unplug, wait 10 minutes for it to cool, remove any obstructions, then plug back in and restart.
Plug feels warm to the touch
This is normal, but if the fit between the outlet and plug is loose, contact an electrician to replace the outlet.
Heater fails to operate
Ensure it is plugged in, the outlet is working, and there are no obstructions. If it still fails, contact an authorized electrician.
Before use
- Place on a flat, stable surface.
- Ensure at least 3 feet (0.9m) of clearance from walls and combustible materials.
- Check that the power cord is not damaged.
- Ensure the heater is plugged directly into a wall outlet (no extension cords or power strips).
Images and diagrams
- Part A: Thermostat Control for temperature adjustment.
- Part B: Power and Setting Control for heat levels and fan mode.
- Part C: Power indicator light.
Model compatibility
- Do not use with extension cords or power strips.
- Not for use in bathrooms, laundry areas, or near water.
- Do not use on cloth surfaces like beds.

Manual page author
David Miller
Documentation analyst
Organizes user manual content into clear summaries, with attention to model details, product context, and everyday usability.