HVAC / Heaters & Fireplaces
User Manual for Utilitech Oil Filled Radiator CYWE08-7
Quick guide for the Utilitech CYWE08-7 oil-filled radiator. Includes assembly instructions, operating settings, safety warnings, and troubleshooting tips.
Table of contents
Manual images
Click an image to enlargeQuick guide from the manual
The Utilitech CYWE08-7 is a portable oil-filled radiator designed for supplementary heating. Before first use, ensure the unit is fully assembled with castors attached. Place the unit on a flat, stable, heat-resistant surface. After assembly, wait at least 3 minutes for the oil to settle before turning the unit on. The heater features three heat settings (600W, 900W, 1500W) and an adjustable thermostat.
Package Contents
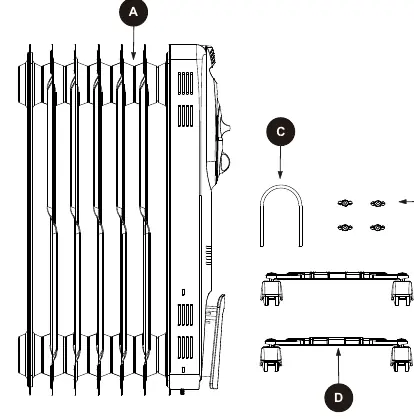
- Radiator Body
- 4 Wing nuts
- 1 U-bolt
- 2 Castor assemblies
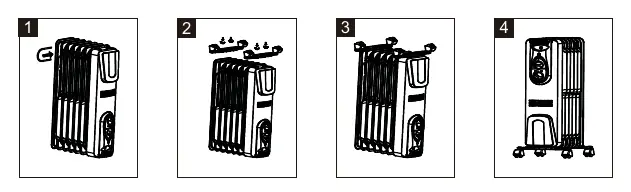
Assembly Instructions
- Place the unit upside down on a flat, stable surface.
- Remove the wing nuts from the U-bolts.
- Attach the castor assembly under the front cover and secure with wing nuts to the U-bolt.
- Attach the U-bolt between the rear two fins and secure the rear castor assembly with wing nuts.
- Set the unit upright and wait at least 3 minutes for the oil to settle before turning on.
Notice: Do not over-tighten the wing nuts.
Operating Instructions
1. Place the unit upright on a flat surface and uncoil the power cord.
2. Turn the thermostat control knob clockwise to its maximum range.
3. Use the Main Control Knob to select the heat setting:
- I: Low heat (600 watts)
- II: Medium heat (900 watts)
- III: High heat (1500 watts)
4. When the desired temperature is reached, slowly turn the thermostat knob back toward MIN until it clicks. The unit will cycle on and off to maintain the temperature.
5. Turn off the product by rotating the Main Control Knob.
Care and Maintenance
- Always unplug the heater and allow it to cool before cleaning.
- Clean with a soft cloth moistened with a mild soap and water solution.
- Do not use abrasive or flammable solvents.
- Dry completely after cleaning.
- Store in a cool, dry location, preferably in the original package.
Troubleshooting
If the heater does not power on, ensure it is plugged into a 120V outlet, check the breaker/fuse, or allow the thermal cut-off to reset by unplugging for 30 minutes. If the power light is on but there is no heat, adjust the thermostat to a higher setting or wait 20 minutes for the oil to heat up. Cracking sounds during initial use are normal and should stop after 15 minutes.
Safety Information
- Keep combustible materials (furniture, curtains, etc.) at least 3 feet (0.9 m) away from the heater.
- Do not use in bathrooms, laundry areas, or near water.
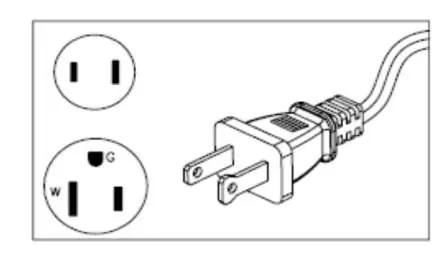
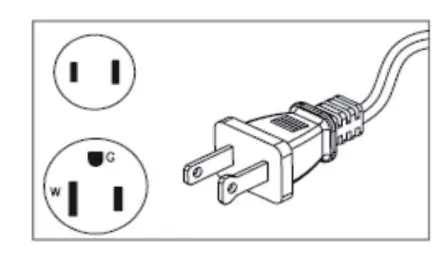
- Always plug directly into a wall outlet; do not use extension cords or power strips.
- Do not operate continuously; this is a supplementary heat source.
- Do not block air intakes or exhaust.
Manufacturer information
Utilitech
Practical help
Common problems
Heater will not power on
Check if the thermal cut-off was activated (unplug for 30 mins), ensure it is plugged into a 120V outlet, or check your home circuit breaker.
Power light is on, but no heat
Adjust the thermostat control knob to a higher setting or wait 20 minutes for the oil fins to warm up.
Burning smell
Ensure no combustible materials are within 3 feet (0.9m) of the heater and remove any items adjacent to the unit.
Cracking sound
This is normal as the oil heats up inside the fins. It should stop after approximately 15 minutes of operation.
Before use
- Verify all parts (radiator, castors, U-bolts, wing nuts) are present.
- Assemble castors before plugging in the unit.
- Place on a flat, stable, heat-resistant surface.
- Ensure no combustible materials are within 3 feet (0.9m).
- Wait at least 3 minutes after setting the unit upright before turning it on.
Specs in practice
- Heat Settings
- I (600W), II (900W), III (1500W)
Images and diagrams
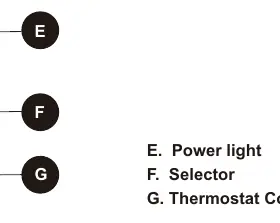
- Figure 1 identifies the Power light, Selector knob, and Thermostat Control knob.
- Assembly diagrams illustrate the upside-down position for attaching castor assemblies to the front and rear of the radiator.
Model compatibility
- For indoor use only.
- Do not use with extension cords or relocatable power taps.
- Not intended for use in bathrooms, laundry areas, or near water.
- Not intended as a primary heat source.

Manual page author
David Miller
Documentation analyst
Organizes user manual content into clear summaries, with attention to model details, product context, and everyday usability.