Furniture / Bathroom Furniture
Installation and Care Guide for allen + roth 48-In Vanity with Top 1483VA-48-201
Complete installation and maintenance guide for the allen + roth 48-inch vanity (model 1483VA-48-201). Includes step-by-step assembly, leveling, sink installation, and care instructions.
Table of contents
Manual images
Click an image to enlargeQuick Guide from the Manual
This vanity requires two adults for assembly. The estimated installation time is 45 minutes, plus 24 hours for silicone caulk to dry. The vanity must be secured to the wall for stability. Do not attempt to pry the top off the vanity, as this may cause damage.
Package Contents
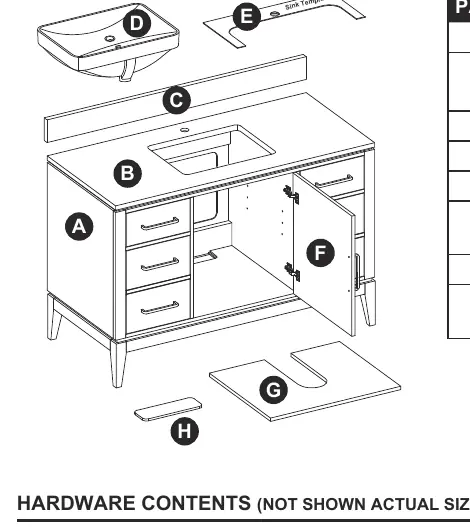
- Vanity (A)
- Top (B)
- Backsplash (C)
- Sink (D)
- Sink Template (E)
- Door (F)
- Shelf (G)
- Floor Plumbing Cutout Lid (H)
- Hardware: Touch Up Pen (AA), Handles (BB), Shelf Pins (CC)
Preparation and Tools
Before beginning, ensure all parts are present. If any part is missing or damaged, do not attempt to assemble.
Tools Required (not included): Phillips screwdriver, utility knife or scissors, silicone caulk, power drill with drill bit.
Helpful Tools (not included): Measuring tape, level.
Installation Instructions
1. Remove Top: Remove the top (B) from the vanity (A). Place the top (B) and backsplash (C) face down on a scratch-free surface.
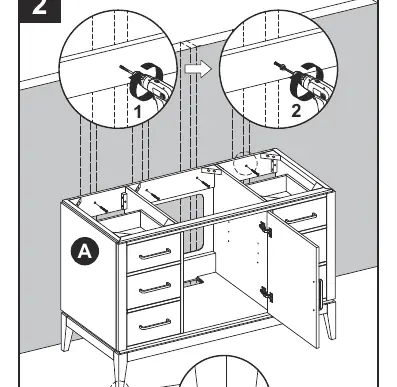
2. Level and Secure: Place the vanity (A) against the wall. Use the pre-assembled levelers on the bottom of each leg to level the item. Once level, drill a hole through the vanity mounting area into the wall studs and secure the vanity (A) to the wall.
3. Install Top: Apply stain-free silicone caulk to the top edge of the vanity (A). With the help of another adult, gently lower the top (B) onto the vanity (A). Wipe away excess caulk and wait 24 hours for it to dry.
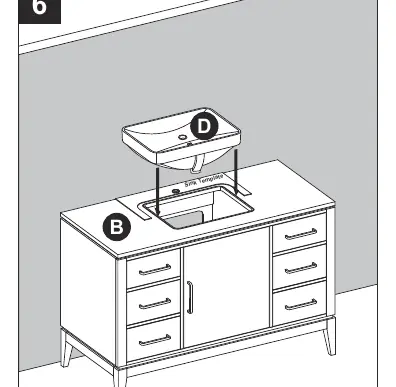
4. Sink Installation: Place the sink template (E) on the top (B), aligning the hole with the stone top. Apply a thin bead of silicone caulk near the edge of the sink cutout. Lower the sink (D) onto the stone top, ensuring the overflow hole is at the front.
5. Backsplash: Apply silicone caulk to the unpolished side and bottom of the backsplash (C). Position it on the top (B) against the wall.
6. Plumbing and Shelving: If plumbing comes out of the back wall, insert the floor plumbing cutout lid (H) to close the hole. Insert shelf pins (CC) at the desired height and place the shelf (G) on top.
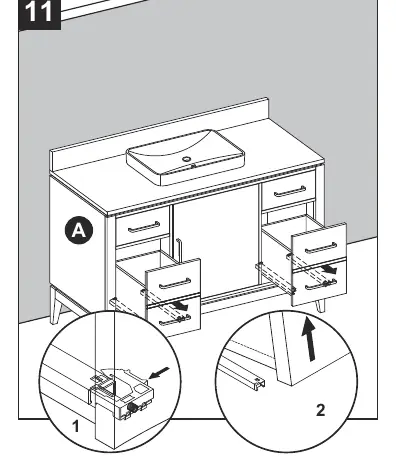
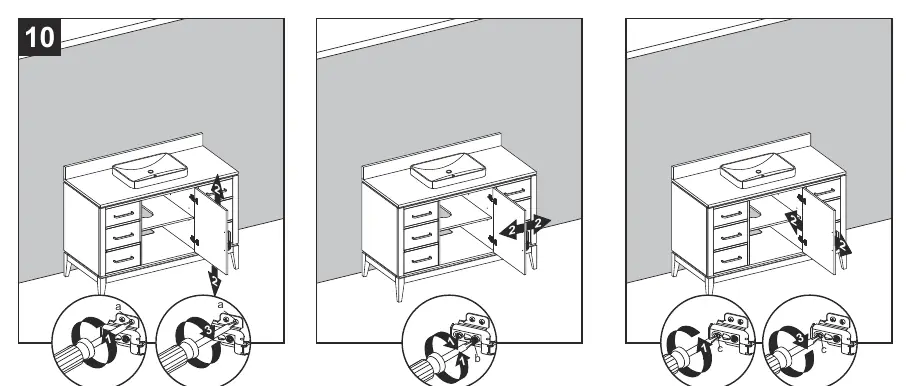
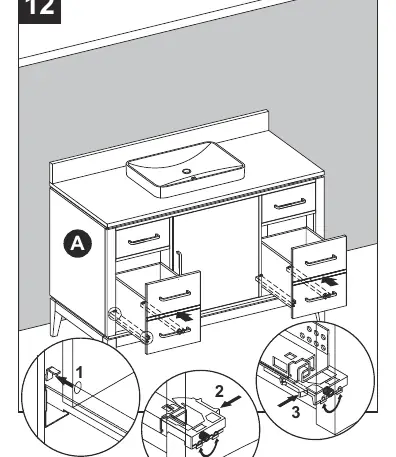
7. Adjustments: Doors can be adjusted for height (screws a), side-to-side (screws b), and depth (screws c). Drawers can be removed by extending them and pushing the plastic levers on the metal glide tracks.
Care and Maintenance
- Dust regularly with a soft, non-lint cloth.
- Clean with a gentle, non-abrasive household cleaner.
- Dry wood immediately after cleaning.
- Use standard marble cleaning agents for the stone top.
- Important: Do not use products containing acetone, lemon, vinegar, or other acids on the stone top.
- Use a soap dish or coaster to protect the stone surface from soap or fragranced products.
Warranty
The manufacturer warrants this item against defects in materials and workmanship for one (1) year from the date of original retail purchase. This warranty does not cover damage caused by accident, misuse, improper installation, or the use of improper cleaning agents.
Practical help
Common problems
Drawer not sliding smoothly
Do not force the drawer. Remove it and try again from the start to ensure it is properly seated on the glides.
Stone top damaged
Do not use cleaners containing acetone, lemon, vinegar, or other acids. Use only stone-safe cleaning agents.
Vanity unstable
Ensure the vanity is secured to wall studs and that the levelers on the legs are adjusted correctly.
Before use
- Verify all parts are present against the package contents list.
- Ensure you have two adults available for assembly steps.
- Prepare required tools: Phillips screwdriver, utility knife, silicone caulk, power drill.
- Clean the area where the vanity will be permanently located.
- Ensure the vanity will not interfere with water supply and drain lines.
Specs in practice
- Estimated Installation Time
- 45 minutes, plus 24 hours for silicone caulk to dry.
Images and diagrams
- Step 2 illustrates using the leg levelers and securing the vanity to wall studs.
- Step 10 shows how to adjust door hinges for height, side-to-side, and depth.
- Step 11 and 12 explain how to remove and reinstall drawers using the plastic levers on the glide tracks.
Model compatibility
- Vanity must be secured to wall studs for stability.
- Faucet and drain kit are not included.
- Stone tops vary in shade and pattern; this is an inherent characteristic.

Manual page author
David Miller
Documentation analyst
Organizes user manual content into clear summaries, with attention to model details, product context, and everyday usability.