Furniture / Bathroom Furniture
User Manual for Better Bathrooms Wall Hung Storage Unit
Quick guide for installing and maintaining your Better Bathrooms wall-hung storage unit. Includes weight limits, hinge adjustment steps, drawer removal instructions, and care guidelines.
Table of contents
Manual images
Click an image to enlargeImportant Information
Before installing your Better Bathrooms storage unit, please read the following guidelines. This product is water-resistant but not waterproof. Any spillages or splashes, including water, must be wiped dry immediately to prevent damage and invalidation of guarantees.
Maximum Weight Limits:
- 600-800mm cabinet: 100kg
- 1200mm cabinet: 120kg
- Tall cabinet: 120kg
- Shelf only: 50kg
We recommend using professional tradespeople for installation. Multi-person assembly is required.
Installation
Wall Hung Unit: Measure the distance (L) between brackets on the unit and the desired height (H). The standard height is 850mm from the floor to the wash basin. Ensure the unit is secured to the wall using suitable fixings. If cutting out for services, all raw edges must be sealed against water ingress.
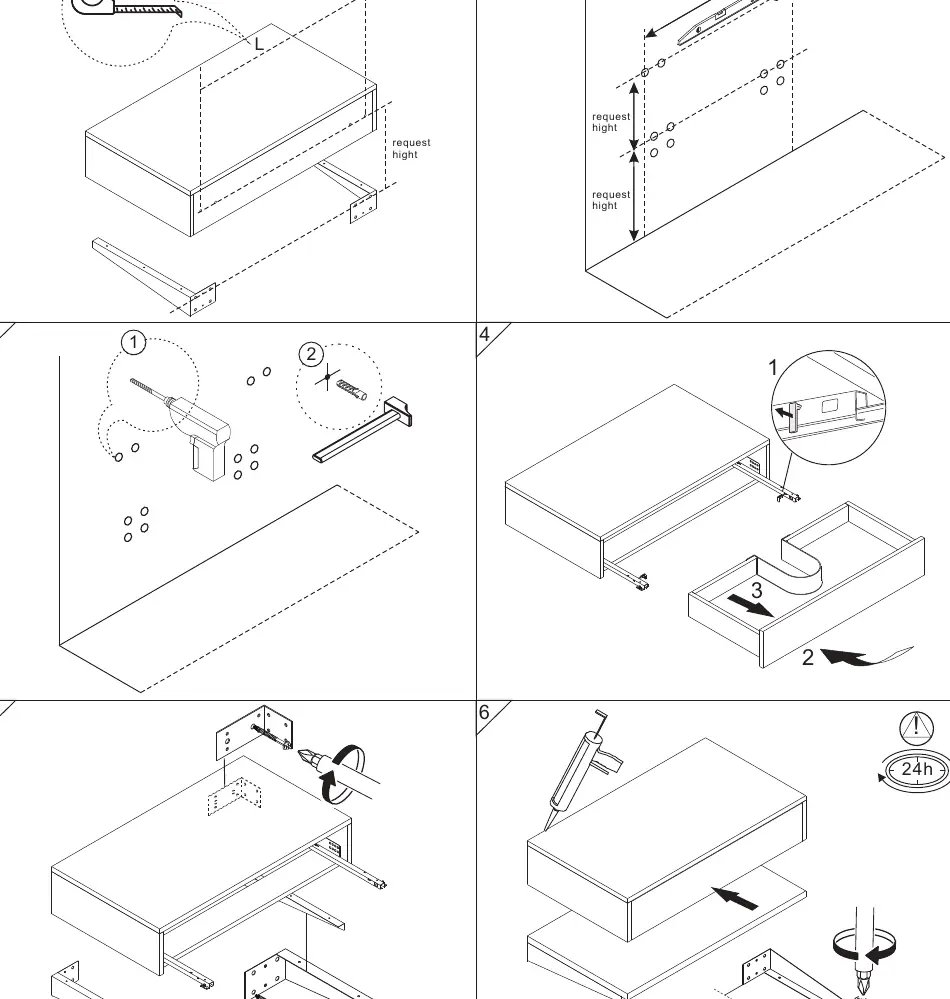
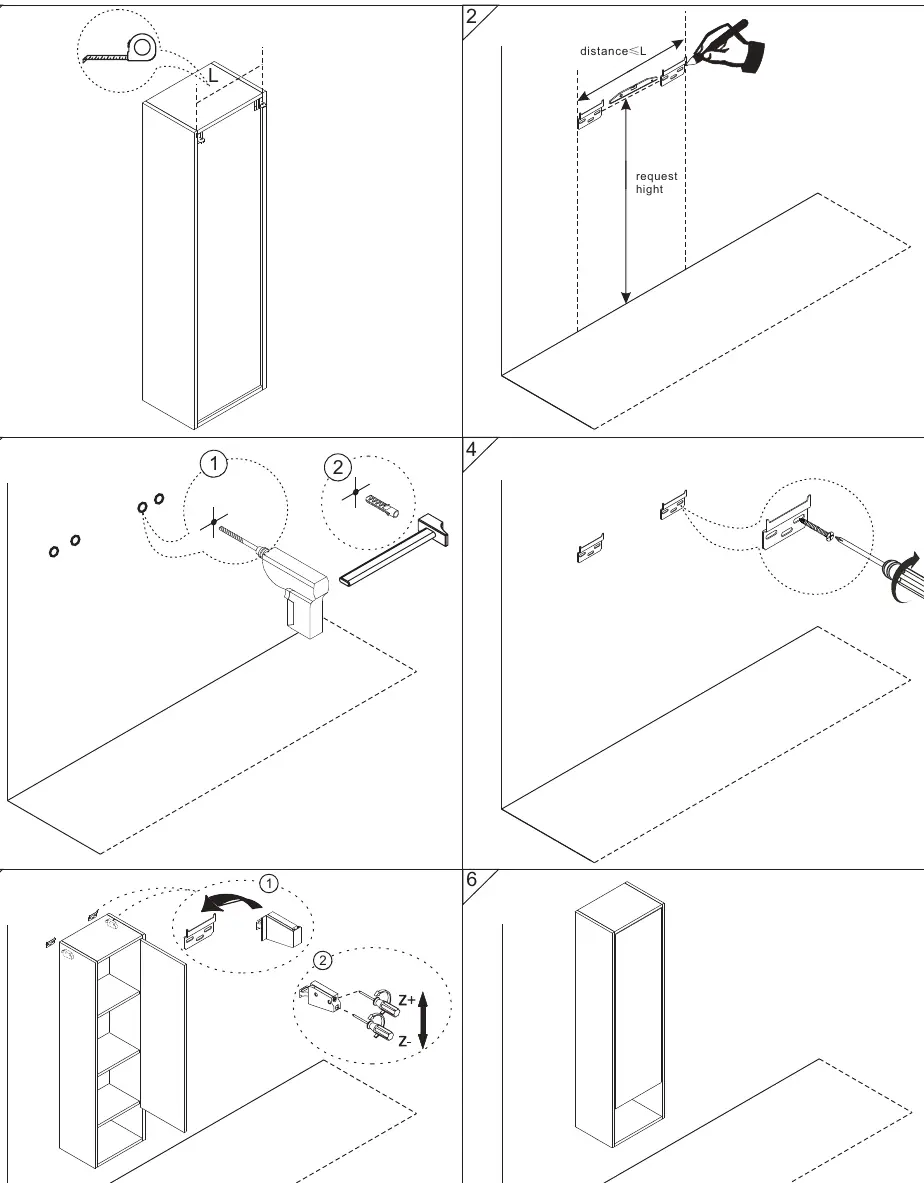
Mirror Cabinet and Storage Unit: Measure the L and H distance between pre-drilled holes. The distance from the mirror cabinet to the basin should be 300-400mm. The distance from the floor to the bottom of the storage unit is at the customer's discretion.
Hinge Adjustment
If doors are misaligned, use the following adjustments:
- Vertical: Loosen screw 'A' on all hinges, adjust the door, and retighten.
- Lateral: Loosen screw 'B', adjust the door, and retighten.
- Horizontal: Loosen screw 'B' by 1/2 turn. Turn screw 'C' until the door is positioned correctly, then retighten screw 'B'.
Drawer Removal and Installation
To Remove: Follow step 'A' to pull out/lock, then remove the fastener and follow step 'B'.
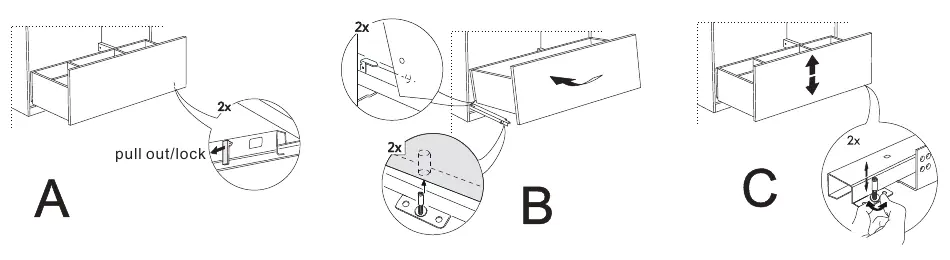
To Install: Follow step 'B' and then follow step 'A' to lock the fastener.
Adjustment: If the drawer position needs altering, use step 'C' to adjust the screw.
Care and Maintenance
To maintain the beauty of your bathroom furniture:
- General Cleaning: Use a soft, damp cloth with warm soapy water. Dry the unit with a cloth after use.
- Avoid: Do not use abrasive cleaning agents, bleaches, scouring pads, or multi-surface cleaners. Avoid hot soapy water on melamine/vinyl/foil doors.
- Protection: Avoid excessive changes in temperature and humidity. Ensure adequate ventilation.
Manufacturer information
Better Bathrooms
Practical help
Common problems
Door is misaligned
Use hinge adjustment screws: A for vertical, B for lateral, and C for horizontal alignment.
Water damage on surfaces
Wipe all spills and splashes immediately. The unit is water-resistant, not waterproof.
Drawer not sliding or sitting correctly
Check the fastener lock (Step A) and adjust the drawer position using screw C.
Before use
- Verify all parts are present.
- Ensure you have a helper for assembly.
- Check wall type to select appropriate fixings.
- Measure distances (L and H) before drilling.
- Ensure all raw edges are sealed if cut for services.
Images and diagrams
- Hinge adjustment: A (Vertical), B (Lateral), C (Horizontal).
- Drawer removal: Use fastener to unlock and remove.
Model compatibility
- Product is water-resistant, not waterproof.
- Professional installation recommended.
- Fixings for wall mounting are included but must be suitable for your wall type.

Manual page author
David Miller
Documentation analyst
Organizes user manual content into clear summaries, with attention to model details, product context, and everyday usability.