Furniture / Bathroom Furniture
User Manual for Better Bathrooms Kobe/Cali Vanity Unit
Quick guide for the Better Bathrooms Kobe and Cali wall-hung vanity units. Includes installation steps, weight limits, technical drawings, and maintenance instructions.
Table of contents
Manual images
Click an image to enlargeQuick Guide from the Manual
This manual provides installation and maintenance instructions for the Better Bathrooms Kobe and Cali wall-hung vanity units. Please note that the installation requires three-person assembly. Always check for cables and pipes before drilling into walls. The provided screws and plugs are suitable for solid walls only; if installing on other wall types, you must use appropriate fixings. The room must be well-ventilated, and the unit should be wiped dry to remove splashes and standing water.
Component Listing
- Basin & Vanity Unit
- Waste
- Expansion bolts & Expansion screws (6 sets for 1200mm and 1400mm models)
Installation Instructions
1. Preparation: Open the package and remove the product. Ensure you have all necessary tools: silicone adhesive, spirit level, tape measure, power drill, and a screwdriver.


2. Mounting: Check the levelness of the wall and confirm the installation location. Use a spirit level to ensure the installation holes are aligned. Use an electric drill to make holes, insert the expansion bolts, and fix the bathroom cabinet to the wall using the provided screws.
3. Finishing: Install the waste into the basin. Apply sealant to the edges along the wall to prevent water ingress. Allow the sealant to stand for 24 hours before using the unit.
Maintenance, Care & Cleaning
For regular cleaning of both glossy and matte finishes, use widely available cleaning products. For matte finishes, a mildly abrasive product may be used occasionally. Wipe the surface with a soft cloth after each use.
Repairing Stubborn Stains and Scratches:
- Use water to remove dirt and dust.
- Sand lightly in small circular motions using 800 grit sandpaper.
- Follow with 1200 grit sandpaper, sanding lightly until smooth.
- Dry with a towel.
- For glossy finishes, polish with a cloth and an automotive polishing compound (e.g., 3M Extra Cut Compound).
Technical Specifications
The unit has specific weight limitations that must be observed to prevent damage:
- Bathroom cabinet weight limit: 50kg
- Drawer weight limit: 20kg
Manufacturer information
Better Bathrooms
Practical help
Common problems
Stubborn stains, scratches, or scuffs
Clean with water, then sand lightly with 800 grit followed by 1200 grit sandpaper. Polish glossy surfaces with automotive compound.
Wall mounting failure
Ensure the wall structure is strong enough to hold the unit. Use appropriate fixings for your specific wall type; provided screws are for solid walls only.
Before use
- Check for cables and pipes before drilling.
- Ensure the wall structure is strong enough to hold the product.
- Use appropriate fixings for your wall type (provided screws are for solid walls only).
- Ensure the room is well-ventilated.
- Prepare tools: silicone adhesive, spirit level, tape measure, power drill, screwdriver.
- Arrange for three-person assembly.
Specs in practice
- Cabinet weight limit
- 50kg maximum load.
- Drawer weight limit
- 20kg maximum load.
- Sealant curing time
- Leave to stand for 24 hours before use.
Images and diagrams
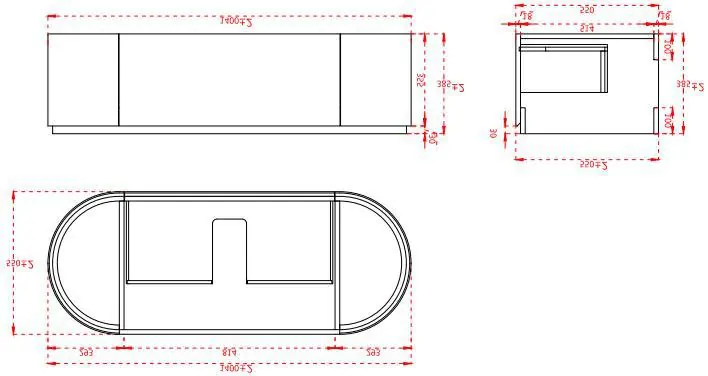
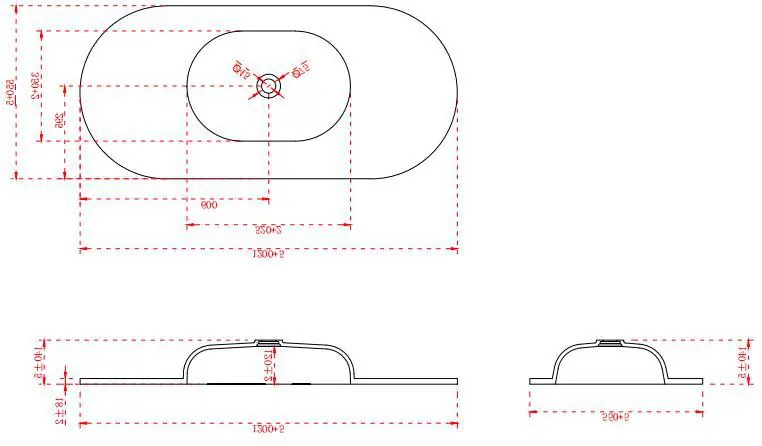
- Technical drawings provide precise dimensions for the 1200mm and 1400mm models.
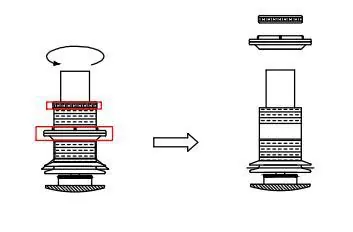
- Installation diagrams illustrate the waste assembly and the wall fixing process.
Model compatibility
- Provided screws and plugs are for solid walls only.
- Waste pipe is not supplied.

Manual page author
Michael Turner
Technical manual editor
Reviews PDF manuals for structure, safety notes, and practical product details so readers can find the right information quickly.