Electronics / Projectors
User Manual for Vankyo Leisure 470 Pro Projector
Get started with your Vankyo Leisure 470 Pro projector. This guide covers setup, screen mirroring for iOS and Android, connection options, image adjustments, and troubleshooting.
Table of contents
Manual images
Click an image to enlargeQuick Start Guide
Follow these steps to set up your projector:

- Plug the power cord into an outlet.
- Remove the lens cover.
- Connect your device (USB, TF card, HDMI, or AV) to the projector.
- Press the Power Button to turn on the projector.
- Select the correct input source by pressing the input button.
- Adjust the kickstand, keystone, and focus ring for the best image performance.
- Press the Power Button twice to turn off the projector.
What's Included
- Projector
- Remote (batteries not included)
- User Manual
- HD Cable
- Power Cable
- Carrying Bag
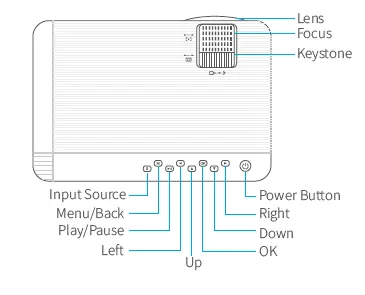
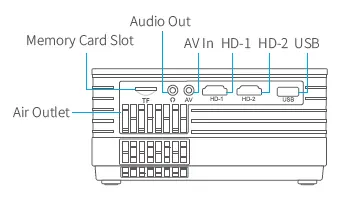
Product Overview
The projector features a lens, focus ring, and keystone ring on the top. The control panel includes buttons for Input Source, Menu/Back, Play/Pause, Left, Up, Down, Right, OK, and Power. The rear panel contains ports for TF card, Audio Out, AV In, two HDMI ports, and a USB port.
Connections
The projector supports various input sources:
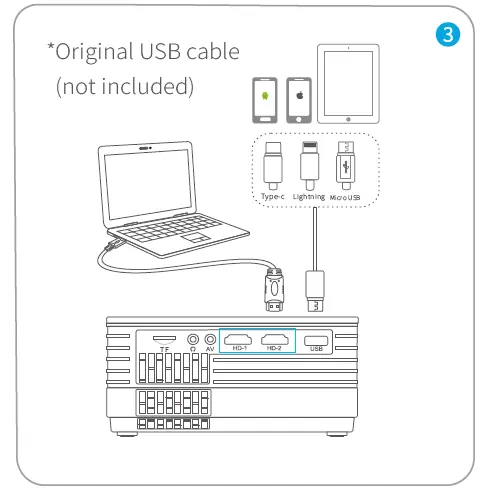
- USB Connection: Connect a USB drive to the USB port.
- TF Card Connection: Insert a TF card into the TF card slot.
- HD Connection: Connect devices with an HDMI output port to the HD-1 or HD-2 ports.
- AV Connection: Use an AV cable to connect devices with composite video output.
Screen Mirroring
For iOS System:
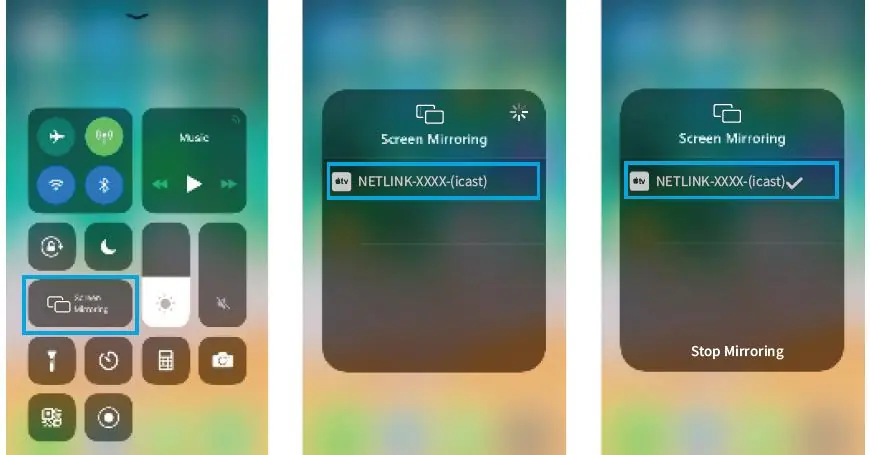
- Wireless: Connect the projector and your iOS device to the same Wi-Fi network, or connect the iOS device to the projector's AP hotspot. Select "iOS Cast" on the projector's homepage, then use the Screen Mirroring feature on your iOS device to select "NETLINK-XXXX-(icast)".
- Wired: Select "iOS Cable" on the homepage. Connect your iOS device to the projector's USB port using an original Lightning cable. Tap "Trust" on your iOS device when prompted.
For Android System:
- Ensure your Android device supports Multi-screen/Smart View/Wireless Display.
- Select "Miracast" on the projector's homepage.
- Enable Wi-Fi on your Android device, access display settings or screen mirroring, and select the "NETLINK-XXXX" receiver.
Settings
Press the Menu button to access Picture, Sound, and Option settings. You can adjust Contrast, Brightness, Color, Tint, Sharpness, Treble, Bass, and Aspect Ratio. Use the homepage settings to configure Wi-Fi, language, factory reset, projection mode, and image size.
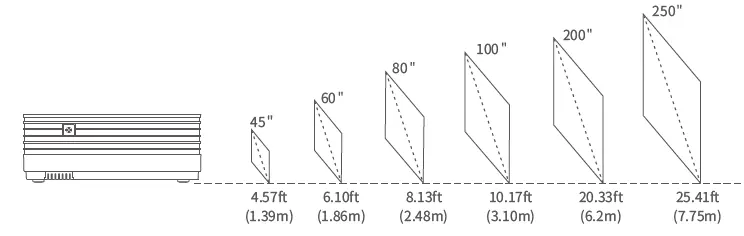
Projection Distance and Size
The recommended projection distance varies based on content. Adjust the distance between the projector and the wall/screen to achieve the desired image size (ranging from 45" to 250"). Ambient darkness improves image clarity.
Troubleshooting
- Cannot mirror Hulu/Netflix: Due to copyright restrictions, these services cannot be mirrored. Use a Fire TV stick, Roku stick, or Chromecast connected to the HDMI port.
- Blurry Image: Adjust the focus ring and keystone. Ensure the projector is at an effective distance from the wall.
- Remote Unresponsive: Point the remote directly at the IR receiver, ensure it is not covered, and replace the AAA batteries.
- Upside Down Image: Go to Settings > Projection Setting > Projection Mode to flip the image.
- Factory Reset: Go to Settings > System Setting > Restore Factory Default.
Specifications
- Display Technology: LCD
- Light Source: LED
- Resolution: Native 1920 x 1080
- Power Supply: AC 100-240 V, 50/60 Hz
- Ports: 2x HDMI, 1x USB, 1x Audio Out, 1x Memory Card Slot
- Mounting: 1/4'' screw thread
Practical help
Common problems
Hulu, Netflix, or similar services cannot be mirrored.
Due to copyright restrictions, these apps cannot be mirrored. Please use a Fire TV stick, Roku stick, or Chromecast connected to the projector's HDMI port.
Blurry image.
Adjust the focus ring and keystone ring. Ensure the projector is placed at an effective distance from the wall or screen.
Remote control is unresponsive.
Ensure the remote is pointed directly at the IR receiver and that the receiver is not obstructed. Replace the old AAA batteries with new ones.
Image is upside down.
Navigate to Settings > Projection Setting > Projection Mode to flip the image.
Before use
- Remove the lens cover.
- Ensure the projector is placed on a stable surface at an effective distance.
- Check that the remote has fresh AAA batteries.
- For wireless mirroring, ensure your mobile device is on the same Wi-Fi network as the projector.
- Ensure the power cable is securely connected.
Specs in practice
- Mounting Screws
- 1/4'' thread size, compatible with standard tripods or ceiling mounts.
- Power Supply
- AC 100-240 V, 50/60 Hz, suitable for standard electrical outlets.
Images and diagrams
- The top of the projector features a focus ring and a keystone ring for image adjustment.
- The rear panel includes ports for TF cards, Audio Out, AV, two HDMI inputs, and a USB port.
Model compatibility
- Supports iOS and Android screen mirroring.
- Compatible with various video formats including MP4, MKV, MOV, AVI, FLV, RMVB, 3GP, MPEG, H.264, and XVID.

Manual page author
Michael Turner
Technical manual editor
Reviews PDF manuals for structure, safety notes, and practical product details so readers can find the right information quickly.