Electronics / Projectors
User Manual for Vankyo Miracle 110 Portable Projector
Quick guide for the Vankyo Miracle 110 portable projector. Learn how to set up, connect devices, adjust focus, and troubleshoot common issues with this easy-to-follow manual.
Table of contents
Manual images
Click an image to enlargeQuick Start Guide
Follow these steps to set up your Vankyo Miracle 110 projector:
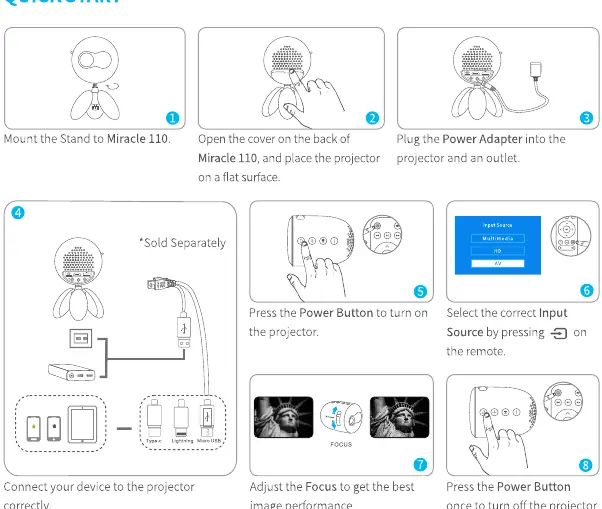
- Mounting: Attach the provided stand to the projector.
- Placement: Open the cover on the back of the unit and place the projector on a flat surface.
- Power: Connect the power adapter to the projector and plug it into an outlet.
- Power On: Press the Power Button to turn on the device.
- Input Selection: Press the Input Source button on the remote to select the correct source (Multimedia, HD, or AV).
- Focus: Adjust the focus ring to achieve the best image clarity.
- Power Off: Press the Power Button once to turn off the projector.
Function Overview
The projector features a focus ring on the top, and a control panel with Power, Volume+, Volume-, and Play/Pause buttons. The rear panel contains the HD port, USB port, Memory Card Slot, AV In, Audio Out, and Power Input. The remote control provides full navigation, including menu access, input source selection, and playback controls.
Input Sources
The projector supports multiple connection types:
- Multimedia Connection: Insert a USB drive or memory card directly into the designated slots.
- HD Connection: Connect devices like laptops or TV boxes using an HD cable.
- AV Connection: Use the provided AV cable to connect compatible media players.
Note for Mobile Devices: For iOS devices, use a genuine Lightning to HD cable. For Android devices, use a Micro USB to HD adapter or a Type C to HD adapter.
Projection Distance and Size
The projection size depends on the distance from the screen:
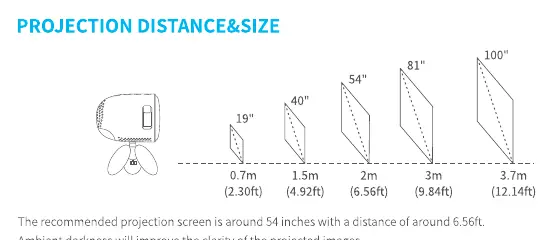
- 0.7m (2.30ft): ~19 inches
- 1.5m (4.92ft): ~40 inches
- 2m (6.56ft): ~54 inches
- 3m (9.84ft): ~81 inches
- 3.7m (12.14ft): ~100 inches
The recommended projection size is approximately 54 inches at a distance of 6.56ft. Ambient darkness will improve image clarity.
Troubleshooting
- Blurry Image: Adjust the focus ring and ensure the projector is within an effective distance from the wall/screen.
- Remote Unresponsive: Ensure the remote is pointed directly at the IR receiver, do not cover the receiver, and try replacing the AAA batteries.
- Up Side Down Image: Navigate to Menu > Picture Setting > Projection Mode to flip the image.
- Factory Reset: If needed, go to Menu > System Setting > Factory Reset.
Specifications
- Display Technology: LCD
- Light Source: LED
- Native Resolution: 480x272
- Power Supply: DC 12V/2.5A
- Supported Video Formats: AVI, MP4, MKV, FLV, MOV, RMVB, 3GP, MPG, VOB, RM
- Supported Audio Formats: AAC, MP3, FLAC, WMA, OGG, APE
Practical help
Common problems
Blurry image
Adjust the focus ring and ensure the projector is at an effective distance from the screen.
Remote not working
Point the remote directly at the IR receiver, ensure the receiver is not blocked, and replace the AAA batteries.
Image is upside down
Go to Menu > Picture Setting > Projection Mode to flip the image.
Mobile device not connecting
Ensure you are using a genuine Lightning to HD cable (iOS) or a compatible Micro USB/Type C to HD adapter (Android).
Before use
- Mount the stand to the projector.
- Place the projector on a flat surface.
- Connect the power adapter to the projector and a power outlet.
- Select the correct input source using the remote.
- Adjust the focus ring for image clarity.
Specs in practice
- Native Resolution
- 480x272 pixels; the physical resolution of the projector's display panel.
- Power Supply
- Requires DC 12V/2.5A input.
- Mounting Screw
- Uses a standard 1/4 inch screw for tripod or ceiling mount.
Images and diagrams
- The Function Overview diagram identifies the location of the focus ring, control buttons, and all input/output ports.
- The Quick Start diagram illustrates the 8-step process from mounting to powering off.
- The Projection Distance & Size diagram provides a visual reference for screen size based on distance.
Model compatibility
- Supports iOS devices via genuine Lightning to HD cable.
- Supports Android devices via Micro USB to HD adapter or Type C to HD cable.
- Supports various media formats including AVI, MP4, MKV, FLV, MOV, RMVB, 3GP, MPG, VOB, RM.

Manual page author
Emily Carter
User documentation editor
Prepares concise manual descriptions and highlights the most useful setup, operation, and maintenance information for readers.