Electronics / Projectors
User Manual for JMGO PicoFlix Projector
Quick guide for the JMGO PicoFlix projector. Includes setup, remote control pairing, charging instructions, projection distance guidelines, and safety information.
Table of contents
Manual images
Click an image to enlargeQuick guide from the manual
This guide provides essential information for setting up and operating your JMGO PicoFlix projector. Before first use, ensure the device is fully charged using the included power adapter. Always follow the safety instructions provided to prevent damage to the device or injury.
Package Contents
- Projector Body
- Remote Control
- 2 x AAA Batteries
- Power Adapter
- User Guide
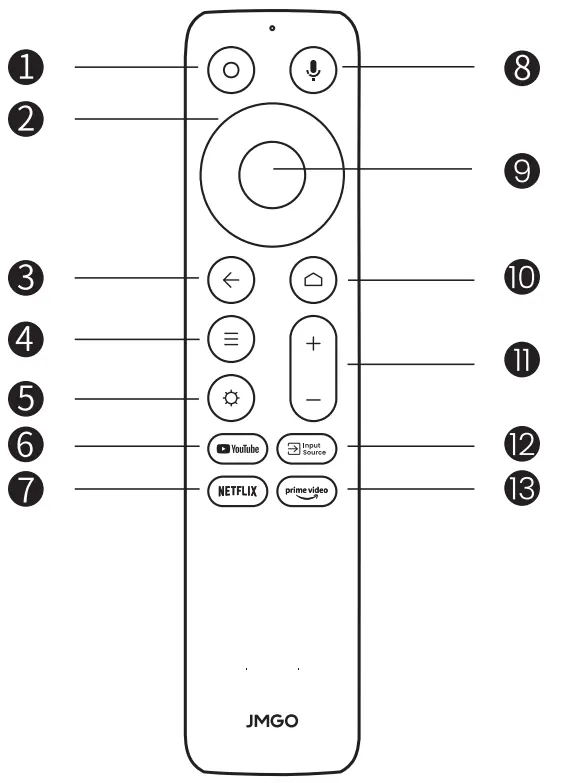
Remote Control
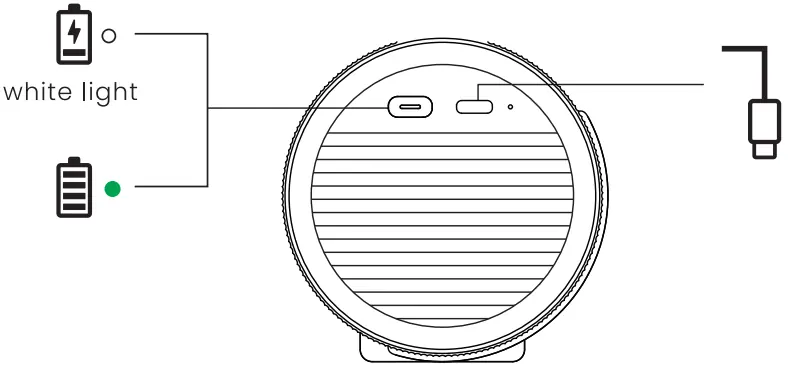
The remote control allows you to navigate the projector's interface and control media playback. To set up the remote, slide down the back cover and insert two AAA batteries, ensuring the correct polarity (+/-). To pair the remote via Bluetooth, turn on the projector and press and hold the Return and Home buttons simultaneously for 3 seconds.
Charging and Power
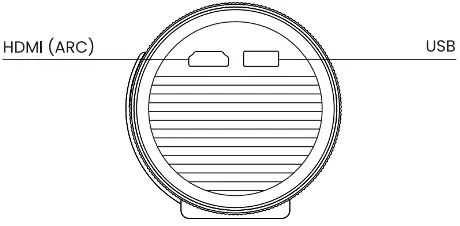
Before using the projector for the first time, connect the included power adapter to the Type-C power port to fully charge the device. The projector features a physical power button for turning the device on or off with a brief press. The device includes a Type-C power port, HDMI (ARC) port, and a USB port for connectivity.
Projection Size and Distance
The projector supports various projection sizes depending on the distance from the wall or screen:
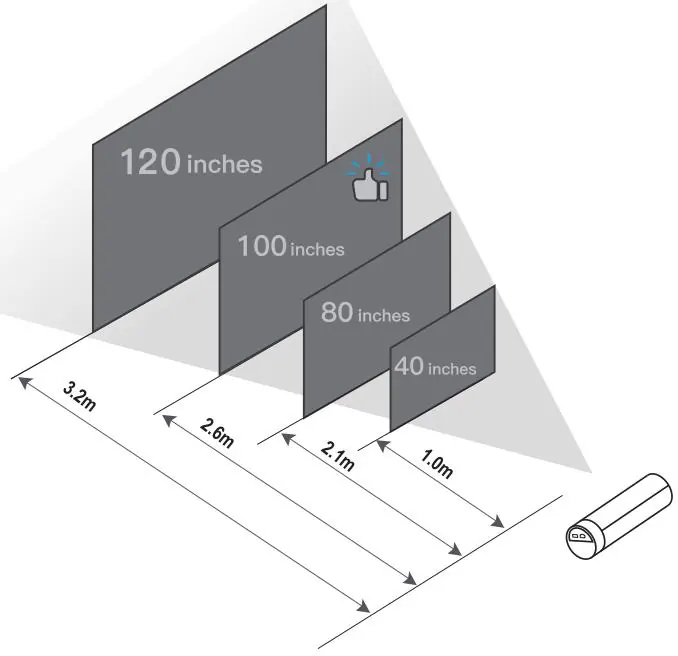
- 1.0m distance: 40 inches
- 2.1m distance: 80 inches
- 2.6m distance: 100 inches
- 3.2m distance: 120 inches
Safety and Warnings
Please adhere to the following safety guidelines:
- Do not look directly into the light lens, as the strong laser may damage your eyes.
- Do not block the projection lens while the device is in operation.
- Do not attempt to disassemble the device without authorization.
- The device contains a built-in battery; do not expose it to fire, high temperatures, or water.
- Operating temperature range is 0°C to 35°C.
- The device is restricted to indoor use when operating in the 5150-5250 MHz frequency range.
Technical Specifications
The provided power adapter has an input of 100-240 V, 50/60 Hz, 1.5 A and an output of 20 V, 3.5 A (65 W).
Practical help
Common problems
Projector will not turn on
Ensure the device is fully charged using the included power adapter.
Remote control not responding
Check that batteries are installed correctly. Re-pair by holding the Return and Home buttons for 3 seconds.
Lens obstruction
Ensure the projection lens is not blocked by any objects during operation.
Before use
- Charge the projector fully using the included adapter.
- Install 2 AAA batteries into the remote control.
- Ensure the projection lens is clear of obstructions.
- Position the projector at the appropriate distance for your desired screen size (1.0m to 3.2m).
Specs in practice
- Adapter Input
- 100-240 V, 50/60 Hz, 1.5 A
- Adapter Output
- 20 V, 3.5 A, 65 W
- Operating Temperature
- 0°C to 35°C
Images and diagrams
- Remote control buttons 1-13 control power, navigation, volume, and input sources.
- The projector features a Type-C power port, HDMI (ARC), and USB port.
Model compatibility
- Indoor use only when operating in the 5150-5250 MHz frequency range.

Manual page author
Emily Carter
User documentation editor
Prepares concise manual descriptions and highlights the most useful setup, operation, and maintenance information for readers.