Garden / Pool Equipment
User Manual for Vevor Above Ground Pool Liners
Quick guide for installing and maintaining Vevor above-ground pool liners. Includes assembly steps, installation methods (Overlap, Beaded, J-Hook, UniBead), and safety precautions.
Table of contents
Manual images
Click an image to enlargeQuick Guide from the Manual
This manual provides instructions for installing Vevor above-ground pool liners. Key safety points include: never dive into the pool, do not sit or stand on the liner, and keep children away. Always inspect the liner for damage before use. Ensure the assembly area is clean, well-lit, and that you wear safety goggles and gloves during installation.
Assembly Steps

- Clear the area of all grass, rocks, and roots, extending 1 foot beyond the pool perimeter.
- Level the surface and spread a 2-inch layer of fine mason sand.
- Form a 6x6 inch cove by compacting sand against the wall.
- Unfold the liner in the sun to warm it up.
- Arrange the liner so welded seams are centered.
- Lift sides, drape over the wall, and fasten using the appropriate coping or bead method.
- Start filling the pool with water to about 1/2 inch, then smooth out wrinkles on the floor.
- Fill to within 3 inches of outlets before cutting in return fittings and the skimmer.
Installation Methods
There are four primary ways to install the liner depending on your pool type:
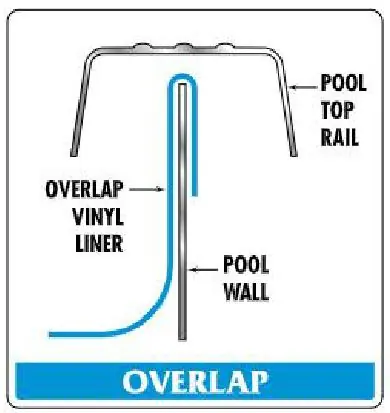
- Overlap: The most common installation for pools with 48-52 inch wall heights.
- Beaded/Hung: Simplifies replacement without disassembling the pool and ensures proper alignment.
- J-Hook: Requires a specific J-Hook top rail.
- UniBead: A versatile option that can be used as either a J-Hook or Beaded/Hung liner.
Maintenance and Notes
Slight wrinkles are normal and do not affect the warranty. Use a soft bristle brush to smooth them out while filling. Do not attempt to pull excess material over the side. The liner is not structural; it is designed to hold water. Proper winterization with covers and pillows is recommended. Do not empty the pool in cold weather, and do not leave the liner without water in the sun as vinyl will shrink.
Manufacturer information
VEVOR
Practical help
Common problems
Wrinkles on the pool floor
Smooth out wrinkles with a soft bristle brush while filling the pool with water. Do not try to eliminate them by pulling excess material over the side.
Air pockets forming
This is normal as the water level rises; continue filling.
Grass or weeds growing through the liner
Ensure all grass, rocks, and roots are removed from the pool area plus 1 foot beyond the perimeter before installation.
Before use
- Clear the assembly area of all grass, rocks, and roots.
- Ensure the surface is level.
- Spread a 2-inch layer of fine mason sand.
- Warm the liner in the sun before installation.
- Inspect the liner for any loose or damaged parts before every use.
- Attach 'DO NOT DIVE' stickers to the liner two inches above the water level.
Images and diagrams
- Assembly Diagram: Shows the pool wall, sand cove, and 2-inch smooth sand bottom.
- Installation Methods: Visual guides for Overlap, Beaded, J-Hook, and UniBead connections.
Model compatibility
- UniBead liners can be used in place of a 52-inch Overlap liner.
- Beaded liners are suitable for pools with wall heights from 48 to 52 inches.

Manual page author
Michael Turner
Technical manual editor
Reviews PDF manuals for structure, safety notes, and practical product details so readers can find the right information quickly.