Garden / Pool Equipment
Hayward EcoStar VS Pump 1B-ESP2300HVS Owner's Manual
Comprehensive owner's manual for the Hayward EcoStar Variable Speed Pump (1B-ESP2300HVS). Includes detailed instructions for installation, configuration, operation, maintenance, and troubleshooting.
Quick answers from the manual
Quick answer
- The Hayward EcoStar VS Pump is a variable speed pool pump. This manual provides instructions for installation, configuration, operation, and maintenance. p. 1
Key actions
- Enter Configuration Mode p. 4, 5
- Priming the Pump p. 6
First start
- Initial Start Up p. 4
Problems and fixes
Motor Cuts Out
The motor has automatic thermal overload protection and will auto-restart when a safe heat level is reached.
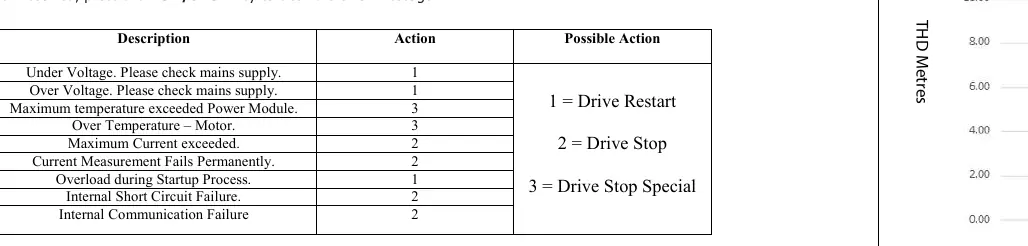
p. 8Error codes
| Code | Meaning | Action | Pages |
|---|---|---|---|
| 01 | Under Voltage | Check mains supply | p. 9 |
| 04 | Maximum temperature exceeded Power Module | Drive Stop Special | p. 9 |
Maintenance and reset
- Clear Error Message p. 9
Technical specifications
| Parameter | Value | Meaning | Pages |
|---|---|---|---|
| Voltage | 220 - 240 VAC | Operating voltage | p. 5 |
| Power | 1,990 W | Power output | p. 5 |
Where to find it in the PDF
- Safety Instructions p. 2, 3
- Installation p. 3, 4
- Operation p. 4, 5, 6
- Maintenance p. 7, 8
- Troubleshooting p. 8, 9
Table of contents
Manual images
Click an image to enlargeQuick Guide
The Hayward EcoStar Variable Speed Pump is designed for in-ground swimming pools and spas. This manual provides essential information for safe installation, operation, and maintenance. Always ensure the pump is installed by a qualified professional and that all electrical wiring conforms to local regulations (AS/NZS 3000).
Installation
Pump Location: Install the pump as close to the pool as possible, in a well-drained area that will not flood. Ensure there is free circulation of air for cooling. Do not install in damp or non-ventilated locations.
Mounting: Secure the pump to a level, rigid concrete slab or base to reduce vibration. Use screws or bolts to secure the pump.
Plumbing: Use Teflon tape or elastomeric thread sealant for plastic connections. Do not use Plumbers Pipe Dope or Putty as it may crack plastic components. Ensure suction lines are at least 50mm in diameter.
Electrical: All wiring must be performed by a qualified electrical contractor. The circuit must be supplied through a Residual Current Device (RCD) with a 30mA residual operating current. A surge protector is recommended.
Operation
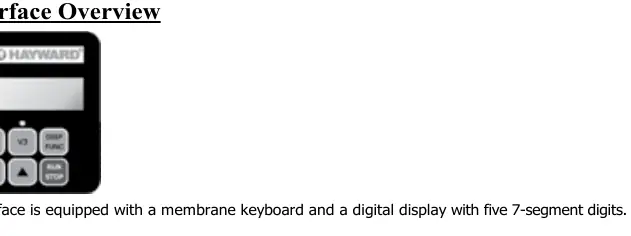
User Interface: The pump features a membrane keyboard and a 5-digit display. Use the DISP/FUNC button to navigate menus and the arrow buttons to adjust settings.
Preset Speeds: The pump has three preset speeds (V1, V2, V3) which can be adjusted between 600 and 2850 rpm. V2 and V3 have adjustable run timers.
Priming: The pump is factory set to start in Prime Mode for 2 minutes. Ensure the strainer housing is filled with water before starting. Do not run the pump dry.
Configuration: Hold the DISP/FUNC button to enter configuration mode. You can adjust priming time, speed settings, and RS485 mode for connection to Hayward control systems like OmniLogic.
Maintenance
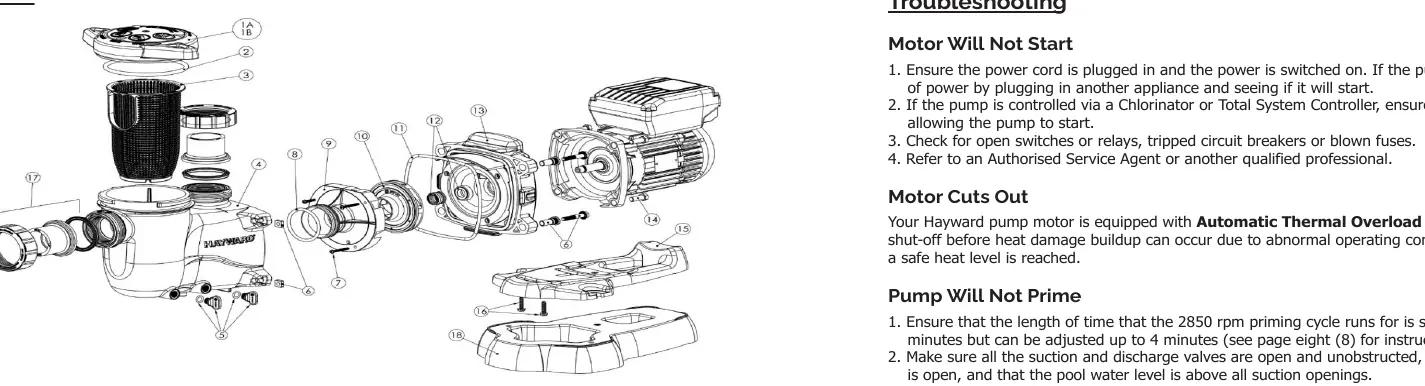
- Strainer Basket: Clean regularly. Do not strike the basket to clean it.
- Shaft Seal: If the seal leaks, it must be replaced by a qualified professional.
- Lubrication: Motor bearings are self-lubricating. Do not use petroleum-based lubricants on gaskets; use silicone-based only.
- Cleaning: Keep the motor clean and free of obstructions. Do not hose off the motor with water.
Troubleshooting
If the pump does not start, check the power supply, RCD, and controlling device. If the pump is noisy, check for air leaks, low water levels, or debris in the impeller. The pump features automatic thermal overload protection and will auto-restart once cooled.
Practical help
Common problems
Motor will not start
Check power supply, RCD, and ensure the controlling device (if applicable) is allowing the pump to start.
Pump will not prime
Ensure strainer basket is clean, all valves are open, and the strainer housing is filled with water to the inlet level.
Noisy pump
Check for air leaks in suction plumbing, low water level, or debris in the impeller/fan cowling.
Error codes displayed
Refer to the error code table in the manual; resolve the issue and press RUN/STOP to clear.
Before use
- Ensure all suction and discharge valves are open
- Verify the Filter Manual Air Relief Valve is open
- Check that the strainer basket is clean and seated correctly
- Ensure the pump is filled with water before starting
- Confirm electrical installation by a qualified professional
Specs in practice
- Power Output
- 1,990 W
- Protection Class
- IP X5
Images and diagrams
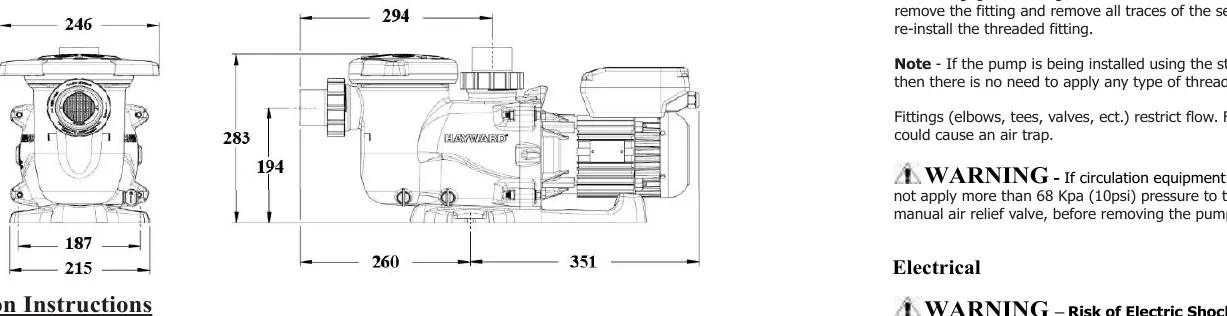
- Product dimensions for installation planning
- Parts diagram for identifying components during maintenance
- Interface display screens for configuration and operation
Model compatibility
- Compatible with Hayward OmniLogic control systems via RS485 connection

Manual page author
Emily Carter
User documentation editor
Prepares concise manual descriptions and highlights the most useful setup, operation, and maintenance information for readers.