Tools / Sharpening Tools
User Manual for Vevor 2002K1 Electric Chainsaw Sharpener
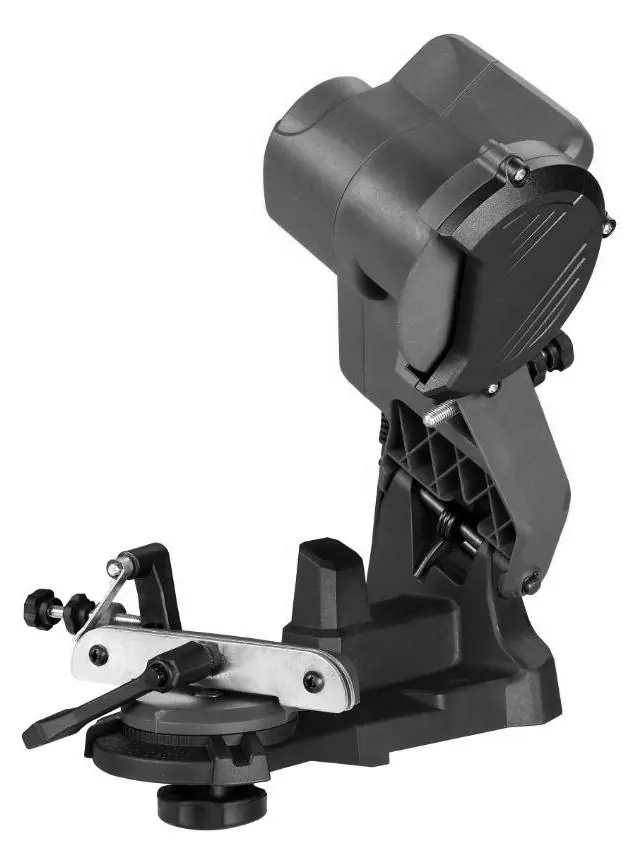
Quick guide for the Vevor 2002K1 Electric Chainsaw Sharpener. Includes assembly instructions, sharpening procedures, maintenance tips, and technical specifications.
Quick answers from the manual
Quick answer
- The Vevor 2002K1 is an electric chainsaw sharpener. It requires mounting to a workbench and uses a grinding wheel to sharpen chain teeth at specific angles. p. 1, 2
Key actions
- Mounting the sharpener to a workbench p. 5
- Replacing the grinding wheel p. 6
- Sharpening the chain p. 7, 8, 9
First start
- Bolt the unit to a workbench, install the grinding wheel, set the sharpening angle, and adjust the depth stop before turning on. p. 5, 6, 7, 8
Show 4 more answers Show less
Problems and fixes
Grinding wheel vibrates
Turn off immediately, check mounting and damage.
p. 5Maintenance and reset
- Replace the grinding wheel when it grinds down to a diameter of 3 inches. p. 11
Technical specifications
| Parameter | Value | Meaning | Pages |
|---|---|---|---|
| Voltage | AC120V 60Hz | Power requirements | p. 14 |
| Rated Power | 85 Watts | Power consumption | p. 14 |
| No load Speed | 5000 RPM | Rotational speed | p. 14 |
Where to find it in the PDF
- Safety Instructions p. 2, 3, 4
- Assembly p. 5
- Operation p. 7, 8, 9, 10
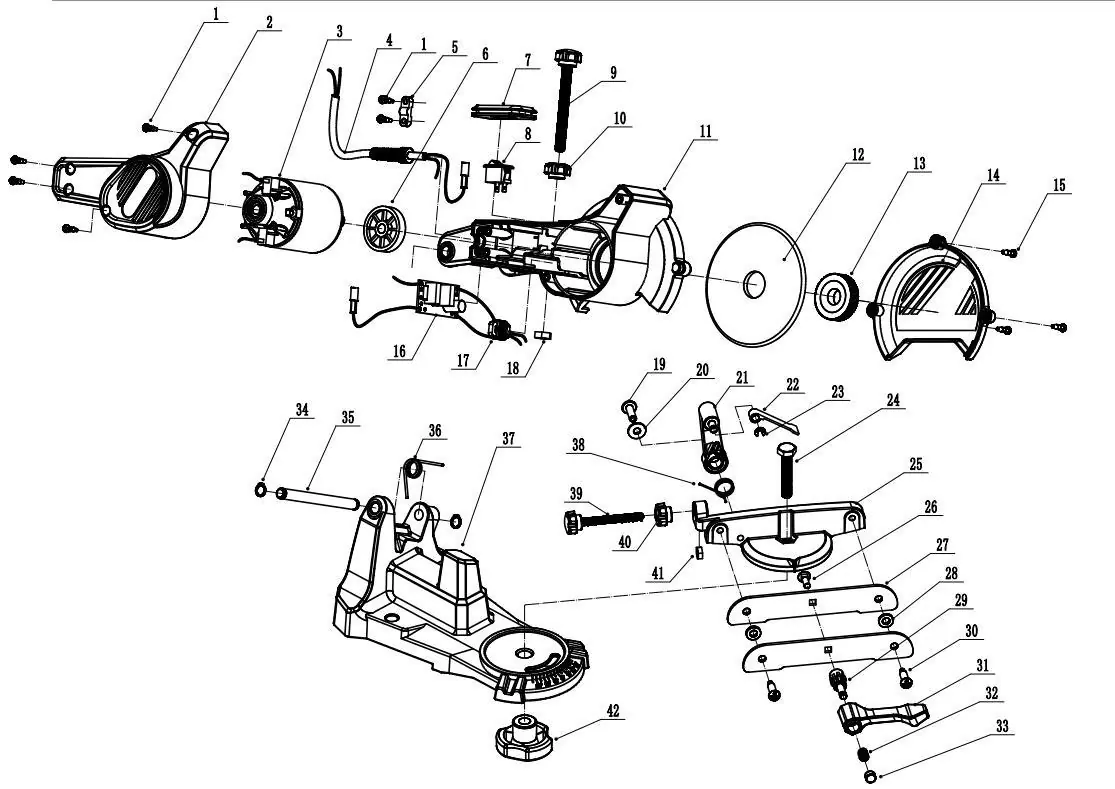
- Parts List p. 12, 13
Table of contents
Manual images
Click an image to enlargeQuick guide from the manual
The Vevor 2002K1 is an electric chainsaw sharpener designed for sharpening chainsaw chains. Before use, ensure the unit is securely bolted to a workbench. Always wear appropriate eye and ear protection. The sharpening process involves setting the correct angle, adjusting the depth, and carefully grinding each tooth of the chain.
Safety Instructions
- Personal Protective Equipment: Always wear ANSI-approved impact safety goggles and soundproof earmuffs. Use a full face shield if producing metal filings.
- Work Environment: Keep the work area clean, well-lit, and free of flammable gases or liquids. Do not use in damp or wet locations.
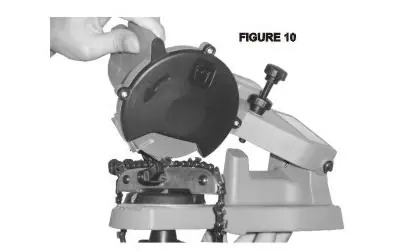
- Operation Safety: Never operate the tool without the Grinding Wheel Cover in place. Keep hands away from the turning wheel. Never attempt to stop the wheel with your hands.
- Extension Cords: Use a cord with 0-10 amps capability (up to 50 feet) and 18 AWG wire size.
Assembly
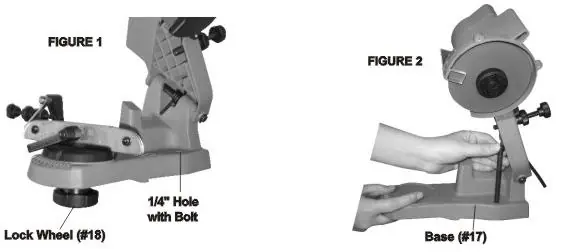
The sharpener must be mounted to a solid workbench capable of supporting the weight of the unit and the workpiece. Use the two 1/4" holes on the base (#17) to bolt the unit directly to the workbench. Ensure the lock wheel (#18) remains accessible.
Mounting a Grinding Wheel
- Unplug the unit before making any adjustments.
- Raise the Top Housing (#4) and lock it in the up position using the Lock Stop (#6).
- Remove the two screws holding the Grinding Wheel Cover (#11).
- Unscrew the Grinder Lock Cap (#9) and remove the old wheel.
- Install the new wheel on the Grinding Wheel Base (#7).
- Safety Check: Before using a new wheel, hang it by the central hole and tap it with a non-metal object. A metallic sound indicates it is in good condition; a dull sound indicates a crack.
- Replace the Grinder Lock Cap (#9) (hand tighten only) and the Grinding Wheel Cover (#11).
Operation
- Preparation: Clean the chain with a non-flammable solvent.
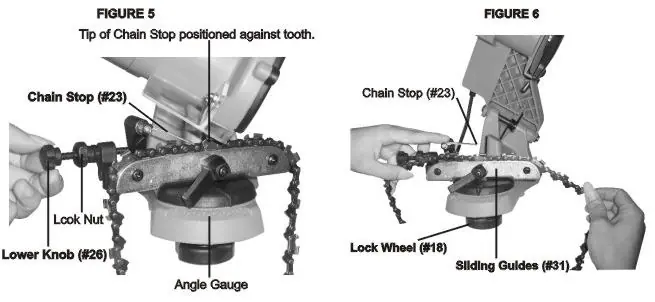
- Securing the Chain: Lift the Chain Stop (#23) and secure the chain in the sliding guides (#31). Lower the Chain Stop so it rests against the tooth to be sharpened.
- Setting the Angle: Loosen the Lock Wheel (#18) to rotate the housing to the required sharpening angle. Tighten the Lock Wheel once set.
- Adjusting Depth: Lower the Top Housing (#4) so the wheel skims the tooth. Tighten the Lock Stop (#6) to set the depth limit. Adjust the Lower Knob (#26) to control material removal.
- Sharpening: Plug in the unit, turn it on, and slowly lower the grinding wheel to sharpen the tooth. Do not dwell too long on one tooth.
- Repeat the process for each link.
Maintenance
- Keep the sharpener clean and free of dust and metal debris.
- Check the grinding wheel before every use for cracks or damage.
- Replace the grinding wheel when it wears down to a diameter of 3 inches.
Technical Specifications
- Voltage: AC120V 60Hz
- Rated Power: 85 Watts
- No load Speed: 5000 RPM
- Table/Vise Angles: 35 Degrees Right to Left
Manufacturer information
VEVOR
Practical help
Common problems
Grinding wheel vibrates
Turn off the machine immediately, check that the wheel is mounted securely, and inspect for damage.
Potential crack in grinding wheel
Hang the wheel by the central hole and tap with a non-metal object. A metallic sound is good; a dull sound indicates a crack.
Chain depth limiting gauges too high
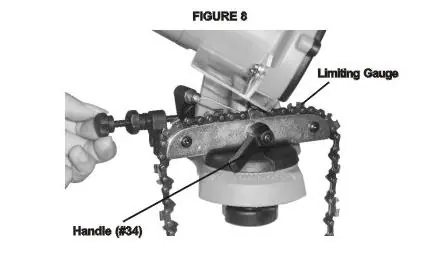
File down each gauge with a flat file so they are at a lower level than the cutting teeth.
Before use
- Wear eye and ear protection
- Ensure work area is clean and well-lit
- Check grinding wheel for cracks
- Ensure grinding wheel cover is in place
- Verify switch is in OFF position before plugging in
Show more Show less
Specs in practice
- No load Speed
- 5000 RPM
- Table/Vise Angles
- 35 Degrees Right to Left
Images and diagrams
- Figure 1-2: Workbench mounting instructions
- Figure 3-4: Grinding wheel replacement steps
- Figure 5-6: Chain positioning and securing
- Figure 7: Setting the depth limit
- Figure 8-9: Using a file for depth gauges
Model compatibility
- Designed specifically for sharpening chainsaw chains.
- Do not attempt to sharpen other tools or grind other objects.

Manual page author
Michael Turner
Technical manual editor