Tools / Sharpening Tools
User Manual for VEVOR 2002P Electric Chainsaw Sharpener
Quick guide for the VEVOR 2002P Electric Chainsaw Sharpener. Includes assembly, sharpening procedures, safety warnings, and maintenance instructions.
Quick answers from the manual
Quick answer
- The VEVOR 2002P is an electric chainsaw sharpener. It requires bench mounting, proper PPE (eye/ear protection, gloves), and regular maintenance of the grinding wheel. Always perform a 30-second test run before use. p. 2, 12
Key actions
- Mounting the sharpener p. 9
- Sharpening the chain p. 15
First start
- Perform a 30-second test run without load before first use. p. 12
Show 4 more answers Show less
Problems and fixes
Grinding wheel vibration
Turn off the machine immediately and check that it is mounted securely and not damaged.
p. 6
Chain jam
Switch off and unplug the product, then clear the jam.
p. 14Maintenance and reset
- Replace grinding disc p. 17, 18
Technical specifications
| Parameter | Value | Meaning | Pages |
|---|---|---|---|
| Voltage | AC120V 60Hz | Required power supply | p. 19 |
| Rated Power | 85Watts | Motor power | p. 19 |
| No load Speed | 5000RPM | Rotational speed | p. 19 |
Where to find it in the PDF
- Safety Instructions p. 3, 4, 5, 6
- Assembly p. 9, 10, 11
- Operation p. 12, 13, 14, 15
- Maintenance p. 16, 17, 18, 19
Table of contents
Manual images
Click an image to enlargeQuick guide from the manual
The VEVOR 2002P is an electric chainsaw sharpener designed for sharpening conventional saw chain types. Before operating, ensure the unit is securely mounted to a bench. Always wear appropriate personal protective equipment, including eye protection, hearing protection, and cut-resistant gloves. Perform a 30-second test run without load before the first use and after every grinding disc change.
Safety Instructions
Safety is paramount when operating power tools. Always follow these precautions:
- Personal Protection: Wear ANSI-approved impact safety goggles, soundproof earmuffs, and cut-resistant safety gloves.
- Work Area: Keep the area clean, well-lit, and free of children or flammable materials.
- Tool Safety: Never operate the tool without the grinding wheel cover in place. Do not use defective, chipped, or cracked grinding discs.
- Operation: Keep hands away from the rotating wheel. Never attempt to stop the wheel with your hands.
Parts Description
The sharpener consists of several key components, including the grinding head (2), grinding base (8), chain vise (12), and the grinding disc (18a). Refer to the parts diagram for the exact location of the On/Off switch (1), handle (4), and various adjusting screws (6, 14a).
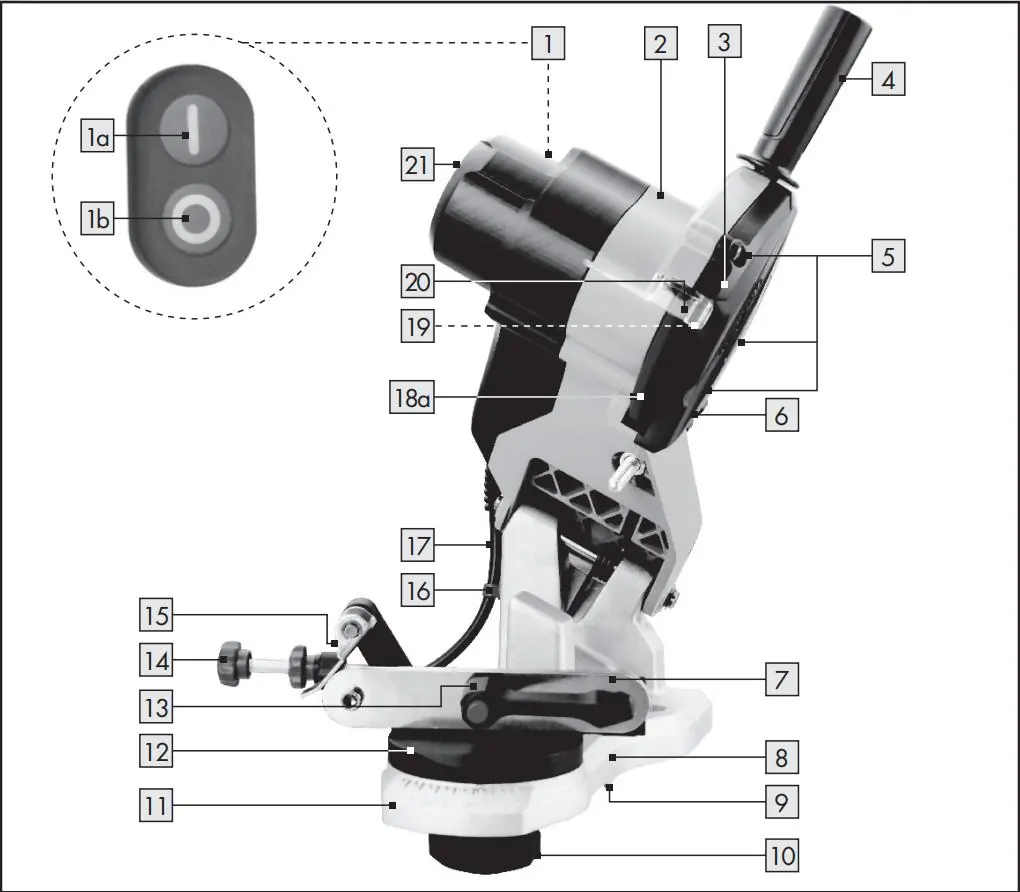
Assembly
Proper assembly is required for safe operation:
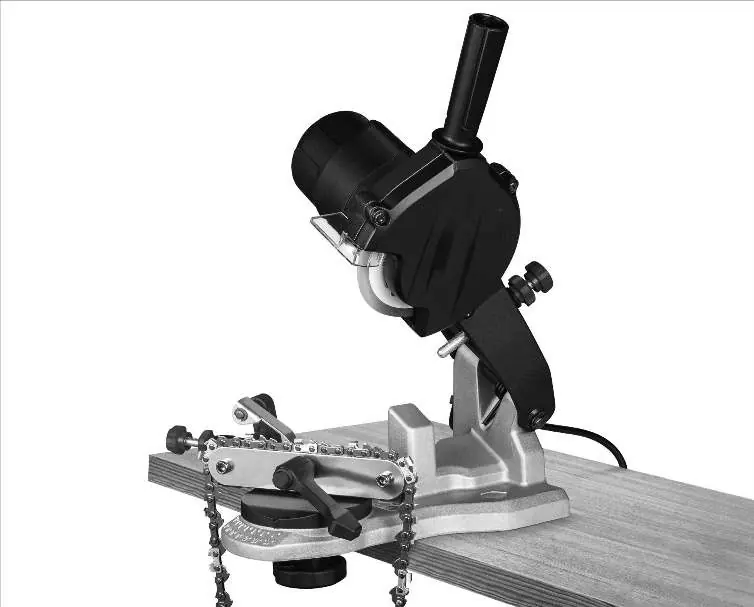
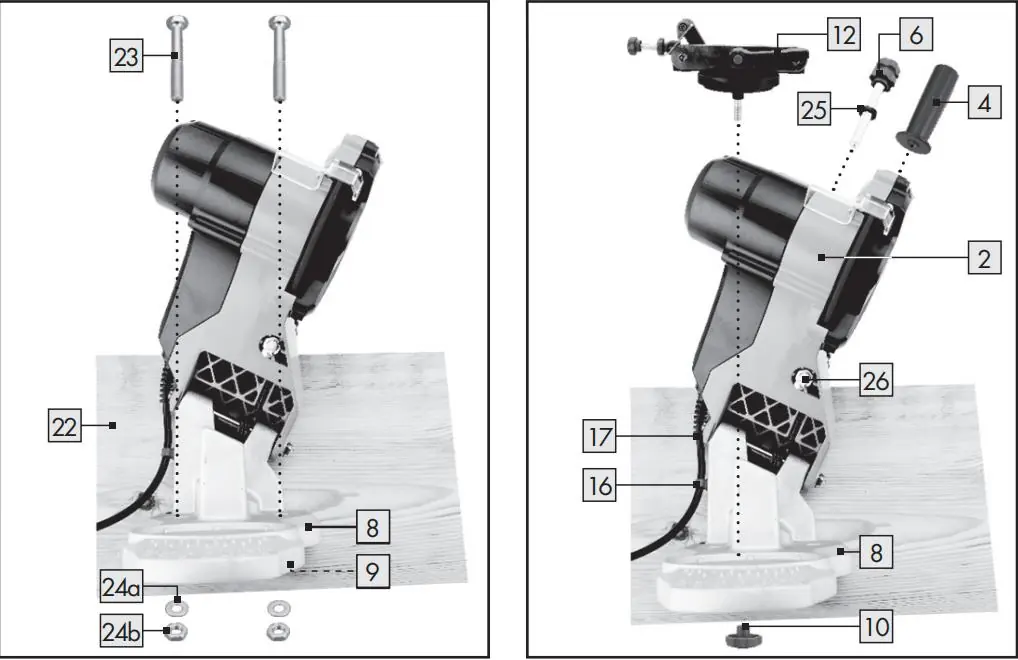
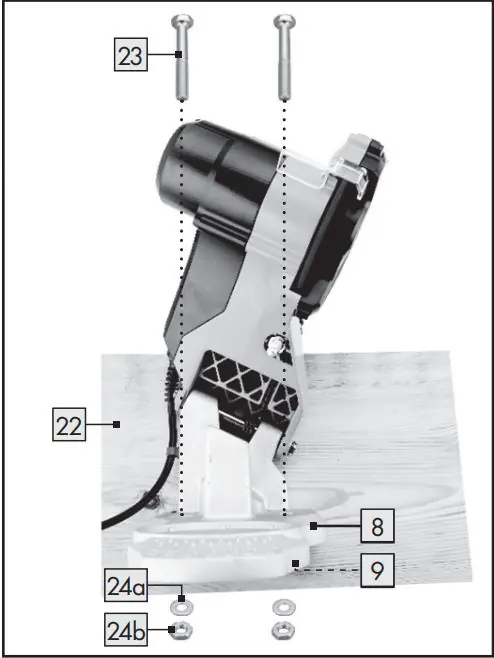
- Bench Mounting: Use the stop notches (9) to position the product on the bench (22). Mark the holes, drill them, and secure the grinding base (8) using the included screws (23), washers (24a), and nuts (24b).
- Handle and Vise: Screw the handle (4) onto the grinding head (2). Attach the chain vise (12) to the grinding base (8) and secure it with the locking screw (10).
- Adjusting Screw: Place the washer (25) over the adjusting screw (6) and screw it into the lock nut (26) inside the grinding head.
Operation
To sharpen a saw chain:
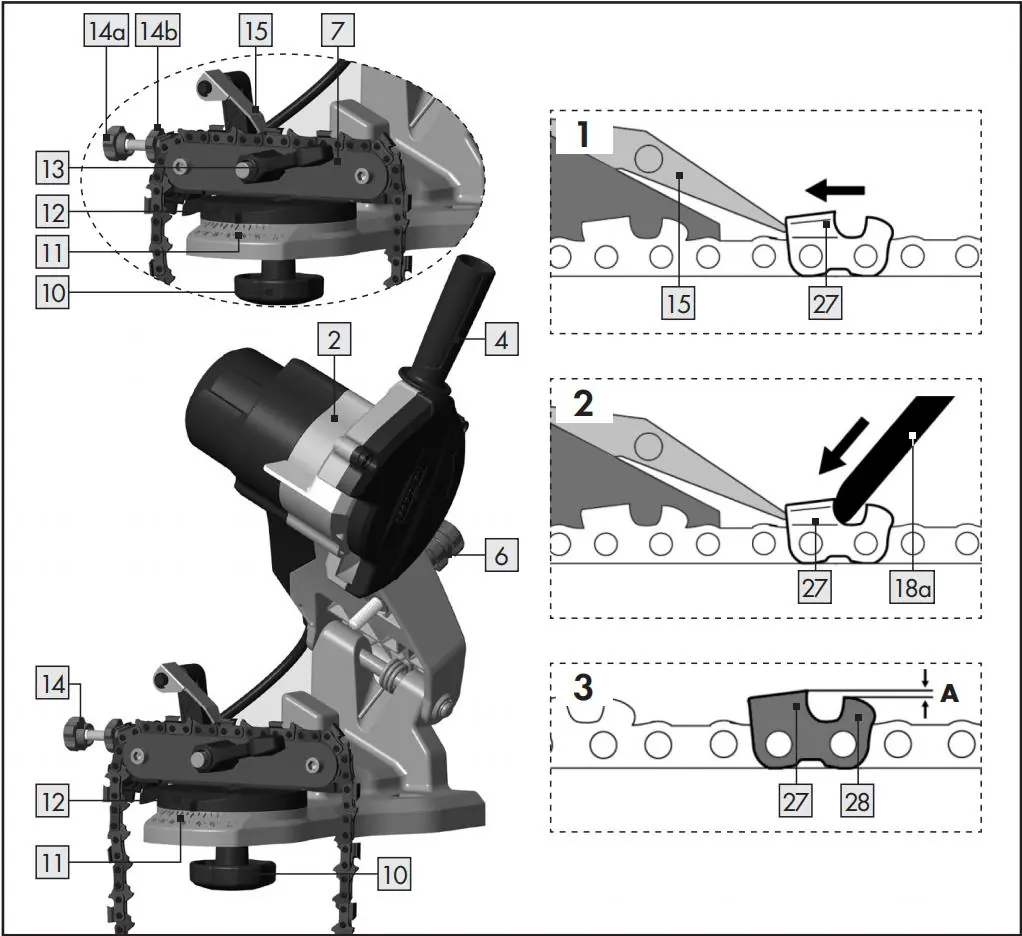
- Inserting the Chain: Open the chain guide (7) using the clamping lever (13). Insert the chain with cutting edges facing the grinding disc (18a).
- Adjusting: Loosen the locking screw (10) to set the grinding angle on the rotary table (12). Use the chain feed adjusting screw (14a) to position the tooth against the disc.
- Sharpening: Switch on the product. Move the grinding head (2) down using the handle (4) and apply light pressure. Do not force the tool.
- Maintenance: Sharpen all teeth on one side, then adjust the angle to sharpen the other side.
Maintenance and Cleaning
Regular maintenance ensures longevity and safety:
- Cleaning: Clean the product after every use. Use a soft brush or cloth to clean vents (21) and the chain guide (7). Do not use solvents or running water.
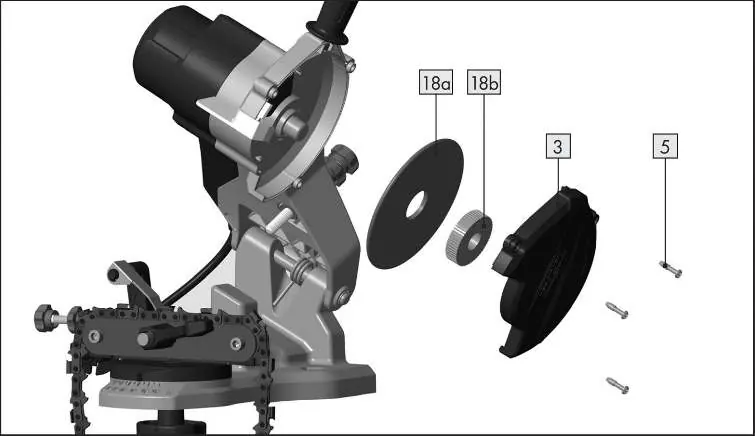
- Replacing the Grinding Disc: Unplug the unit. Loosen the 3 retaining screws (5) to remove the cover (3). Unscrew the grinding disc nuts (18b) by hand, replace the disc, and reassemble.
- Storage: Store in a dry, dust-free location out of reach of children.
Technical Specifications
- Voltage: AC120V 60Hz
- Rated Power: 85 Watts
- No load Speed: 5000 RPM
- Table/Vise Angles: 35 Degrees Right to Left
Manufacturer information
VEVOR
Practical help
Common problems
Grinding wheel vibrates
Turn off the machine immediately and check that it is mounted securely and not damaged.
Chain jammed
Switch off and unplug the product, then clear the jam.
Grinding wheel sounds dull when tapped
This indicates a crack or break; do not use the disc.
Before use
- Wear eye and ear protection.
- Wear cut-resistant safety gloves.
- Check the grinding wheel for cracks or damage.
- Ensure the grinding wheel cover is securely in place.
- Verify the power source voltage matches the tool's rating (120V).
- Perform a 30-second test run without load.
Show more Show less
Specs in practice
- Rated Power (85W)
- The power consumption of the motor.
- No load Speed (5000 RPM)
- The rotational speed of the grinding disc when not cutting.
- Table/Vise Angles (35°)
- The range of adjustment for the sharpening angle.
Images and diagrams
- The parts diagram identifies 28 components, including the grinding head, base, and various adjustment screws.
- The sharpening process diagrams show the correct positioning of the chain tooth against the stop and the grinding disc.
Model compatibility
- Designed for sharpening conventional saw chain types only.
- Not intended for wet grinding or grinding other materials.
- Use only grinding wheels that fit the 7/8" arbor.

Manual page author
David Miller
Documentation analyst