Industrial / Agricultural Equipment
VEVOR Livestock Stand 51*23inch-B User Manual
User manual for the VEVOR Livestock Stand (Model: 51*23inch-B). This guide provides comprehensive assembly instructions, safety precautions, and usage guidelines for livestock handling.
Quick answers from the manual
Quick answer
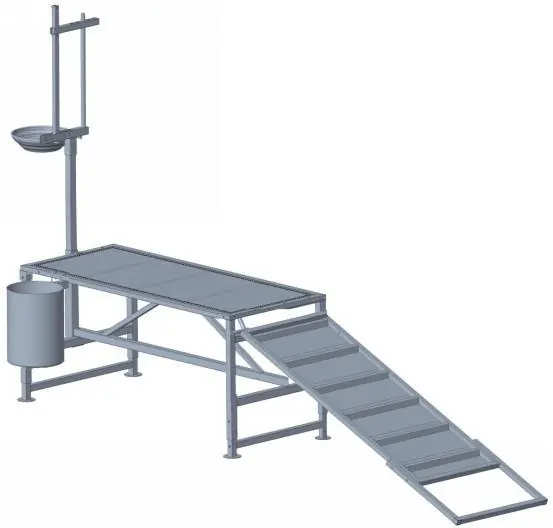
- The VEVOR Livestock Stand (51*23inch-B) is a platform for livestock handling. Assembly involves attaching the legs, support rods, and ramp to the tabletop, followed by installing the head rack and accessories. p. 7, 8, 15
Key actions
- Assemble on a flat, level surface. p. 2
- Inspect before every use. p. 3
First start
- Follow the 8-step assembly process outlined in the manual. p. 7, 8, 9, 10
Show 3 more answers Show less
Problems and fixes
Parts are loose or damaged
Do not use the product if parts are loose or damaged.
p. 3Technical specifications
| Parameter | Value | Meaning | Pages |
|---|---|---|---|
| Safe Loading Weight | 600 lbs / 272 kg | Maximum weight capacity | p. 18 |
| Desktop Size | 51*23 in (1295*584 mm) | Dimensions of the platform | p. 18 |
Where to find it in the PDF
- Safety Instructions p. 2, 3
- Parts List p. 4, 5, 6
- Assembly Steps p. 7, 8, 9, 10
- Product Parameters p. 18
Table of contents
Manual images
Click an image to enlargeSafety Instructions
Read all instructions before using this product. Failure to follow safety guidelines can result in serious injury.
Assembly Precautions
- Assemble only according to these instructions. Improper assembly can create hazards.
- Wear ANSI-approved safety goggles and heavy-duty work gloves during assembly.
- Keep the assembly area clean and well-lit.
- Keep bystanders out of the area during assembly.
- Do not assemble if tired or under the influence of alcohol, drugs, or medication.
- Assemble on a flat, level, hard, and smooth surface capable of safely supporting the stand.
Use Precautions
- DO NOT SIT OR STAND ON THIS ITEM.
- This product is not a toy. Do not allow children to play with or near this item.
- Do not exceed specified weight capacities.
- Inspect before every use; do not use if parts are loose or damaged.
Assembly Steps
Ensure all parts are unwrapped and separated in a clean work area before beginning.
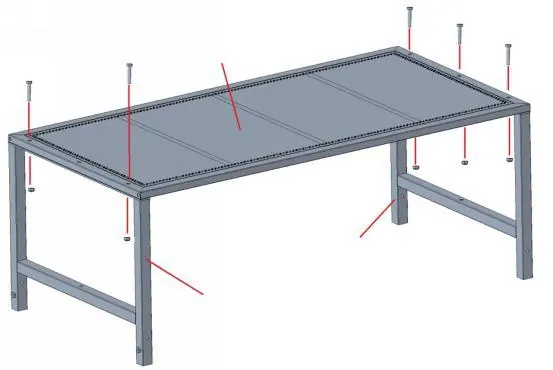
Step 1: Tabletop Assembly
Secure the adjustable leg B (7) to the tabletop (5) using screws (C) and nuts (D).
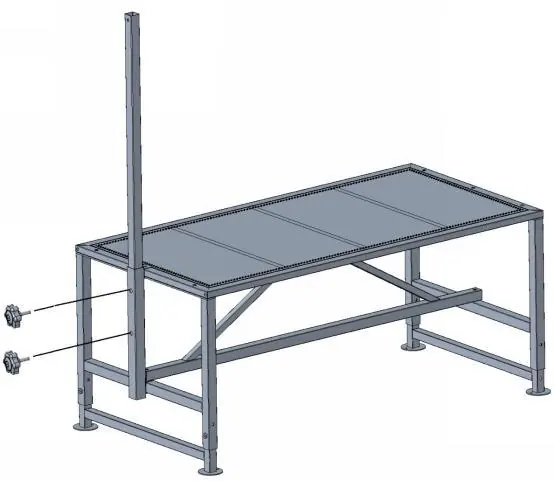
Step 2: Rod Assembly
Secure the fixed rod (4) and connecting rod (11) to the tabletop (5) using screws (C and H).
Step 3: Support Leg Assembly
Insert the adjustable leg A (6) into the support leg and fix it with the pin (A) and plastic knob (B).
Step 4: Long Pole Installation
Insert the long pole (3) into the fixed tube (4) and secure it with the plastic knob (B). Note the direction shown in the diagram.
Step 5: Mounting Bracket
Secure the goat head mounting bracket (2) to the long pole (3) with screw (C) and plastic knob (B). Insert the movable rack (1) into the bracket and secure it with a pin (A).
Step 6: Basin and Tool Bag
Insert the circular hoop (8) through the mounting bracket and tighten with screws (D). Place the basin (9) on the hoop. Hang the tool bag (10) on the platform.
Step 7: Ramp Assembly
Secure the U-shaped pole (15) to the ramp (14) with screws (F).
Step 8: Final Assembly
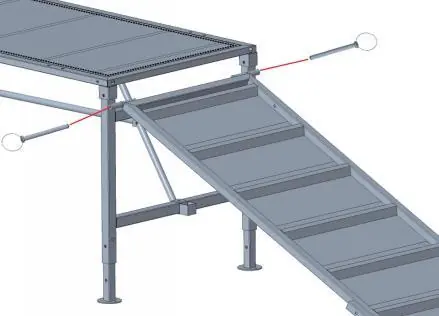
Secure the ramp (14) to the tabletop (5) using pins (E).
Usage Instructions
Headband Width Adjustment
The fixed and movable racks are equipped with 5 adjustment positions. The smaller the number, the narrower the spacing. Ensure upper and lower positions are aligned to maintain a vertical state. If unsure, start with the middle position.
Guiding the Animal
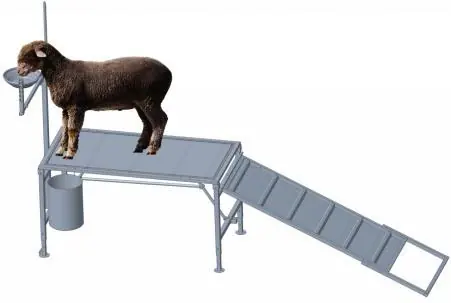
Open the bracket and guide the animal to the fixed rack. Adjust the height of the fixed rack so the animal's lower neck is level with the lower crossbar of the bracket. This allows the animal to lower its head to drink or feed without touching the upper crossbar.
Technical Specifications
- Model: 51*23inch-B
- Safe Loading Weight: 600 lbs / 272 kg
- Desktop Size: 51*23 inches (1295*584 mm)
- Colour: Black
Manufacturer information
VEVOR
Practical help
Common problems
Stand is unstable
Ensure the stand is assembled on a flat, level, hard, and smooth surface.
Parts are loose or damaged
Inspect the stand before every use. Do not use if any parts are loose or damaged.
Animal cannot be securely fixed
Adjust the headband width to a position with smaller spacing.
Before use
- Wear ANSI-approved safety goggles and heavy-duty work gloves.
- Ensure the assembly area is clean and well-lit.
- Check that all parts are properly secured.
- Verify the stand is on a flat, level surface.
- Ensure weight capacity is not exceeded.
Show more Show less
Specs in practice
- Safe Loading Weight
- The maximum weight the stand can safely support is 600 lbs (272 kg).
- Desktop Size
- The dimensions of the platform are 51*23 inches (1295*584 mm).
Images and diagrams
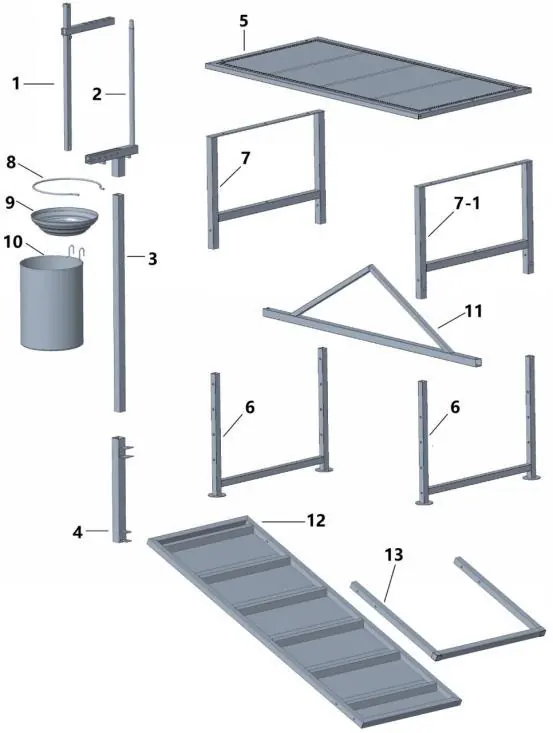
- The parts list diagram (Page 7) identifies all components by number for easy assembly.
- Step 4 diagram highlights the correct direction for inserting the long pole.
- Step 8 diagram shows the final attachment of the ramp to the tabletop.
Model compatibility
- Intended for household and similar applications, such as farm houses.

Manual page author
David Miller
Documentation analyst