Automotive / Motorcycle Accessories
User Manual for VEVOR 170B Gas Pressure Washer
Comprehensive user guide for the VEVOR 170B gas pressure washer. Includes assembly instructions, operating procedures, maintenance schedules, and troubleshooting tips.
Quick answers from the manual
Quick answer
- The VEVOR 170B is a gas-powered pressure washer. Before use, ensure it is on a level surface, check the oil level (600ml required), fill the fuel tank with unleaded gasoline, and connect a continuous water supply. p. 17, 20
Key actions
- Assembly p. 13, 14
- Start-up p. 20
- Maintenance p. 24, 26, 29, 30
Problems and fixes
Machine does not start
Check fuel valve, choke position, engine switch, fuel level, spark plug, or carburetor.
p. 37Technical specifications
| Parameter | Value | Meaning | Pages |
|---|---|---|---|
| Pressure | 3500 psi | Max pressure | p. 8 |
| Flow | 10L/min (2.6GPM) | Water flow | p. 9 |
| Rated power | 7HP | Engine power | p. 9 |
Where to find it in the PDF
- Safety Instructions p. 4, 5, 6
- Part List p. 7, 8
- Assembly p. 13, 14
- Operation p. 16, 17, 18, 20
- Maintenance p. 24, 26, 29, 30
Table of contents
Manual images
Click an image to enlargeQuick guide from the manual
The VEVOR 170B is a gas-powered pressure washer designed for heavy-duty cleaning. Before operating, ensure the machine is placed on a firm, level surface. Always check the engine oil level (requires 600ml) and fuel level (unleaded gasoline) before starting. Ensure a continuous water supply is connected and turned on before starting the engine to prevent equipment damage.
Assembly
Follow these steps to assemble your pressure washer:
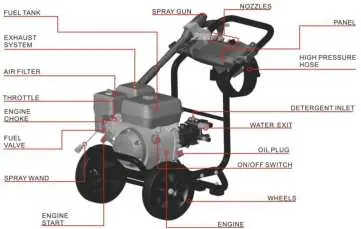


- Foot Stool: Lock the foot stool to the bottom of the host using the M8 screw kit.
- Wheels: Attach both wheels to the sides of the host using the wheel shaft kit.
- Handle: Align the handle into the host pipe and secure the panel to the handle using screws.
- Hook: Use screw N to lock the hook with the panel kit.
- Hose and Gun: Connect the high-pressure hose to the pressure outlet and assemble the spray gun.
Operation
Pre-start checks: Always inspect the machine for oil or gasoline leaks, ensure all fasteners are tight, and check the air filter and oil level.
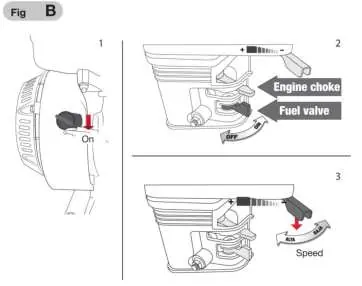
Start-up procedure:
- Turn the motor power button to the ON position.
- Set the choke lever to the OFF position.
- Ensure the fuel key is in the ON position.
- Set the throttle to the idle (-) position.
- Pull the starter handle slowly until resistance is felt, then pull hard (repeat 3-4 times).
- Once started, return the choke lever to the ON (OPEN) position.
- Regulate engine speed using the throttle lever.
Maintenance
Regular maintenance is essential for safety and performance. Refer to the maintenance schedule in the manual for intervals regarding engine oil, gear oil, air filter, and spark plug checks. Always allow the engine to cool before performing maintenance.

Troubleshooting
If the machine does not start, check the fuel valve, choke position, engine switch, fuel level, and spark plug. If performance is low, check the air filter, fuel quality, and ensure there is no air in the fuel hose.
Manufacturer information
VEVOR
Practical help
Common problems
Machine does not start
Check if the fuel valve is closed, choke is open, engine switch is OFF, or if there is no fuel. Also, check the spark plug for defects or flooding.
Engine has little power
Check if air filter elements are clogged, fuel is old/contaminated, or if there is a carburetor/ignition malfunction.
Low performance of the pressure washer
Check for incorrect ignition timing, air in the fuel hose, incorrect motor adjustment, or clogged carburetor/nozzle.
Before use
- Check for oil or gasoline leaks
- Ensure all nuts, bolts, and screws are tight
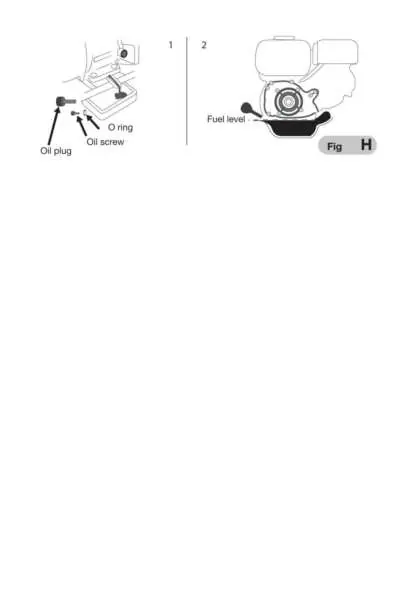
- Check engine oil level (requires 600ml)
- Check air filter condition
- Check fuel level (unleaded gasoline)
- Ensure water supply is connected and turned on
Specs in practice
- Fuel capacity
- 3L - tank size for unleaded gasoline
- Oil capacity
- 0.6L - engine oil requirement
Images and diagrams
- Fig A: Oil level check and nozzle selection
- Fig B: Start-up controls (choke, fuel valve, throttle)
- Fig C: Engine speed adjustment
- Fig D: Shut down procedure
- Fig H: Oil change and drain points
Model compatibility
- Copper interface R is only available in the US standard version; the European version does not have it.

Manual page author
Emily Carter
User documentation editor
Prepares concise manual descriptions and highlights the most useful setup, operation, and maintenance information for readers.