Tools / Air Compressors & Pneumatics
User Manual for VIAIR 150C-IG Compressor Kit
Quick guide for the VIAIR 150C-IG Compressor Kit. Includes installation steps, wiring diagrams, maintenance tips, troubleshooting, and technical specifications for 12V and 24V models.
Table of contents
Manual images
Click an image to enlargeQuick Guide
The VIAIR 150C-IG is a high-performance air compressor designed for 12V or 24V DC systems. This manual covers the installation, operation, and maintenance of the unit. Key operational requirements include maintaining proper duty cycles, ensuring adequate ventilation, and using a relay for electrical installation. The unit features an automatic thermal overload protector to prevent overheating.
Safety Instructions
CAUTION: To reduce the risk of electrical shock or injury:
- Do not disassemble or attempt unauthorized repairs.
- Do not use near water, flames, explosive materials, or where oxygen is administered.
- The compressor becomes very hot during and after use; do not touch with bare hands.
- Always wear safety glasses when operating.
- Use only in well-ventilated areas.
- If the thermal protector activates, cut off the power source immediately.
Installation
Proper installation is critical for the longevity of the compressor.
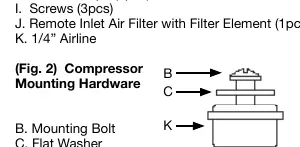

- Mounting Location: Select a flat, upright, and secure location. Mount as close to the battery as possible to minimize positive lead wire length. Keep away from heat sources and flammable liquids.
- Moisture Protection: The unit is moisture and splash-resistant but not waterproof. Avoid locations where it may come into contact with water.
- Wiring: Disconnect the ground cable from the vehicle battery before starting. Use a relay (40-Amp or higher) for installation. Ensure the system is properly fused.
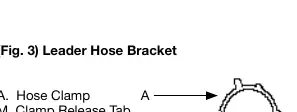
- Hose Installation: Use the provided hose bracket to secure the stainless steel braided leader hose. Drill a 3/16" hole for the self-anchoring pin.
- Sealing: Use thread sealant for fittings; thread tape is not recommended. Recommended torque is 12 to 15 ft. lbs.
Operating Instructions
Always operate the compressor at or below its maximum pressure rating. The compressor is equipped with an automatic thermal overload protector. If the unit shuts off during use, do not attempt to restart it immediately. Turn off the power and allow the unit to cool for approximately 30 minutes to allow the protector to reset.
Duty Cycle: The compressor has a 25% duty cycle (15 minutes on / 45 minutes off at 72°F & 100 PSI). Exceeding this will result in damage.
Maintenance & Repairs
- Periodically check all electrical and fitting connections; clean and tighten as needed.
- Check mounting screws regularly.
- Replace the air filter element periodically, especially in dusty environments (recommended at least once a month).
- Clean dust and dirt from cooling fins and motor housing.
- The motor is permanently lubricated and maintenance-free; do not attempt to lubricate it.
Troubleshooting
If the compressor fails to operate or performs poorly, check the following:
- Tank pressure drops: Check for loose drain cocks, leaking check valves, or loose connections.
- Compressor runs continuously: Check for excessive air usage, loose connections, or a clogged air filter.
- Compressor will not run: Ensure the switch is ON, check the fuse, or allow the thermal overload protector to reset.
- Excessive knocking: Tighten mounting bolts or check for worn bearings/piston.
Specifications
The 150C-IG is available in 12V (Part No. 15010) and 24V (Part No. 15018) versions.
- Max Working Pressure: 150 PSI
- Duty Cycle: 25%
- Ingress Protection: IP67
- Max Ambient Temperature: 158°F
- Min Ambient Temperature: -40°F
Practical help
Common problems
Tank pressure drops when compressor shuts off
Tighten the drain cock, check for leaking check valves, or tighten all air line connections.
Compressor runs continuously with low airflow
Reduce air usage, check for leaks, or replace the clogged air filter element.
Compressor will not run
Ensure the power switch is ON, check the fuse, or allow the unit to cool for 30 minutes to reset the thermal overload protector.
Excessive knocking or rattling
Tighten mounting bolts or have the unit inspected for worn bearings or piston rings.
Before use
- Ensure the mounting location is flat, upright, and secure.
- Verify the compressor is mounted as close to the battery as possible.
- Check that the area is well-ventilated and away from heat sources.
- Ensure the system is properly fused according to the specifications.
- Verify all electrical connections are tight and secure.
- Check that the air filter is clean and properly installed.
Specs in practice
- Thermal Overload Protector
- An automatic safety feature that shuts off the unit if it overheats; requires 30 minutes to cool and reset.
Images and diagrams
- Fig 1: Installation parts list including hose bracket, bolts, washers, and fittings.
- Fig 2: Compressor mounting hardware assembly sequence.
- Fig 3: Leader hose bracket installation details.
- Fig 4: Recommended wiring diagram showing relay, fuse, and pressure switch connections.
Model compatibility
- Use only with 12V (P/N 15010) or 24V (P/N 15018) DC systems.
- Requires a 40-Amp relay or higher for installation.
- Do not use a pressure switch with a higher cut-off pressure than the compressor's rated working pressure.

Manual page author
David Miller
Documentation analyst
Organizes user manual content into clear summaries, with attention to model details, product context, and everyday usability.