Tools / Air Compressors & Pneumatics
User Manual for California Air Tools 15020C-22060 Air Compressor
Quick guide for the California Air Tools 15020C-22060 air compressor. Includes assembly instructions, daily operation steps, maintenance procedures, and troubleshooting tips.
Table of contents
Manual images
Click an image to enlargeQuick Guide
This manual provides essential instructions for the safe operation and maintenance of the California Air Tools 15020C-22060 air compressor. Always read the full safety instructions before use. The compressor is designed for use on a 220V circuit and must be properly grounded. Do not use adapters or extension cords that are too long or thin.
Assembly
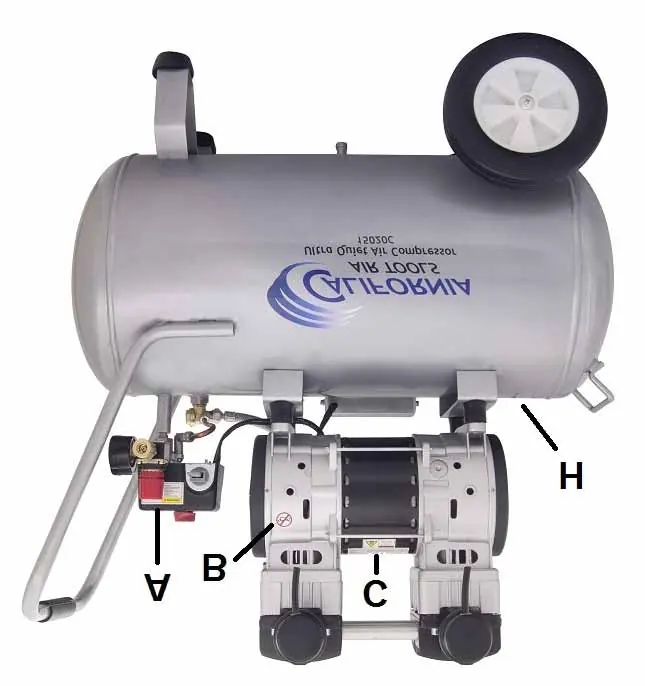
Before operating, you must install the wheels and cushion foot:
- Wheels: Slide the wheel bolt through the wheel, then through the wheel support hole on the back bottom of the tank. Secure with the washer and nut. Repeat for the second wheel.
- Cushion Foot: Slide the bolt through the washer and cushion foot, then through the support hole on the front bottom of the tank. Secure with the washer and nut.
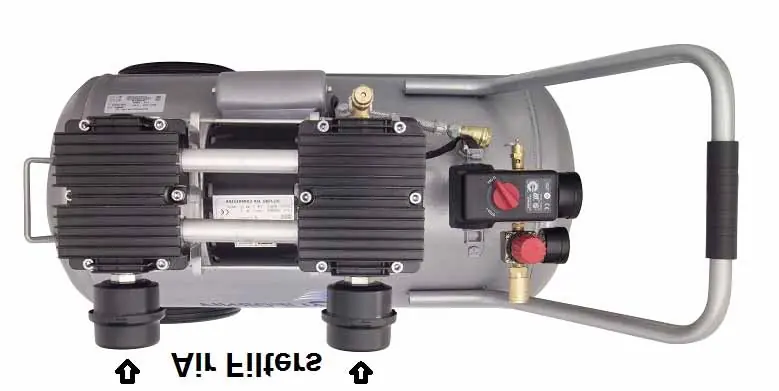
- Air Filters: Screw the air filters into the motor head ports on the top right side of the motor head.
Operation
Test Run: Before first use, plug in the unit, turn the power switch to ON, and let the pressure rise to 130 PSI. The unit should shut off automatically. If it does not work properly or leaks, turn it off and contact support.
Daily Operation:
- Ensure the power switch is OFF and the drain valve is closed.
- Attach your air hose to the quick coupler.
- Plug in the power cord and turn the switch to ON.
- Allow the tank to fill until the motor stops.
- Regulate airflow using the regulator knob while the tool is running.
- Do not run the compressor continuously for more than 1 hour.
Shutting Down: Turn the power switch to OFF, unplug the unit, and release pressure from the tank through the air hose.
Maintenance
- Draining the Tank: Drain the air tank daily or after each use to prevent rust and moisture buildup. Place the compressor over a container, open the drain valve, and let the water drain out. Close the valve afterward.
- Air Filter: Clean or replace the air filter element regularly if it becomes clogged to maintain performance.
- Cleaning: Use a soft brush or moistened cloth with a biodegradable solvent. Do not use flammable liquids like gasoline.
Troubleshooting
If you encounter issues, check the following:
- Pressure drop: Check for air leaks at connections using soapy water. Tighten if necessary.
- Compressor won't start: The thermal protector may have tripped due to overheating. Allow the motor to cool. Ensure the voltage is correct and the extension cord is not too long or thin.
- Noisy/Metallic clangs: The compressor head gasket or reed valve may be damaged. Stop use and contact the dealer.
Specifications
The 15020C-22060 features a 15-gallon steel tank, 2.0 HP motor, and operates at 220V/60Hz. The pressure switch is factory-set to shut off at 130 PSI and restart at 100 PSI.
Practical help
Common problems
Pressure drop in the tank
Check for air leaks at connections using soapy water. Tighten any loose connections.
Compressor stopped and does not start
The thermal protector may have tripped due to overheating. Allow the motor to cool down. Check that the main voltage matches specifications and that the extension cord is not too long or thin.
Motor does not start or starts slowly
Low voltage supply. Ensure the compressor is plugged into a fully functional outlet and use a heavy-duty extension cord if necessary.
Compressor is noisy with metallic clangs
Compressor head gasket or reed valve may be damaged. Stop the compressor immediately and contact the parts dealer.
Before use
- Inspect all parts for damage.
- Ensure the air tank is not damaged.
- Place the compressor on a flat surface (incline no greater than 15 degrees).
- Ensure at least 2 feet of obstacle-free space around the unit for airflow.
- Verify the air filter is properly installed.
- Ensure the power supply is a dedicated 220V circuit.
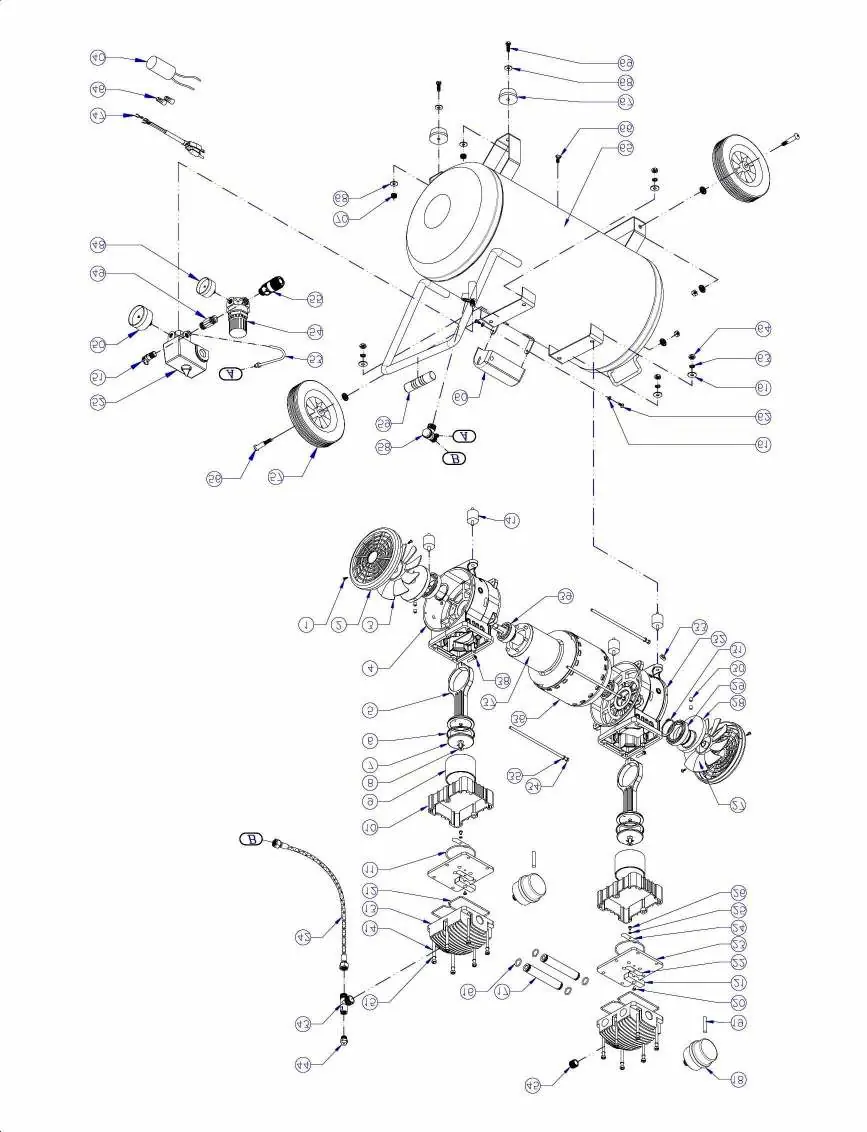
Images and diagrams
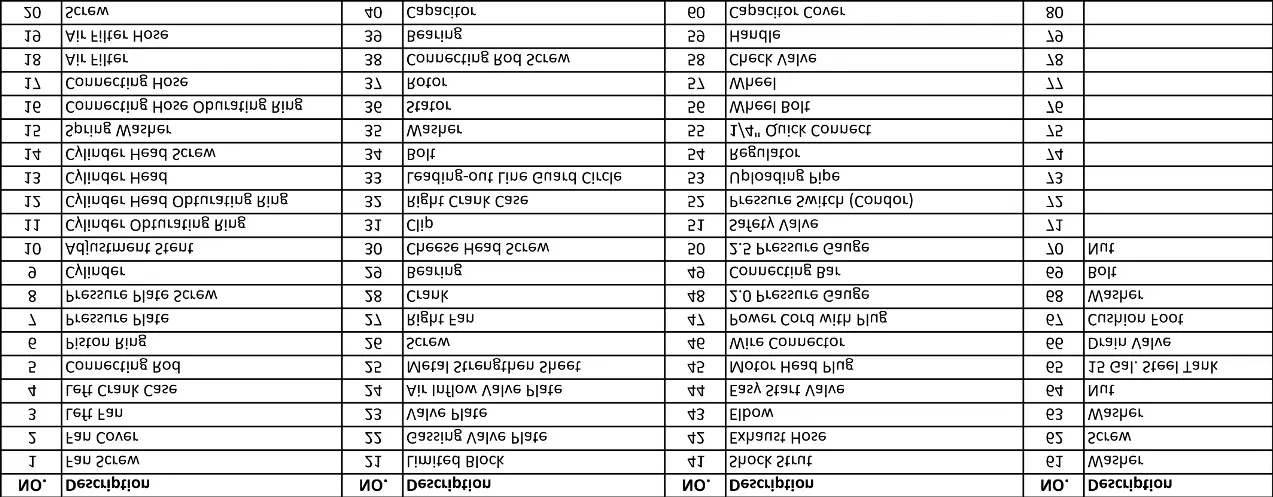
- The parts diagram (Page 7) provides a numbered list of all components for assembly and repair identification.
- The electrical circuit diagram (Page 14) illustrates the wiring for the motor, capacitor, and overload protector.
- The air passage drawing (Page 14) shows the flow of air from the intake through the compressor, tank, and out to the regulator.
Model compatibility
- Requires a dedicated 220V 60Hz circuit.
- Extension cords must be no more than 25 feet long and at least 14 gauge.
- Use only 3-wire extension cords with a 3-blade grounding plug.

Manual page author
Michael Turner
Technical manual editor
Reviews PDF manuals for structure, safety notes, and practical product details so readers can find the right information quickly.