Power / Wireless Chargers
User Manual for Hyundai HYC 14208LMS, HYC 18225LMS, and HYC 30350LMS Air Compressors
Quick guide for the Hyundai HYC 14208LMS, HYC 18225LMS, and HYC 30350LMS oil-free air compressors. Includes assembly instructions, operation procedures, maintenance schedules, and troubleshooting tips.
Table of contents
Manual images
Click an image to enlargeQuick Guide
This manual provides essential information for the operation and maintenance of Hyundai oil-free air compressors (models HYC 14208LMS, HYC 18225LMS, HYC 30350LMS). Always read the full manual before use. Key operational constraints include a maximum duty cycle of 15-20 minutes per hour and a requirement to drain condensate before every use.
Product Description
These are oil-free, electromechanical air compressors designed for pneumatic tools and equipment. They feature automatic pressure regulation, shutting off at 8 bar. They are not intended for professional, continuous use.
Assembly
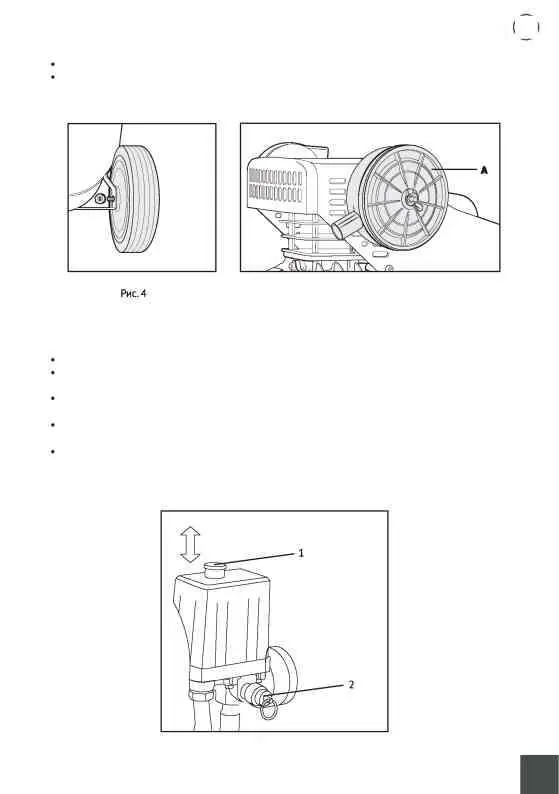
- Wheels: Attach the transport wheels to the compressor frame.
- Air Filter: Connect the air filter housing (A) to the cylinder head.
Operation
Before starting: Ensure the compressor is on a stable surface with at least 50 cm of clearance from walls for ventilation. Open the condensate drain valve to release any moisture, then close it.

Starting: Set the pressure switch to the 'ON' position. For the first use or after a long period of inactivity, let the compressor run for 10 minutes at idle to ensure proper lubrication.
Shutting down: Use the pressure switch to turn off the unit. Always release the air pressure from the receiver after finishing work.
Maintenance
- Before each use: Drain condensate from the receiver and check for air leaks.
- Weekly: Check and clean the air filter; replace if necessary. Check inlet and outlet pressure.
- Monthly: Check the safety valve; clean or replace if necessary.
- Every 3 months: Tighten cylinder head bolts and check the valve block.
Troubleshooting
If the compressor is not performing correctly, check the following:
- Reduced performance: Clean or replace the air filter; check for air leaks in connections.
- Pressure drop/hissing: The check valve may be worn or dirty. Clean the seat and gasket or replace the valve.
- Overheating/Shutdown: Reduce the load (pressure/consumption). Check the fan. Ensure the unit is not running continuously for more than 20 minutes.
Safety
Always wear safety glasses. Do not operate in explosive or flammable environments. Keep children and animals away. Do not touch hot surfaces (cylinder head, motor). Never leave the compressor unattended while connected to power.
Manufacturer information
Hyundai
Practical help
Common problems
Reduced performance
Clean or replace the air filter; check for air leaks in connections or hoses.
Constant hissing when stopped
The check valve may be worn or dirty. Clean the seat and gasket or replace the valve.
Overheating and shutdown
Reduce load; ensure the compressor is not running for more than 15-20 minutes at a time; check fan operation.
Compressor does not start
Check power supply and circuit; ensure the thermal protection has not tripped due to overheating.
Before use
- Check power connection and voltage.
- Ensure wheels and supports are securely fastened.
- Verify the safety valve and controls are intact.
- Ensure the power cord is not touching hot surfaces.
- Drain condensate from the receiver.
Specs in practice
- Max Pressure
- 8 bar (automatic shut-off).
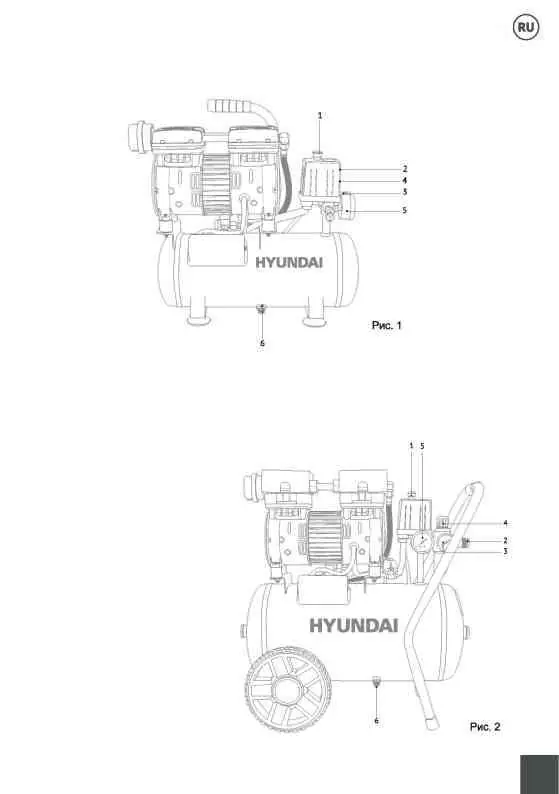
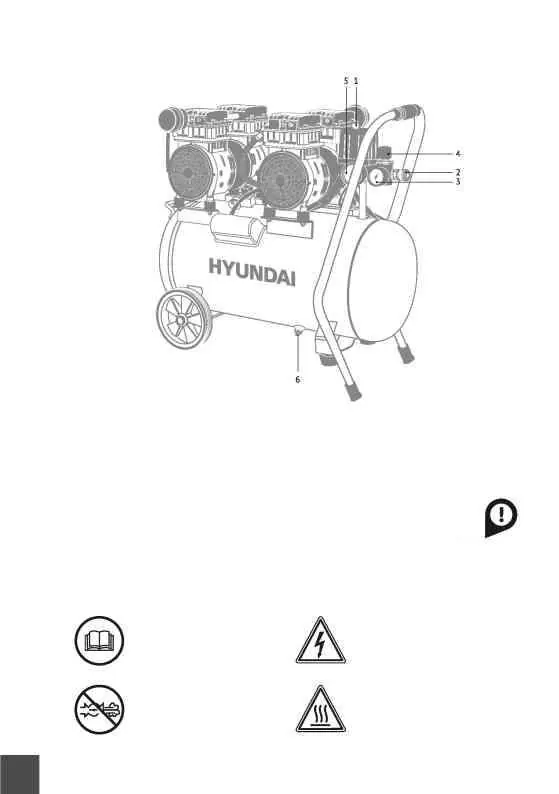
Images and diagrams
- 1: Power switch
- 2: Outlet connector with valve
- 3: Outlet pressure gauge
- 4: Pressure regulator
- 5: Receiver pressure gauge

Manual page author
David Miller
Documentation analyst
Organizes user manual content into clear summaries, with attention to model details, product context, and everyday usability.