Lighting / Ceiling Fans
Installation Guide for Visual Comfort Junio 2-Light Pendant
Complete installation and assembly guide for the Visual Comfort Junio 2-Light Pendant (TOB 5645-2). Includes step-by-step wiring instructions, alternative cord mounting options, and maintenance tips.
Quick answers from the manual
Quick answer
- The Visual Comfort Junio 2-Light Pendant (TOB 5645-2) is installed by mounting the plate to a junction box, connecting the ground, neutral, and hot wires, and securing the canopy. An alternative cord mount option is also available. p. 1, 2, 3
Key actions
- Mounting the fixture to the junction box p. 1
- Connecting electrical wires p. 2
Maintenance and reset
- Clean only with a soft dry cloth or feather duster. Do not use abrasive or chemical agents. p. 2, 3
Show 1 more answers Show less
Where to find it in the PDF
- Standard Assembly Instructions p. 1, 2
- Cord Mount Option p. 3
Table of contents
Manual images
Click an image to enlargeQuick Guide from the Manual
This document provides instructions for installing the Visual Comfort Junio 2-Light Pendant (TOB 5645-2). Before beginning, ensure the power is turned off at the main fuse box. The installation requires basic tools including a Phillips screwdriver, slotted screwdriver, wire cutters, wire strippers, hammer, pencil, and a drill.
Assembly Instructions
- Carefully remove all parts from the box and place them on a clean, soft surface.
- Remove the mounting plate (B) from the canopy (D) by removing the collar rings (E).
- Install the mounting plate (B) to the junction box and secure it using the mounting screws (C).
- Feed the fixture wires through the collar rings (E) and the canopy (D).
- Hold the fixture upright and slide the collar rings (E) and canopy (D) down to rest on the fixture body (F). Slide components down slowly to avoid damage.
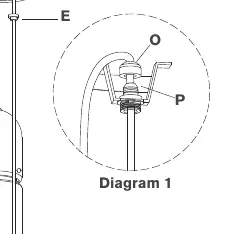
- Remove the threaded caps (O) from the mounting brackets (P), then insert the fixture wires through the center hole of the cord holders (P) and threaded caps (O).
- Adjust the fixture wire to the desired height, then secure it with the cap (O). Repeat for remaining wires. Ensure the canopy hole aligns with the collar loop to prevent wire twisting.
- Cut excess wires, leaving enough length to reach the junction box. Separate wires and strip 5/8" of insulation from each.
Wiring Connections
- Wrap the supply ground wire (bare copper) around the green grounding screw and tighten. Connect the fixture ground wire to the supply ground wire using a wire nut (A).
- Connect the fixture neutral wire (white) to the supply neutral wire (white) using a wire nut (A).
- Connect the fixture hot wire (black) to the supply hot wire (black) using a wire nut (A). Do not reverse hot and neutral connections.
Final Assembly
- Install the canopy (D) to the mounting plate (B) and secure with collar rings (E).
- Install light bulbs into the sockets.
- Install glass shades (H) to the fixture body (F) and secure with thumbscrews (G). Do not overtighten to avoid damaging the shade.
Cord Mount Option
If using the alternative cord mount option:
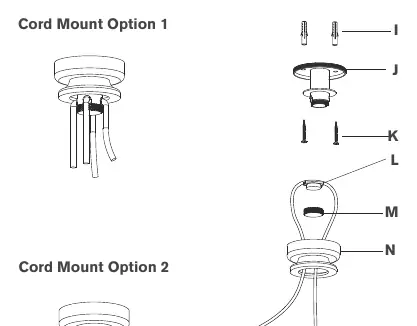
- Remove the canopy (N) from the mounting plate (J) by unscrewing, then remove the collar ring (M) and wire mount (L).
- Use the mounting plate (J) as a guide to mark anchor positions on the ceiling.
- Drill holes at marked positions and install anchors (I) using a hammer.
- Install the mounting plate (J) to the ceiling and secure with wood screws (K) into the anchors (I).
- Place the fixture wire on the slot of the wire mount (L), then pass it through the canopy (N).
- Adjust the fixture wire to the desired height, then install the wire mount (L) to the mounting plate (J) and secure with the collar ring (M).
- Thread the canopy (N) to the mounting plate (J).
Care and Maintenance
Clean the fixture only with a soft dry cloth or feather duster. Do not use abrasive or chemical agents.
Practical help
Common problems
Wires twisting inside canopy
Ensure the hole of the canopy aligns with the collar loop during installation.
Glass shade damaged
Do not overtighten the thumbscrews when securing the glass shades.
Fixture not grounded
Ensure the supply ground wire is wrapped around the green grounding screw and connected to the fixture ground wire.
Before use
- Turn off electrical power at the main fuse box
- Inspect all parts for damage before installation
- Gather required tools: Phillips/Slotted Screwdriver, Wire Cutters, Wire Strippers, Hammer, Pencil, Drill
- Ensure junction box is properly installed
Show more Show less
Images and diagrams
- Diagram 1 illustrates the wiring connection and collar assembly for the standard pendant installation.
- Cord Mount Option diagrams show the alternative ceiling mounting method using anchors and wire mounts.
Model compatibility
- Requires a standard electrical junction box for installation.

Manual page author
Michael Turner
Technical manual editor