Furniture / Chairs & Seating
Owner's Manual for Wade Logan Weisberg 20H Dining Chair
Quick guide for the Wade Logan Weisberg 20H Dining Chair. Includes assembly instructions, maintenance tips, weight limits, and warranty information.
Quick answers from the manual
Quick answer
- The Wade Logan Weisberg 20H is a residential dining chair with a 250 lbs weight limit. Assembly requires the included M6 and M8 Allen keys. p. 2, 3, 4
Key actions
- Assemble the chair using the provided bolts and Allen keys. p. 5, 6
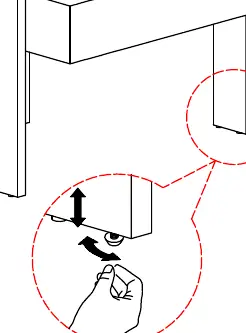
- Adjust the levelers on the legs to ensure the chair is balanced. p. 7
First start
- Check all packaging for small parts, assemble the frame, and adjust the levelers. p. 3, 4, 7
Problems and fixes
Chair wobbles
Adjust the levelers on the bottom of the legs.
p. 7Technical specifications
| Parameter | Value | Meaning | Pages |
|---|---|---|---|
| Weight Limit | 250 LBS | Maximum load capacity | p. 2 |
Where to find it in the PDF
- Parts List p. 3
- Assembly Instructions p. 5, 6
Table of contents
Manual images
Click an image to enlargeQuick Guide
The Wade Logan Weisberg 20H is a residential dining chair designed for indoor use. Before assembly, ensure you have all parts and hardware. The chair has a maximum weight capacity of 250 lbs. After assembly, use the adjustable levelers on the legs to ensure the chair is balanced.
Parts List
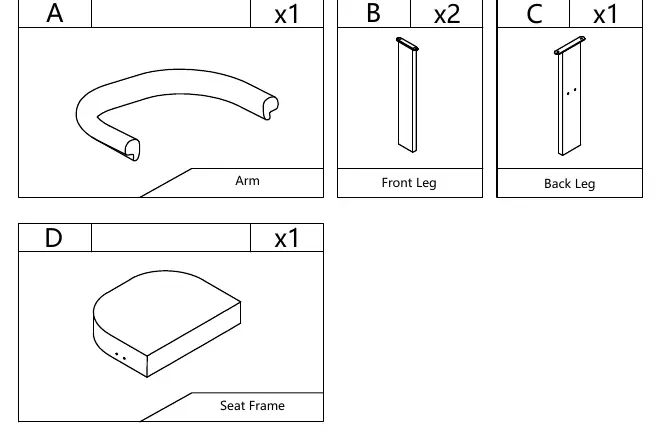
- A: Arm (x1)
- B: Front Leg (x2)
- C: Back Leg (x1)
- D: Seat Frame (x1)
Hardware and Tools
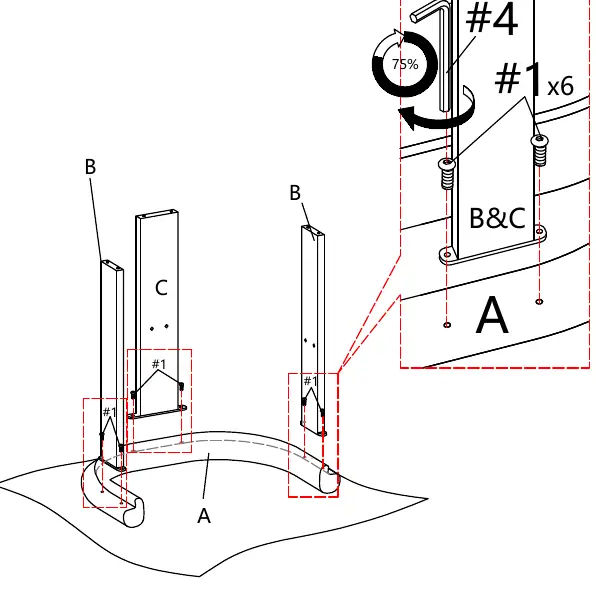
- #1: Bolts M6x25mm (x6)
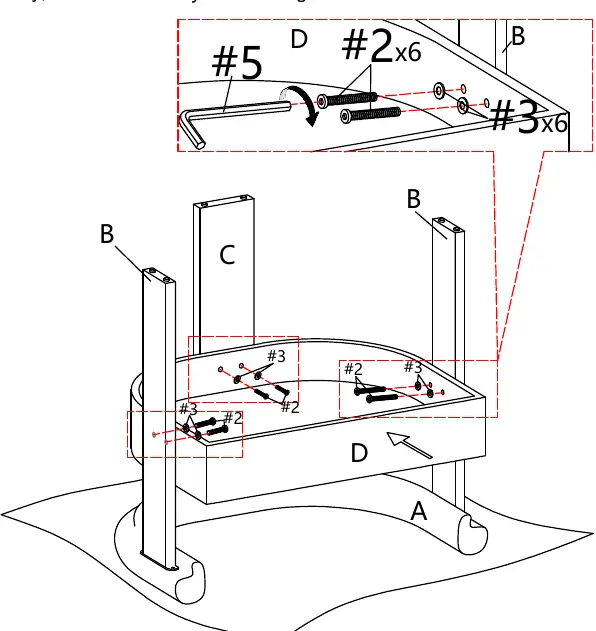
- #2: Bolts M8x40mm (x6)
- #3: Flat Washer (x6)
- #4: Allen Key M6
- #5: Allen Key M8
Assembly Instructions
Step 1
Attach the front legs (B) and back leg (C) to the arm (A) using the M6 bolts (#1) and the M6 Allen key (#4). Tighten to approximately 75% initially.
Step 2
Attach the seat frame (D) to the leg assembly using the M8 bolts (#2) and flat washers (#3). Use the M8 Allen key (#5) to tighten the screws. Ensure all connections are secure.
Step 3
After installation, check the chair for stability. Adjust the levelers located at the bottom of the legs to keep the chair balanced.
Maintenance and Care
- Keep furniture away from heat sources.
- Do not place furniture under direct sunlight to prevent material fading.
- Clean spills using a mixture of non-color mild soap and warm water (1:10 ratio).
- Do not use harsh cleaners, polishes, detergents, solvents, abrasives, or spray packs.
- Do not use on-site dry cleaning machines.
- Do not allow children to climb or jump on the furniture.
- Do not write on the furniture without a padded barrier.
- For residential use only; not for commercial use.
Warranty
The product includes a 30-day warranty starting from the date of receipt. Customers must provide a record of the order, such as an order number or receipt, for warranty claims. Replacement parts may be purchased from the company if available.
Practical help
Common problems
Chair is unstable or wobbling
Adjust the levelers on the bottom of the legs to balance the chair.
Missing small parts
Check all packing material carefully, as small parts may have come loose inside the carton during shipment.
Before use
- Verify all parts (Arm, Front Legs, Back Leg, Seat Frame) are present.
- Ensure you have the required Allen keys (M6 and M8).
- Check for loose hardware in the packaging.
- Ensure the assembly area is clear and protected.
Specs in practice
- Weight Limitation
- Maximum weight capacity is 250 lbs.
- Cleaning Solution
- Mix 1 part mild soap to 10 parts water.
Images and diagrams
- Step 1: Align legs with the arm and secure with M6 bolts.
- Step 2: Secure the seat frame to the leg assembly using M8 bolts and washers.
- Step 3: Adjust the levelers at the base of the legs for balance.
Model compatibility
- Residential use only.
- Not for commercial use.

Manual page author
Michael Turner
Technical manual editor
Reviews PDF manuals for structure, safety notes, and practical product details so readers can find the right information quickly.