Tools / Air Tools Painting
Operating Manual for Wagner W 600 Flexio 18V Paint Sprayer
A comprehensive user guide for the Wagner W 600 Flexio 18V paint sprayer. This manual covers safety instructions, setup, spray techniques, cleaning, maintenance, and troubleshooting to ensure optimal performance.
Quick answers from the manual
Quick answer
- The Wagner W 600 Flexio 18V is a cordless paint sprayer. To start, ensure the battery is charged, the suction tube is aligned for your spraying angle (forward for lying, backward for overhead), and the correct spray attachment is selected based on the coating material. p. 10
Key actions
- Adjusting spray jet p. 11
- Cleaning after use p. 13, 14, 15
First start
- Charge battery, mix paint, align suction tube, insert battery, and test on cardboard. p. 9, 10
Problems and fixes
No material output
Check battery, nozzle, and feed tube.
p. 18Technical specifications
| Parameter | Value | Meaning | Pages |
|---|---|---|---|
| Atomizing output | 200 W | Power of the spray mechanism | p. 19 |
Where to find it in the PDF
- Operation p. 10, 11, 12, 13
- Cleaning p. 14, 15
Table of contents
Manual images
Click an image to enlargeQuick Guide from the Manual
The Wagner W 600 Flexio 18V is a cordless paint sprayer designed for various coating applications. Before use, ensure the battery is fully charged and the correct spray attachment is selected based on your coating material. Always mask areas not to be sprayed and ensure the nozzle seal is present and undamaged.
Description of Device
The device consists of a spray gun, a container, and a battery-powered motor unit. Key components include the nozzle, air cap, material volume control, air volume control, and the battery indicator.
Field of Application
The W 600 is compatible with various coating substances:
- Standard spray attachment: For low-viscosity substances like water- and solvent-based paints, finishes, primers, and clear finishes.
- Wall Extra I-Spray attachment: For interior wall paints (dispersions and latex paint).
Note: Do not use materials with highly abrasive components, plaster, facade paint, caustic solutions, acidic substances, or flammable materials.
Preparation
Workplace Preparation
Mask all areas and objects not to be spray painted. Use high-quality adhesive tape and remove it carefully to avoid damaging surfaces. Silicate paint can corrode glass and ceramic surfaces; cover these completely.
Coating Material Preparation
Mix the material well. For smooth surfaces and thick paint, dilute by 10%. Material at room temperature provides better results.
Start-up
- Suction Tube Alignment: For lying objects, turn the suction tube forwards. For overhead objects, turn it rearwards.
- Filling: Pour prepared coating substance into the container using the feed hopper and screw it tightly onto the gun.
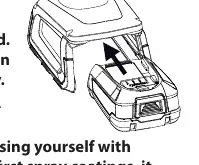
- Battery: Insert the battery securely.
- Operation: Switch the unit on using the ON/OFF switch.
Spray Settings
Selecting Spray Jet
Adjust the air cap to change the spray jet shape:
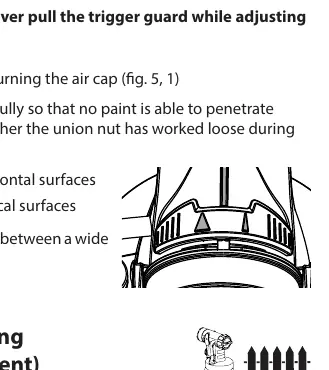
- Vertical flat jet: For horizontal surfaces.
- Horizontal flat jet: For vertical surfaces.
- Circular jet: For corners, edges, and hard-to-reach surfaces.
Adjusting Volume
- Material Volume: Adjust using the control on the spray gun (1 to 12).
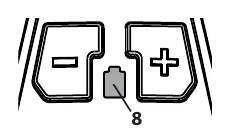
- Air Volume: Adjust using the + and - buttons. Use lower levels for thin paint and higher levels for thick paint.
Spray Technique
Start the spray movement before pressing the trigger. Maintain a uniform distance (5-15 cm for standard, 20-30 cm for wall paint) from the surface. Move the gun evenly cross-wise or up-and-down. Wipe the nozzle and air cap regularly to prevent blockages.
Cleaning and Maintenance
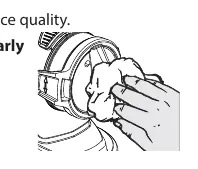
Proper cleaning is essential for device longevity. Never immerse the rear part of the spray gun in liquids; wipe only with a moistened cloth.
- Cleaning Attachments: Disassemble the spray attachment, clean the nozzle, air cap, and container with solvent or water.
- Air Filter: Check after each use. Replace if contaminated.
- Ventilating Hose/Valve: If paint enters the hose, clean the diaphragm or replace it if damaged.
Troubleshooting
If the device malfunctions, check the battery charge, nozzle cleanliness, and feed tube connection. Ensure the container is tightened properly to build pressure.
Manufacturer information
Wagner Group
Practical help
Common problems
No coating material emerges from the nozzle
Check if the device is switched on, the battery is charged, the nozzle is clogged, or the feed tube is loose.
Coating material drips from the nozzle
Tighten the nozzle, replace a worn nozzle or seal, or clean the assembly.
Atomisation is too coarse
Dilute the paint, reduce material volume, clean the nozzle, or increase air quantity.
Spray jet pulsates
Refill the container, change the air filter, or replace the nozzle seal.
Before use
- Check that the nozzle seal is present and undamaged.
- Ensure the battery is fully charged.
- Mask all areas not to be sprayed.
- Mix coating material well and dilute if necessary.
- Align the suction tube according to the spraying angle.
- Check the air filter for contaminants.
Specs in practice
- Max. viscosity
- 4000 mPas (for Interior wall paint/Wall Extra I-Spray).
- Atomizing output
- 200 W power for the spray mechanism.
- Max. flow rate
- 500 ml/min (for Interior wall paint/Wall Extra I-Spray).
- Total weight
- 1.7 kg including battery.
Images and diagrams
- Fig 1: Parts identification and scope of delivery.
- Fig 2: Suction tube alignment for different spraying angles.
- Fig 5/6: Spray jet adjustment using the air cap.
- Fig 11: Air volume control buttons.
- Fig 23/24: Spare parts diagrams for spray attachments.
Model compatibility
- Use only BOSCH POWER FOR ALL compatible PBA 18V batteries (min 2.5 Ah).
- Do not use flammable materials.
- Do not use materials with highly abrasive components, plaster, or caustic solutions.

Manual page author
Michael Turner
Technical manual editor
Reviews PDF manuals for structure, safety notes, and practical product details so readers can find the right information quickly.