Music / Instruments
User Guide for Wampler Metaverse DSP Multi-Delay Pedal
Comprehensive user guide for the Wampler Metaverse DSP Multi-Delay pedal. Learn about the 11 delay programs, MIDI control, preset management, expression pedal setup, and routing configurations.
Table of contents
Manual images
Jump to the sectionQuick Guide
The Wampler Metaverse is a programmable, true stereo delay pedal featuring 11 unique delay algorithms. It supports full MIDI control, presets, and expression pedal integration. Ensure you use a 9V DC center-negative power supply (approx. 130mA). Do not exceed 9V.
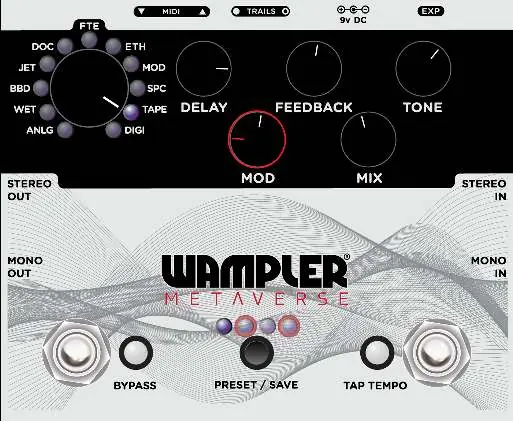
Delay Programs
The pedal features 11 hand-picked delay algorithms:
- ANLG: Analog style delay
- WET: Modulated analog delay
- BBD: Bucket Brigade delay
- JET: Analog flanger delay
- DOC: Wampler 'The Doctor'
- FTE: Wampler 'Faux Tape Echo'
- ETH: Wampler 'Ethereal' delay
- MOD: Digital flanger delay
- SPC: Echo-Space delay
- TAPE: Multi-head tape delay
- DIGI: Digital delay
Controls
The pedal features 6 main rotary controllers. Physical positions are overwritten by MIDI commands. Hold the Bypass switch to access ALT functions (indicated by the LED turning red).
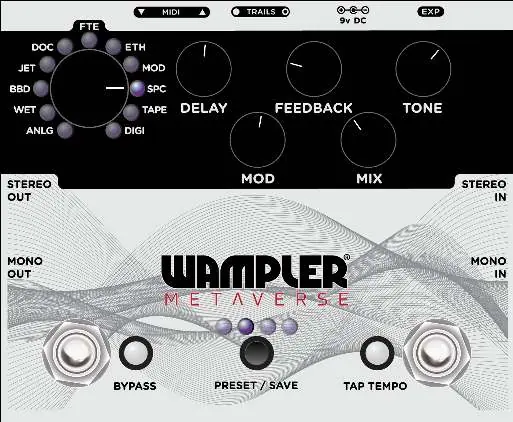
- Delay: Sets delay time (25ms to 2000ms).
- Feedback: Sets delay feedback.
- Tone: Sets delay tone.
- Mod: Sets modulation depth.
- Mix: Sets dry/wet mix.
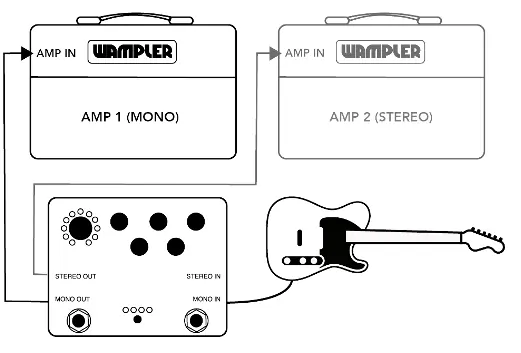
Routing and Connections
The Metaverse can be run in Mono or Stereo using 2-4 guitar cables. For optimal performance, use the effects loop of a guitar amplifier, though it works well through the front input.
Expression Pedal Setup
An external expression pedal can control any rotary control. To configure:

- Press and hold Bypass and Tap Tempo switches for one second; release when Tap Tempo LED lights red.
- Adjust controls for the 'minimum/heel' position.
- Press and hold Bypass and Tap Tempo switches for one second; release when Tap Tempo LED lights green.
- Adjust controls for the 'maximum/toe' position.
- Press and hold Bypass and Tap Tempo switches for one second; release when Tap Tempo LED blinks blue.
Presets
The pedal has 128 preset locations. The first 8 are accessible via the front panel.
- Saving (Front Panel): Configure knobs, hold Preset switch for 1 second, cycle to destination, hold Preset switch to save.
- Saving (MIDI): Configure knobs, hold Preset switch for 1 second, send PC message (0-127) via MIDI Input.
MIDI Configuration
The pedal accepts MIDI CC and PC messages. To set the MIDI channel:
- Power off the device.
- Press and hold the Preset Switch and power on.
- Release the Preset Switch.
- Press the Preset Switch to increment through channels (1-16 or Omni).
- Press and hold the Preset Switch for 1 second to save.
Maintenance and Troubleshooting
Factory Reset: Power off, press and hold Bypass, Tap Tempo, and Preset switches, then power on. Release switches after power up. This resets all presets, ALT controls, expression pedal configuration, and MIDI channel.
MIDI Self-Test: Power off, connect a 3.5mm TRS cable between MIDI In and Out, hold Tap Tempo switch, and power on. If the LED blinks blue, the test passed.
Practical help
Common problems
Pedal not powering on
Ensure you are using a 9V DC center-negative power supply. Do not use 18V.
Expression pedal not controlling parameters
Ensure the expression pedal is calibrated using the setup procedure in the manual. By default, it controls the mix parameter.
MIDI commands not working
Check that the MIDI channel on the pedal matches your controller, or set the pedal to Omni mode. Ensure you are using a TRS type A cable.
MIDI clock noise
Be aware that sending a constant MIDI clock signal can create noise on gain-based pedals.
Before use
- 9V DC center-negative power supply (approx. 130mA)
- 1/4 inch instrument cables for audio
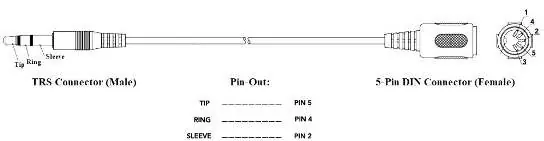
- 3.5mm TRS cable for MIDI connections
- Expression pedal (optional, for external control)
Images and diagrams
- Routing diagram shows how to connect the pedal in Mono or Stereo configurations.
- MIDI connector specification diagram details the TRS type A pinout (Tip=5, Ring=4, Sleeve=2).
Model compatibility
- Compatible with MIDI CC and PC messages.
- Requires TRS type A cables for MIDI communication.
- Can sync with other Wampler pedals via MIDI Thru.

Manual page author
David Miller
Documentation analyst
Organizes user manual content into clear summaries, with attention to model details, product context, and everyday usability.