Home Appliances / Food Dehydrators
User Manual for Waring Commercial Induction Range WIH400 / WIH400B
Comprehensive user guide for the Waring Commercial Induction Range (models WIH400 and WIH400B). Includes safety precautions, installation and grounding instructions, operating procedures for HEAT and TEMP modes, timer settings, cleaning...
Table of contents
Manual images
Click an image to enlargeQuick Guide and Safety Information
The Waring Commercial Induction Range is designed for commercial use. For your safety, always read the instruction book before use. Ensure the unit is placed on a stable countertop or table. The unit requires induction-ready cookware with a flat bottom surface between 4.75 and 10 inches in diameter. If the cooktop is broken, do not use the appliance to avoid electrical shock. Always unplug the unit when not in use and before cleaning.

Parts and Controls
The unit features a stainless steel housing and a Schott ceramic glass cooking surface. The control panel includes:
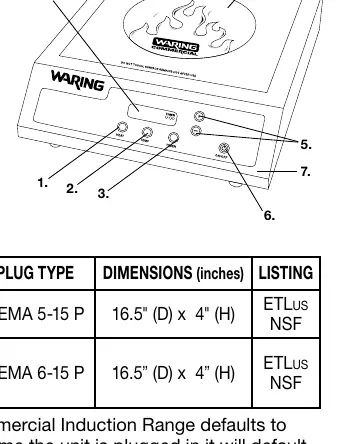
- Heat Mode Setting: Allows selection of power in watts.
- Temperature Mode Setting: Allows selection of cooking temperature.
- Timer Mode Setting: Adjustable from 1 minute to 10 hours.
- LCD Display: Shows settings and error codes.
- Adjustment Control: Plus (+) and minus (-) buttons for settings.
- On/Off Power Button.
Operation
Before turning on the power, ensure induction-ready cookware is on the ceramic surface. The unit features small-object detection and will not operate without an appropriate pan.
To operate:
- Press the ON/OFF button.
- Choose a cooking mode by pressing HEAT or TEMP. If no mode is selected within 30 seconds, the unit will shut off.
- Use the + and - buttons to set the desired wattage or temperature.
Timer: Press the TIMER button and use the + and - buttons to set the time. The timer counts down seconds when it reaches 59 seconds. The unit will beep 4 times when the time reaches 0, but it will not automatically shut off.
Temperature Units: To switch between Fahrenheit and Celsius, ensure the unit is plugged in but OFF. Press and hold the TEMP button for three seconds until the display shows °C and °F. Use the + and - buttons to select the desired unit, then press TEMP to confirm and ON/OFF to finish.
Cleaning and Maintenance
Always unplug the unit after each use and before cleaning. Clean the cooking surface while it is warm using warm soapy water. Do not use cold water on a warm surface. Do not immerse the unit in water or use a water jet. The exterior can be wiped with a damp cloth.
Troubleshooting
If the unit displays an error code or beeps, consult the following:
- "----" and beeps: No cookware, empty cookware, or non-induction cookware detected. Ensure the pan is induction-ready and the diameter is 4.75 to 10 inches.
- E1/E2: Voltage issues. Check electrical specifications of the power source.
- E3/E5: Heater damage. Contact an authorized service facility.
- E6: Thermal protection triggered (overheating in TEMP mode). Unplug and let cool for 20 minutes.
- E7: Internal overheating. Unplug, let cool for 20 minutes, and ensure proper airflow.
- E9: NTC sensor triggered. Unplug and let cool for 20 minutes.
Practical help
Common problems
Unit beeps and displays "----"
No suitable cookware detected. Ensure the pan is induction-ready and has a flat bottom between 4.75 and 10 inches in diameter.
E6 Error Code
Thermal protection triggered due to overheating. Unplug the unit, let it cool for 20 minutes, then resume use.
E7 Error Code
Internal overheating. Unplug, let cool for 20 minutes, and ensure the unit is positioned away from walls with no obstructions to airflow.
E1 / E2 Error Codes
Voltage is outside the operating range. Check the electrical specifications of your power source.
Before use
- Ensure the unit is on a stable, level surface.
- Verify the cookware is induction-ready and has a flat bottom.
- Check that the cookware diameter is between 4.75 and 10 inches.
- Ensure the electrical outlet is properly grounded.
- If using an adapter (not permitted in Canada), ensure it is grounded via the outlet cover plate screw.
Images and diagrams
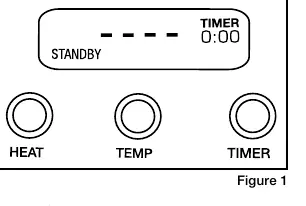
- Figure 1 shows the control panel layout including HEAT, TEMP, and TIMER buttons.
- Figure 2 illustrates the temperature unit selection display (C/F).
- Grounding diagrams (Figures 1-3) show proper connection for 3-prong plugs and adapters.
Model compatibility
- Requires induction-ready cookware only.
- Cookware must have a flat bottom surface.
- Cookware diameter must be between 4.75 and 10 inches.
- Adapter use is not permitted in Canada.

Manual page author
Emily Carter
User documentation editor
Prepares concise manual descriptions and highlights the most useful setup, operation, and maintenance information for readers.