Furniture / Storage Cabinets
Assembly Instructions for Wayfair Accent Cabinet
Step-by-step assembly guide for the Wayfair Accent Cabinet. Includes a complete parts list, hardware identification, and detailed installation instructions for a secure setup.
Quick answers from the manual
Quick answer
- This manual provides assembly instructions for the Accent Cabinet, including a parts list, step-by-step installation, and safety warnings regarding weight limits and hardware maintenance. p. 1, 2, 6
Key actions
- Assemble the frame by attaching the back, side, bottom, and front panels, leaving bolts loose until the final panel is attached. p. 3, 4
- Attach legs and foot pads to the base of the cabinet. p. 5
Problems and fixes
Installation or usage issues
Email [email protected] with your order ID and a description of the problem.
p. 6Maintenance and reset
- Periodically check all hardware and re-tighten as necessary. p. 2
Technical specifications
| Parameter | Value | Meaning | Pages |
|---|---|---|---|
| Tabletop Weight Limit | 80 lbs | Maximum weight capacity, evenly distributed | p. 2 |
| Shelf Weight Limit | 30 lbs | Maximum weight capacity, evenly distributed | p. 2 |
Where to find it in the PDF
- Parts List p. 2
- Assembly Steps p. 3, 4, 5, 6
Table of contents
Manual images
Click an image to enlargeQuick guide from the manual
This document provides the necessary steps to assemble your Accent Cabinet. Before beginning, ensure you have a soft surface to protect the finish of the furniture. Do not use power tools during assembly, as this may damage the components. Ensure all hardware is tightened properly, but do not over-tighten. The cabinet is intended for residential use only.
Parts list
Before starting assembly, verify that you have all the following components:
- A: Tabletop
- B: Front panel
- C: Back panel
- D: Side panels (x2)
- E: Bottom panel
- F: Shelf
- G: Leg
- H: Leg
- Hardware: H1 (Hex bolt short), H2 (Hex bolt long), H3 (Washer), H4 (Foot pad), H5 (Allen key), H6 (Shelf pin)
Assembly instructions
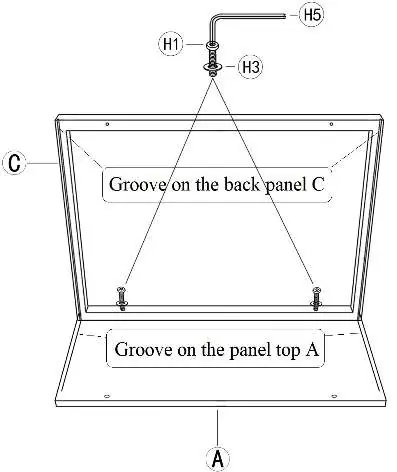
- Step 1: Place the Tabletop (A) on a soft surface. Attach the Back panel (C) to the Top (A) using Hex bolts (H1) and Washers (H3) with the Allen key (H5). Ensure the Back panel aligns with the groove on the Top. Leave hardware loose in this step.
- Step 2: Insert the Side panels (D) and ensure they align with the groove on the Back panel (C).
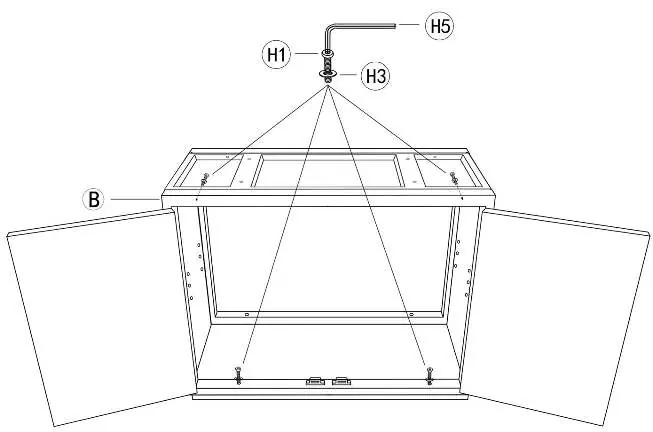
- Step 3: Attach the Bottom panel (E) using Hex bolts (H1) and Washers (H3). Note that the doorstop on E must face toward the open front. Leave hardware loose in this step.
- Step 4: Attach the Front panel (B) using Hex bolts (H1) and Washers (H3). Fully tighten all bolts from Step 1 to 4.
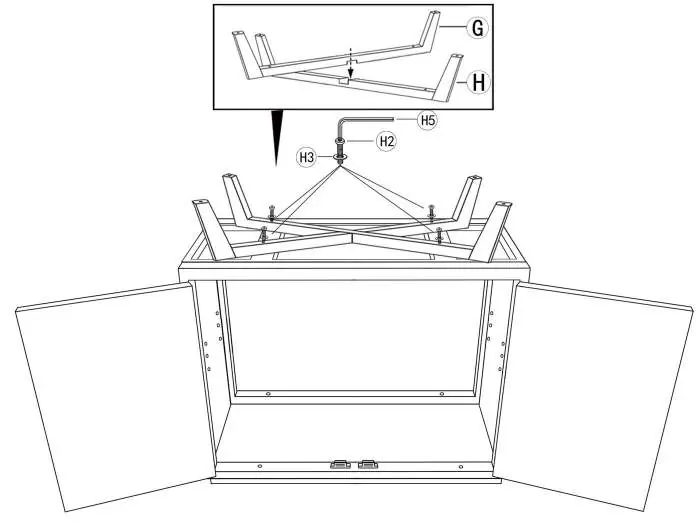
- Step 5: Attach the Legs (G & H) to the bottom of the cabinet using Hex bolts (H2) and Washers (H3).
- Step 6: Attach the Foot pads (H4) to the bottom of all legs.
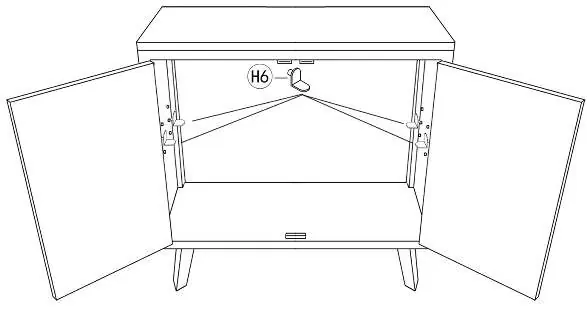
- Step 7: Open the doors, insert the Shelf pins (H6) into the desired holes, and place the Shelf (F) inside.
Safety and maintenance
To ensure the longevity and safety of your cabinet, please observe the following:
- Periodically check all hardware and re-tighten as necessary.
- Do not use the product if any component becomes damaged.
- Do not sit or stand on the product.
- Weight limits: Do not exceed 80 lbs for the tabletop and 30 lbs for the shelf, evenly distributed.
If you encounter any issues during installation or use, please email [email protected] with your order ID and a detailed description of the problem.
Manufacturer information
Wayfair LLC
Practical help
Common problems
Hardware feels loose
Ensure you have fully tightened all bolts from steps 1 through 4 after the front panel is attached.
Shelf is uneven
Ensure all four shelf pins (H6) are inserted into the same level of adjustable holes on the side panels.
Before use
- Verify all parts are present according to the parts list
- Prepare a soft surface to protect the cabinet finish
- Ensure you have the included Allen key (H5)
- Check that the doorstop on the bottom panel faces the front
Specs in practice
- Tabletop weight limit
- Maximum 80 lbs, evenly distributed
- Shelf weight limit
- Maximum 30 lbs, evenly distributed
Images and diagrams
- Steps 1-4 require leaving hardware loose to allow for alignment of panels.
- Legs G and H are designed to be attached to the bottom of the cabinet frame.
Model compatibility
- Residential use only; not intended for commercial applications.

Manual page author
David Miller
Documentation analyst
Organizes user manual content into clear summaries, with attention to model details, product context, and everyday usability.