Tools / Saws
Owner's Manual for Bauer 5.5 Amp 15-Inch Corded String Trimmer 20115E-B
Quick guide for the Bauer 5.5 Amp 15-Inch Corded String Trimmer (Model 20115E-B). Includes assembly instructions, operation, line replacement, and safety guidelines.
Quick answers from the manual
Quick answer
- The Bauer 20115E-B is a 5.5 Amp corded string trimmer. It requires a 3-wire outdoor extension cord and uses .065" nylon line. p. 1, 6
Key actions
- Assemble Safety Guard p. 7
- Assemble Handle p. 7
- Replace Nylon Line p. 11
First start
- Secure the extension cord using the cord hook, wear safety gear, and press the trigger to start. p. 9, 10
Problems and fixes
Line not feeding
Stop the trimmer, allow it to stop fully, and restart. If it still fails, check for tangles in the spool.
p. 11Technical specifications
| Parameter | Value | Meaning | Pages |
|---|---|---|---|
| Electrical Rating | 120VAC / 60Hz / 5.5A | Power requirements | p. 6 |
| No Load Speed | 7500 RPM | Rotational speed | p. 6 |
Where to find it in the PDF
- Safety Instructions p. 2, 3, 4, 5
- Assembly p. 7
- Operation p. 9, 10
- Maintenance p. 11, 12
Table of contents
Manual images
Click an image to enlargeQuick Guide from the Manual
The Bauer 5.5 Amp 15-Inch Corded String Trimmer is designed for trimming grass and weeds. Before use, ensure you have an appropriate outdoor-rated 3-wire extension cord. Always wear ANSI-approved safety goggles and heavy-duty work gloves during operation. The trimmer features an adjustable handle and shaft height for ergonomic use.

Safety Instructions
- Electrical Safety: Use only three-wire outdoor extension cords with grounding plugs. Secure the cord using the built-in cord hook to prevent accidental disconnection.
- Personal Safety: Wear ANSI-approved safety goggles, heavy-duty work gloves, and substantial footwear. Keep children and visitors away from the work area.
- Vibration Hazard: Prolonged use can cause vibration-related injuries. Take breaks, wear suitable gloves, and grip the appliance lightly.
- General Safety: Do not use in rain, snow, or on wet grass. Do not rinse the trimmer.
Assembly
Installing the Safety Guard
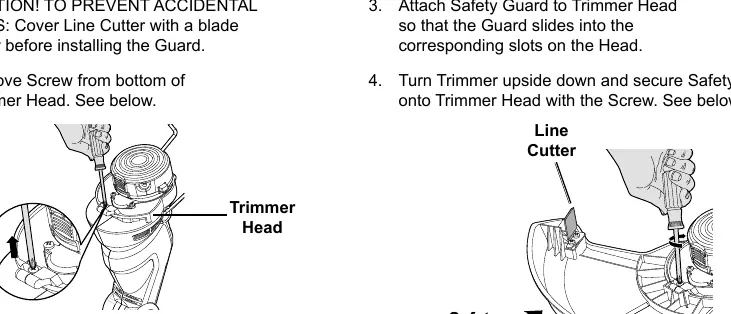
- Remove the screw from the bottom of the Trimmer Head.
- Attach the Safety Guard to the Trimmer Head, ensuring it slides into the corresponding slots.
- Turn the trimmer upside down and secure the guard with the screw.
Installing the Handle
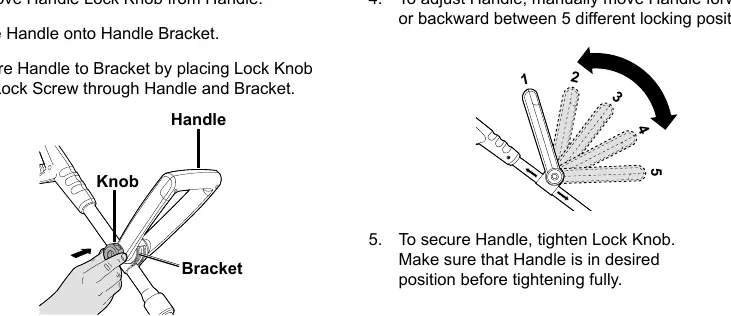
- Remove the Handle Lock Knob.
- Place the handle onto the Handle Bracket.
- Secure the handle by placing the Lock Knob and Lock Screw through the handle and bracket.
- Adjust the handle to one of the 5 locking positions and tighten the knob.
Operation
General Operation
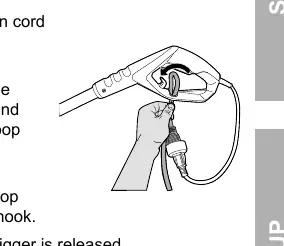
- Cord Hook: Make a loop in the extension cord, pass it through the hole in the handle, and hook it around the cord hook before plugging it in.
- Shaft Height: Press the Height Adjustment Lock, pull the lower shaft to the desired length, and release the lock.
- Head Angle: Press the Head Angle Button to adjust the trimmer head angle.
- Trimming: Hold with both hands, press the trigger, and use the tip of the line to cut. Do not rest the trimmer on the ground.
Maintenance
Feeding and Replacing Nylon Line
- Automatic Feed: The trimmer feeds line automatically when stopping and restarting.
- Manual Feed: Unplug the power cord, press the Line Outlet Button on the spool housing, and pull the line out.
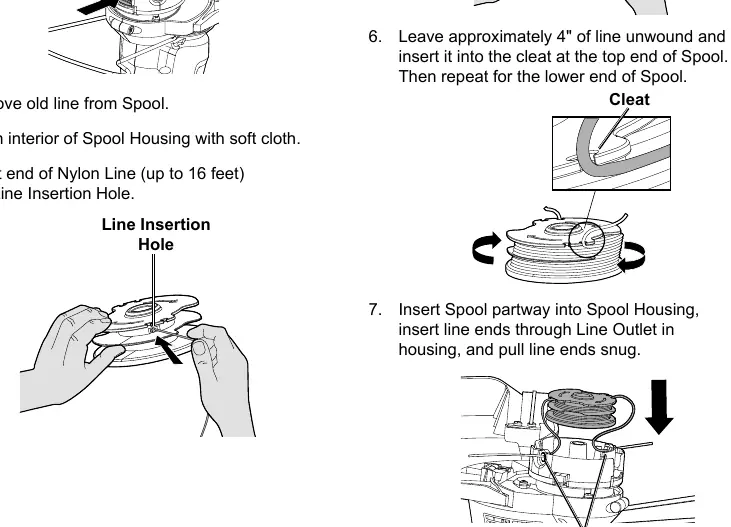
- Replacing Line: Remove the spool cover, remove the old line, clean the housing, and wrap new .065" nylon line onto the spool in neat, straight rows. Leave approximately 4 inches of line unwound and secure it in the cleat before reassembling.
Specifications
- Electrical Rating: 120VAC / 60Hz / 5.5A
- No Load Speed: 7500 RPM
- Replacement Line: .065" Nylon
Manufacturer information
Harbor Freight Tools
Practical help
Common problems
Trimmer not cutting correctly
The spool may be tangled. Remove the spool and rewind the line.
Line not feeding automatically
Release the trigger and allow the trimmer to stop fully, then press the trigger to restart. If it fails, manually feed the line by pressing the Line Outlet Button.
Excessive vibration
Stop use immediately. Inspect the tool for damage, loose hardware, or debris. Have the problem corrected before further use.
Before use
- Inspect the general condition of the tool for loose hardware.
- Check for damaged cords or electrical wiring.
- Ensure the guard is properly installed and undamaged.
- Wear ANSI-approved safety goggles and heavy-duty work gloves.
- Ensure the extension cord is an outdoor-rated 3-wire type.
Specs in practice
- Electrical Rating
- 120VAC / 60Hz / 5.5A - Ensure your power source matches these requirements.
- No Load Speed
- 7500 RPM - The rotational speed of the trimmer head without resistance.
- Replacement Line
- .065 inch Nylon - Use only this diameter to prevent damage to the trimmer.
Images and diagrams
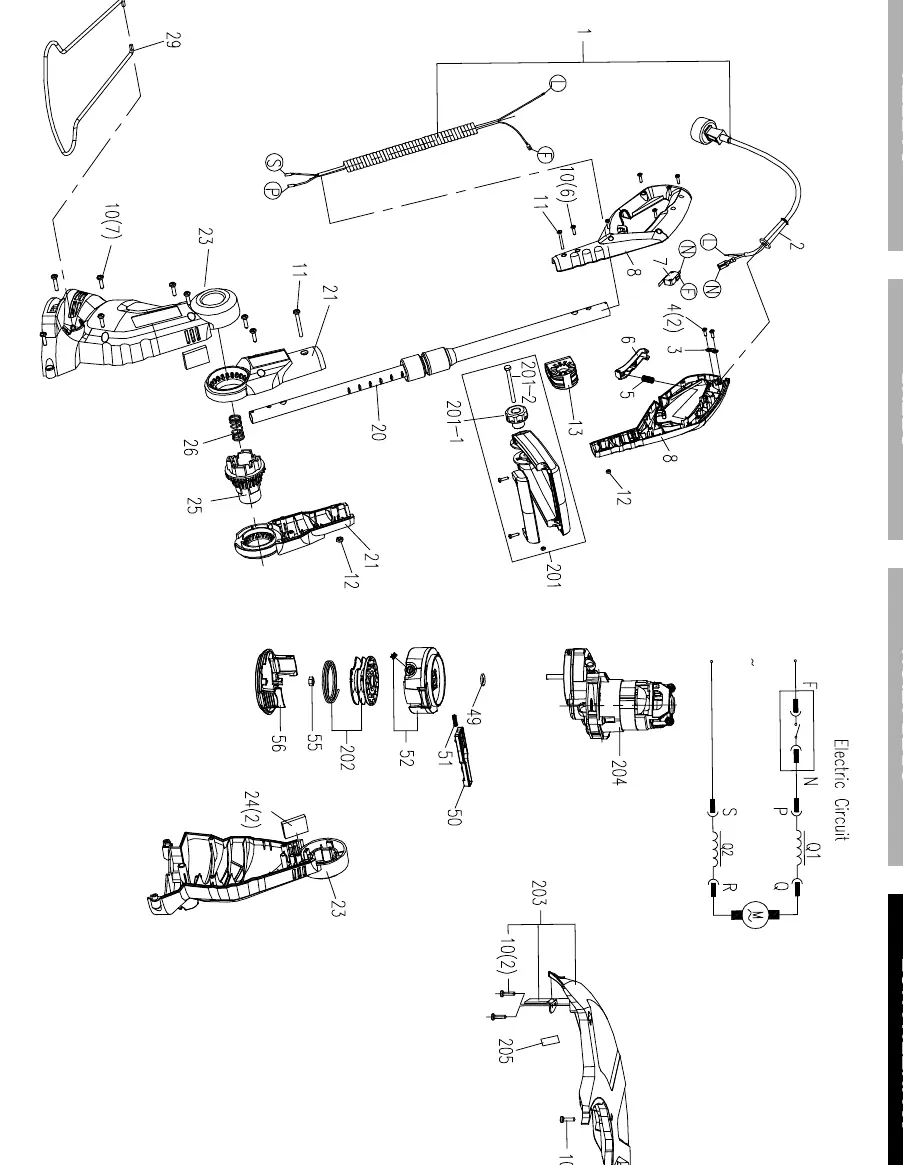
- The Assembly Diagram (Page 15) illustrates the breakdown of the motor, shaft, and handle components for maintenance reference.
- The Cord Hook diagram (Page 9) shows how to loop the extension cord to prevent accidental unplugging.
Model compatibility
- Use only three-wire outdoor extension cords with grounding plugs.
- Do not use accessories or attachments other than those specified in the manual.

Manual page author
Michael Turner
Technical manual editor
Reviews PDF manuals for structure, safety notes, and practical product details so readers can find the right information quickly.